Salesforce WP Portal- WPML Addon
Salesforce WordPress Customer Portal-
WordPress Multilingual Addon
Version: 1.0.0
Compatibility:
WordPress Compatibility:
WordPress: 4.0 to 6.8.2
Salesforce Compatibility:
Professional (API Should be enabled), Enterprise, Unlimited, Developer, Performance
About WPML Addon
Introduction
Salesforce Customer Portal for WordPress enables you to integrate a customer portal in your website with Salesforce as the backend framework and WordPress as the front-end interface. You can configure the WPML into WordPress to provide the Portal language-specific to the portal users.
WPML plugin is a great way to translate your WordPress website or portals into other languages. Add the translated content to pages, menu options, widgets, taxonomies, etc. Overall, portal users can switch languages and browse content in their preferred language.
Benefits of WPML Addon
> Customer Experience
With a WPML plugin installation & configuration, you can provide a better customer experience in the regional language of the portal users.
> Get and Sync the Salesforce Customer Portal content
Scan Salesforce Customer portal strings and Sync the navigation Menus.
> Customer Experience
Translate the pages into other languages by duplicating the original pages for the portal users.
> Language Switcher
Enable and customize the language switcher for the Login, Forgot Password, Register, and Dashboard pages.
Prerequisites
Follow these points before you start the installation:
– You should login as an Administrator in Salesforce and have a valid License Key Provided by CRMJetty.
– Check if your WordPress site is compatible with Customer Portal and have an SSL certificate.
– With these details, you should be able to login as an admin on your WordPress site.
– Create a connected app on the Salesforce.
– You should also authenticate the connected app on the WordPress end.
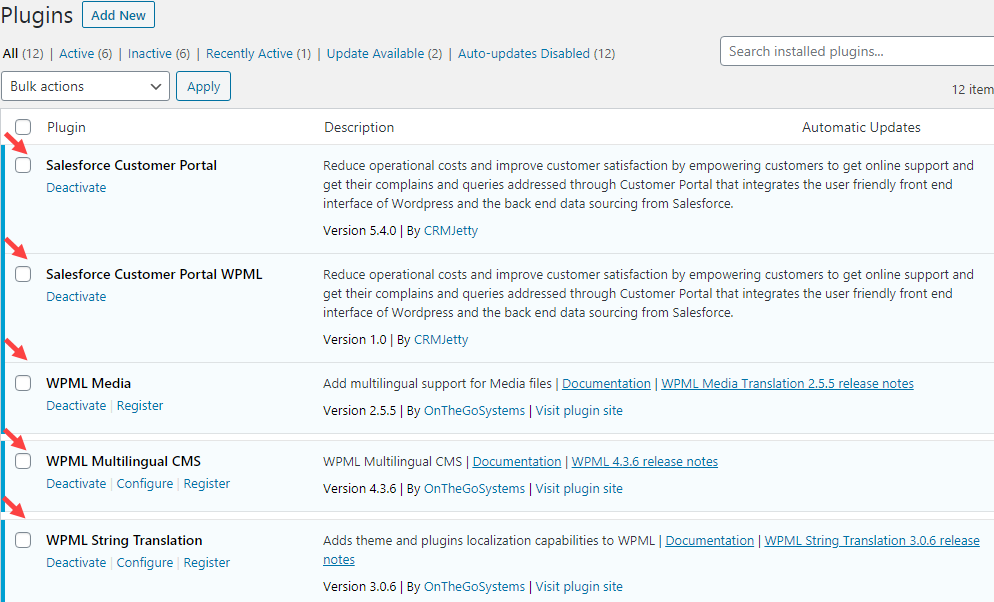
– Install and activate the “Salesforce Customer Portal WPML” and WPML Plugins into WordPress.
– Supported Salesforce Editions:
Enterprise,Unlimited, Developer, Performance, Professional (API should be enabled).
Installation
You need to install the plugins for “Salesforce Customer Portal WPML” and WPML plugins.
WordPress Plugin installation
Login to your WordPress site from wp-admin and navigate to the “Plugins” module.
Click on the ‘Add New’ button which will redirect you to the ‘Add Plugins’ Page. Click on the ‘Upload Plugin’ button. Browse the ‘sf-customer-portal’ zip and Install the Plugin.
Click on the ‘Install Now’ button to install the plug-in. After installation, you can see the “Salesforce Customer Portal” plugin was successfully installed. But still, it’s Inactive.
Click on ‘Activate’ to activate this newly installed plugin.
WPML Plugins installation & activation
Similarly, you need to add the following plugins and activate them once they installed:
Salesforce Customer Portal WPML
WPML Media
WPML Multilingual CMS
WPML String Translation
“Salesforce Customer Portal WPML” is primary a plugin for the SF Customer portal to configure and manage the translation of the customer portal content: Menu, Pages, Theme & Strings.
You also need to add the plugins of WPML: “WPML Media”, “WPML Multilingual CMS” & “WPML String Translation”.
You must keep activating all the plugins.
WPML Setup
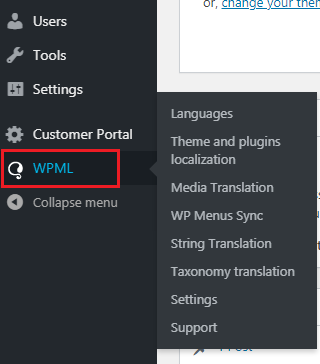
Once you installed & activated the required plugins for WPML, you will get the WPML option in the WordPress navigation pane.
Languages Setup
Once you installed & activated the required plugins for WPML, you will get the WPML option in the WordPress navigation pane.
From here, you can manage the translation of the Salesforce content and sync the menu of the Salesforce Customer Portal.
By clicking on the Languages, you can enable the required languages to translate the SF customer portal.
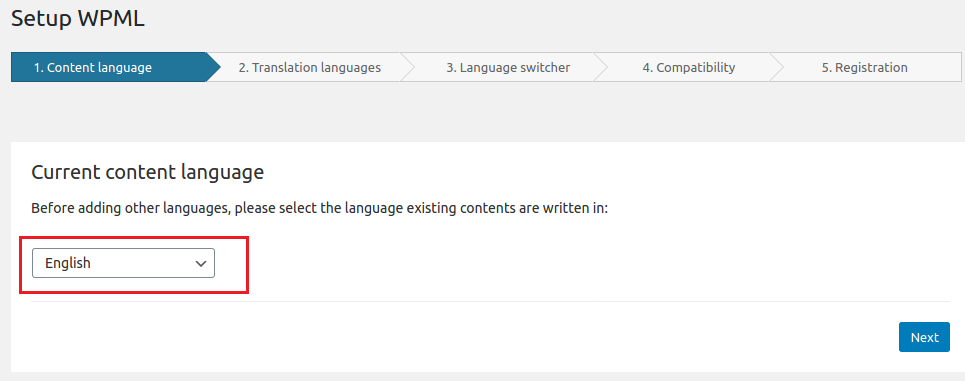
Content language: Select the existing language of the content and click on the “Next”.
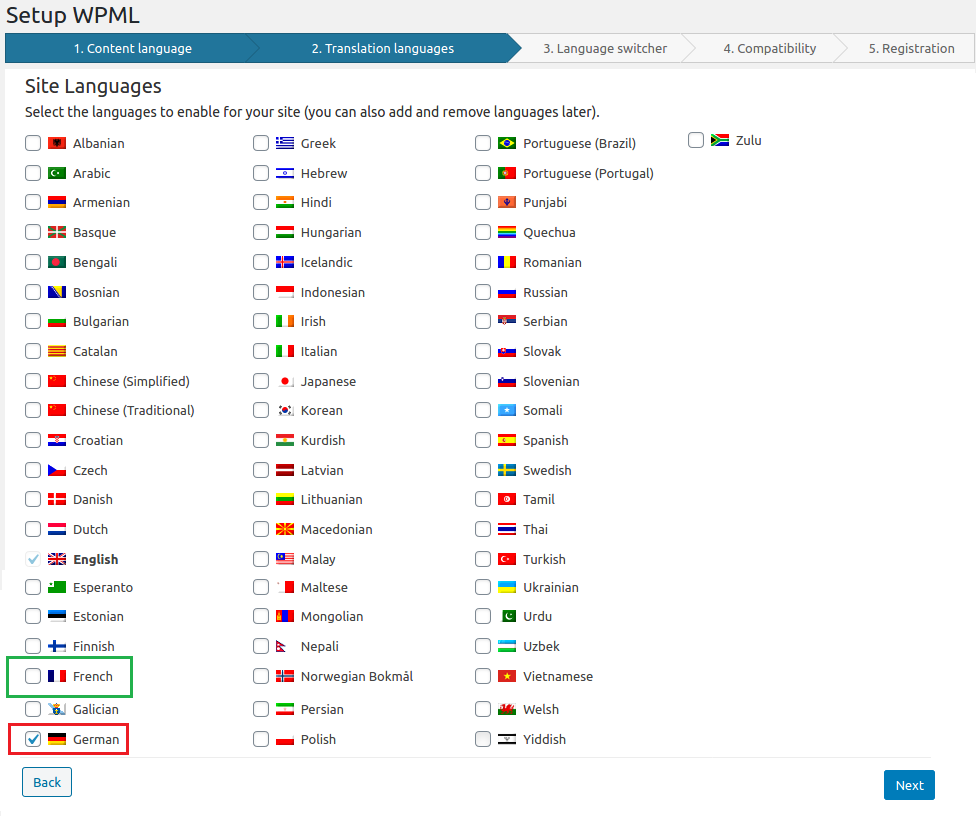
Translation Languages: On the next screen, select the languages that you want to enable for the customer portal. Select the languages from the list that you want to add to the customer portal and click on the “Next” button to set up WPML.
Note: Here’s the reference link to check how to set up the WPML.
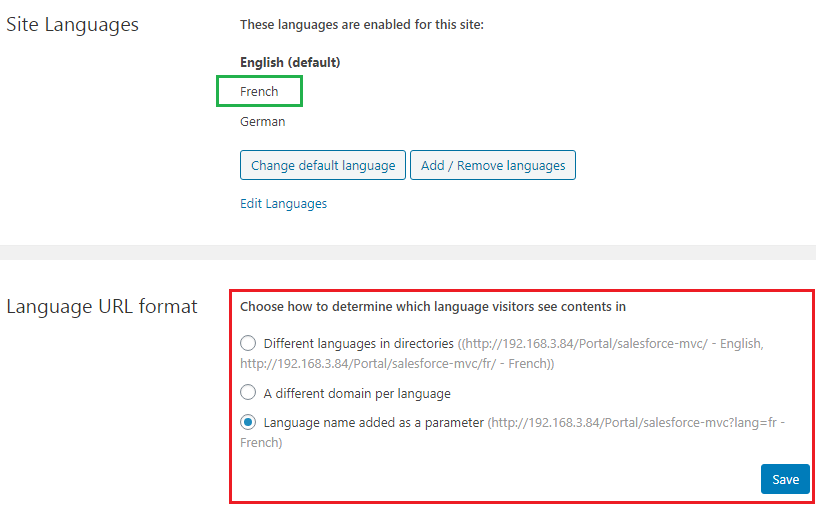
Site Languages
You can change the Default language and Add/Remove languages as per need.
Language URL format
Choose the URL format for the selected language as ‘directories’ or as a ‘parameter’. You can also add a different domain for the languages.
Note: If you have a different domain, for that, you must have a multi-domain website.
By clicking on the Save button the URL format will be saved. Once you save the format you must need to reset the permalinks in WordPress settings.
Pages
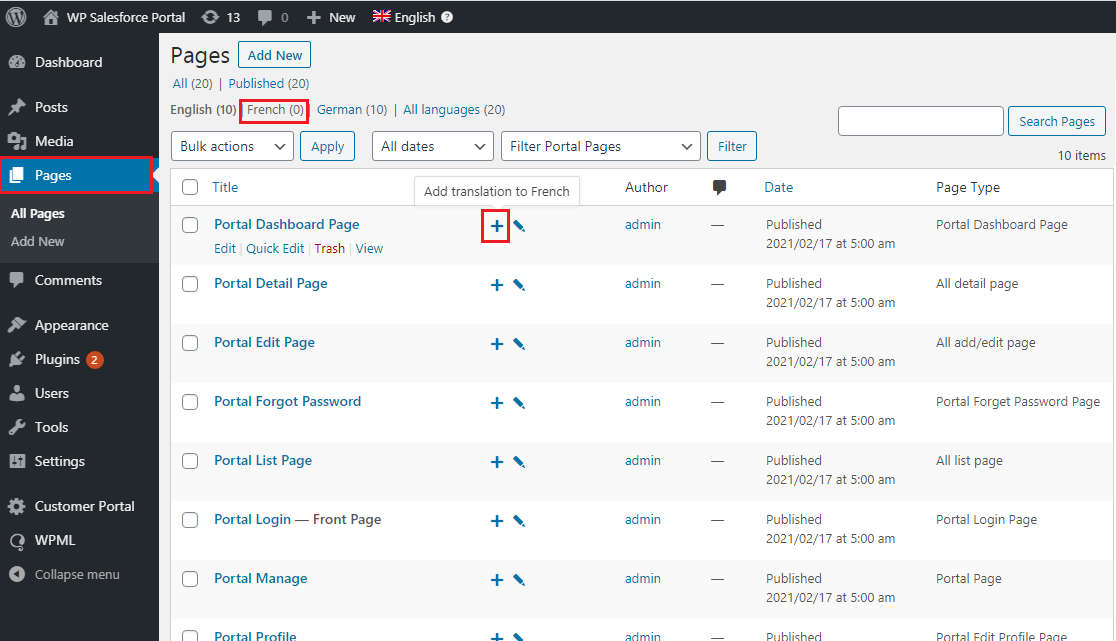
After setting up the WPML Languages setup, navigate to the Pages to translate the content of the portal page. You can see the list of portal pages. Translate all the language-specific pages by adding a new page or duplicating the page.
Here, by clicking on the + (add) icon of any page, you can add a new page of the specific language.
You can also edit the already translated pages of any language by clicking on the ‘editing’ option.
Add and Duplicate the Content
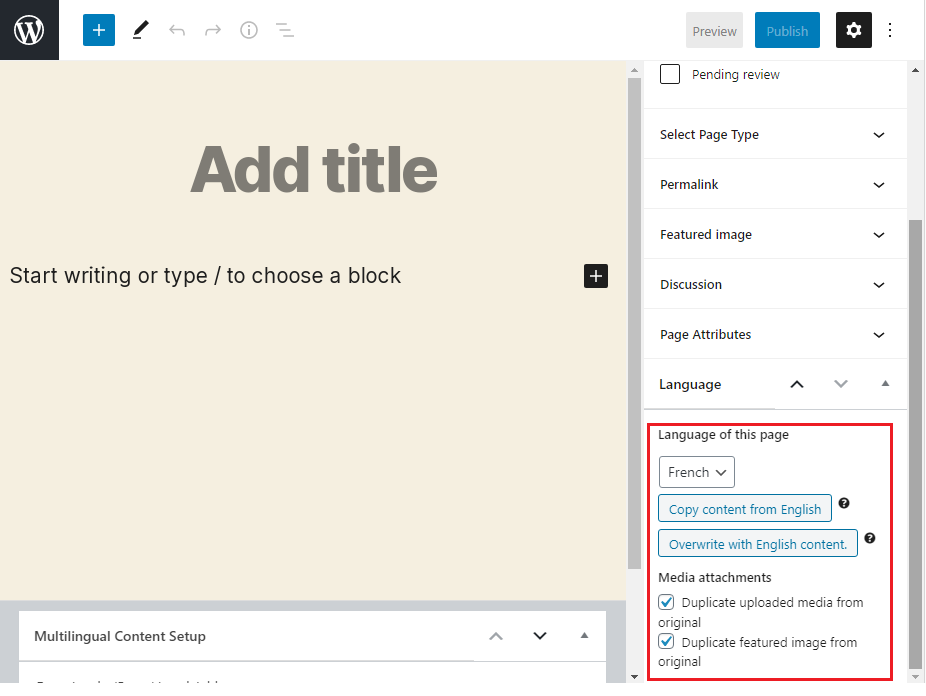
Now by clicking on the + add an icon, you will navigate to a new page from where you can add the new page of the Language and duplicate the content. You need to configure the below options under the “Language of this page”:
– Language of this page: Select the language of the page.
– Copy content from English (Source page content): Copy the content from the “Source Page”.
i.e., here the Source page is the English page.
– Overwrite with English Content (Source page content): Overwrite the content from the Source page content.
You can duplicate the uploaded media and featured image from the original page.
Duplicate the page from the original
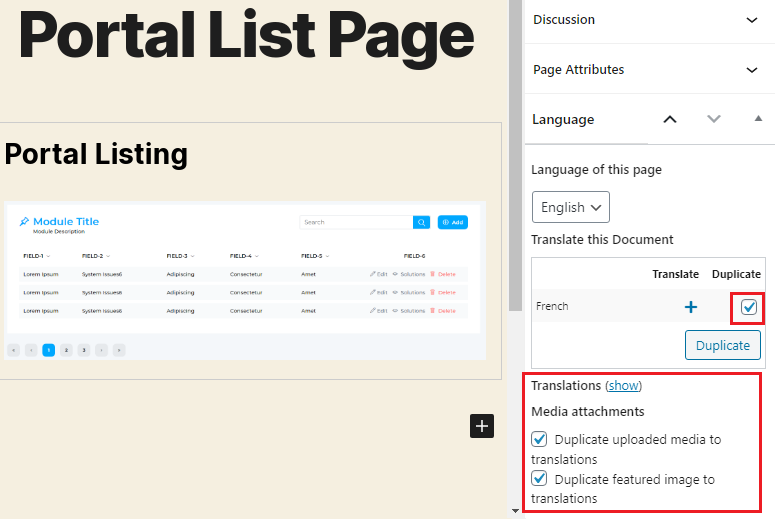
You can directly copy the page and translate the content by navigating the detail of any page.
‘Tick’ the check box of the Duplicate for the “French” Language and ‘tick’ the media options to translate.
From the Translation (show) option, you can check another language translation that is already translated into that language.
By clicking on the Duplicate button, the page will be duplicated with all the content for the specific language.
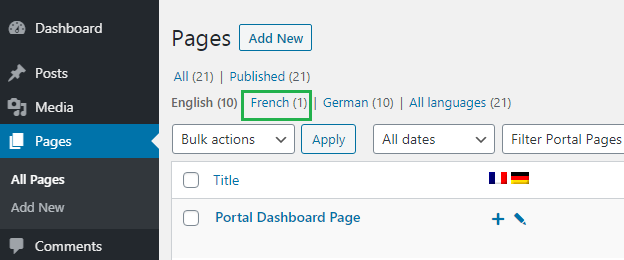
If you navigate to the list of the Pages, you will get the translated pages counter for the specific language.
i.e., French.
Similarly, you can duplicate all the pages into that language you want.
Themes & Plugins Localization
By default, WPML will not scan or load the translation files into the database. So, you will not be able to find these strings on the “String Translation page”.
Themes and plugins usually come with their own translations for the texts for the user interface as well as their front-end output. It will store the translations inside translation files.
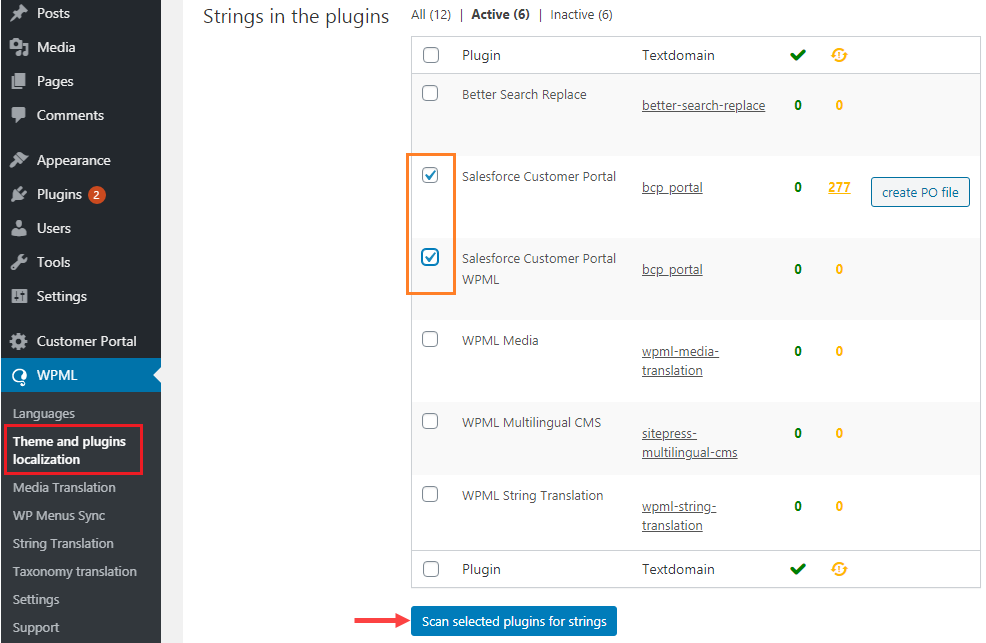
To translate or edit the strings, you first need to scan the translation files of the related theme or a plugin. For that, navigate to the WPML -> Theme and Plugin Localization.
Select the required plugins to get the strings under the “Strings in the plugins” section. You need to select the Salesforce Customer Portal plugins and click on the Scan selected plugins for string button.
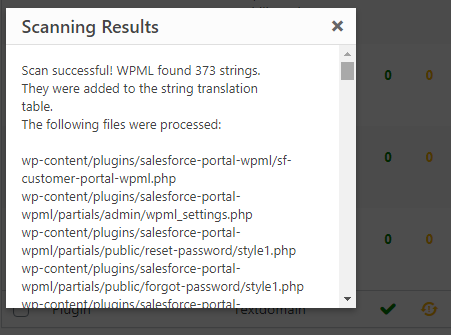
Once you get the Scanning Results, you can now translate the SF customer portal strings from the String Translation menu.
Salesforce field sync for WPML
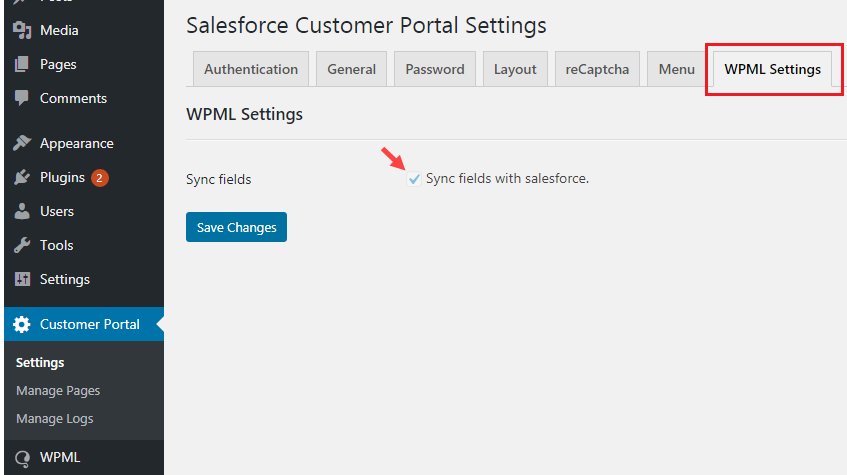
You will need to sync the field’s value to the String Translation from the Customer Portal setting page to sync the field values to String translation.
You will find a new tab named WPML Settings which contains a button named “Sync fields” and by clicking on that, it will fetch all strings and add the fields to the translation.
After successful syncing, you will get all module field names from the CRM and the fields will be added in the String Translation.
String Translation
Once you scan the plugins to get the strings, you need to sync and search the string to translate into the specific language. For that navigate to the WPML -> String Translation.
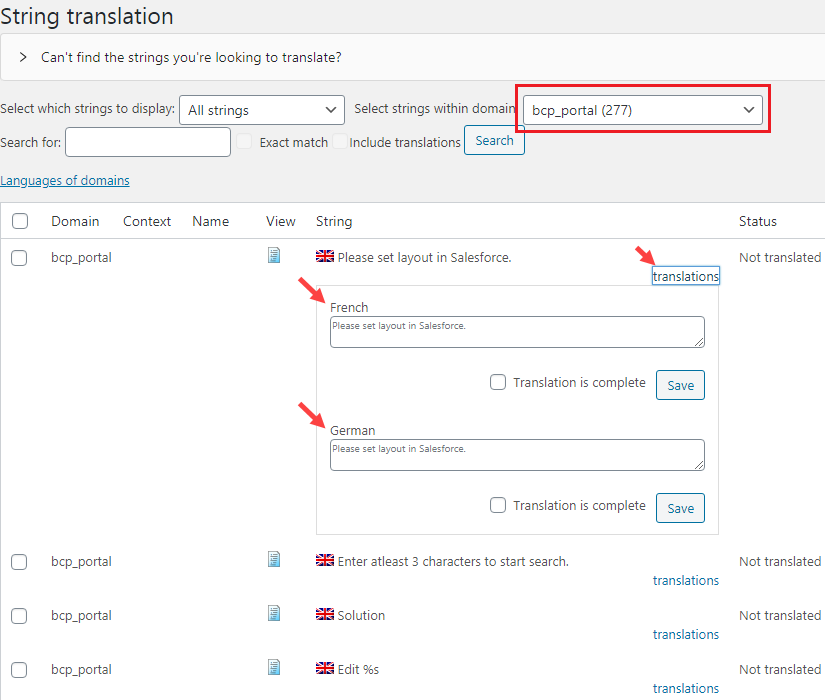
You need to select the domain for which you want to translate the strings. You can also search & filter the specific strings.
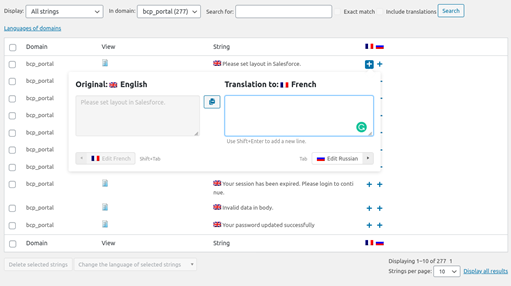
Once you have located all the static strings, you need to translate by clicking the + add icon under the flag of the language you would like to translate into.
You can save your translation by clicking the ‘Enter’ or ‘Tab’ keys on your keyboard or simply clicking out of the window. The Tab key allows you to switch between languages without having to click.
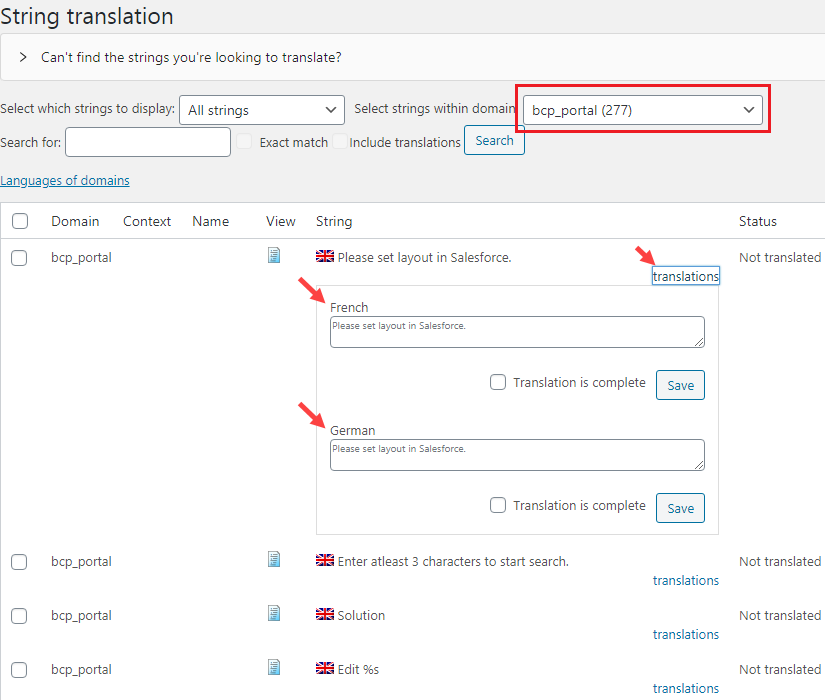
You can edit any string by clicking on the “Translations” option.
You can save your translation by clicking the ‘Enter’ or ‘Tab’ keys on your keyboard or simply clicking out of the window. The Tab key allows you to switch between languages without having to click.
You can edit any string by clicking on the “Translations” option.
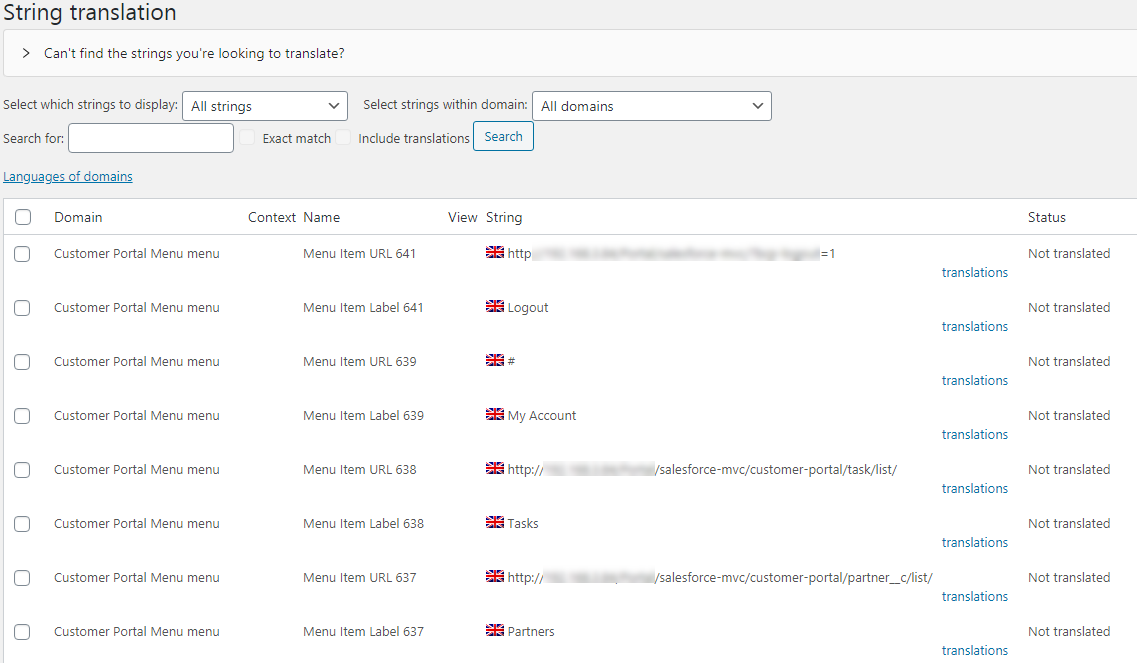
If you have already synced the field’s value from the “Customer Portal Settings” page, you will get the Salesforce field (strings) to translate.
In this way, you can translate all the strings to a different language.
Media Translation
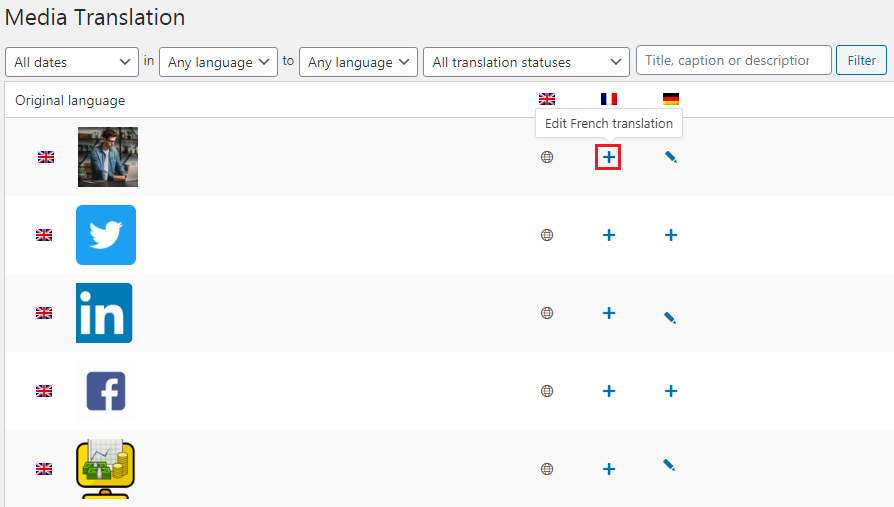
You can translate the media content from the WPML -> Media Translation. By navigating to it, you will find the list.
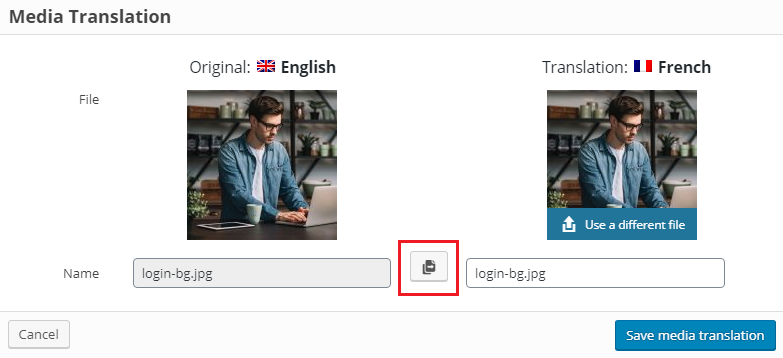
You can translate the language-wise media content. By clicking on the + icon, you can edit the translation of the content.
After editing the translation & image, click on the Save Media translation button.
WP Menu Translation
You can translate the WP Customer portal menu and customize the language-specific menu. You can translate the manus in two ways:
– Translating Menus manually
– Automatic Menu sync by WPML
Translating Menus manually
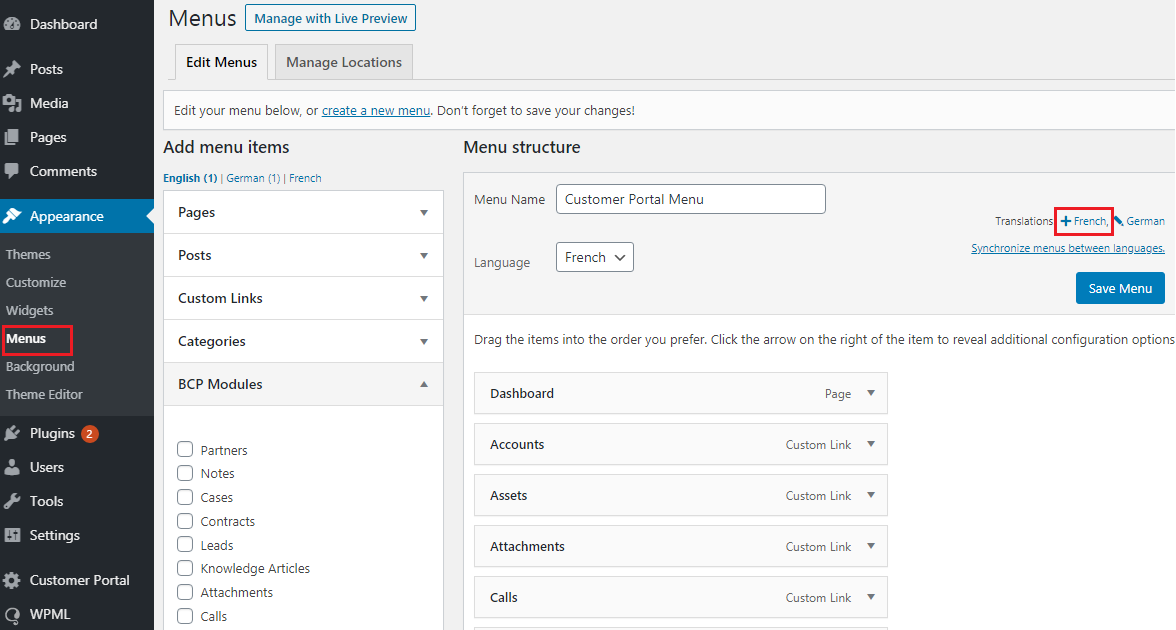
– To translate the menu for the specific language, navigate to the Appearance → Menu.
– You will see the menu with links to translate into other languages enabled on your site. Click on the + icon next to the new language.
By clicking on a language will create a new menu for that language. You can add the same menu items as in your primary language menu or customize the menu as per your need.
Note: If you have your posts and pages in the navigation menus, then you will first need to translate them. After that, you can add them from the tabs on the left in the edit menu screens.
Automatic Menu sync by WPML
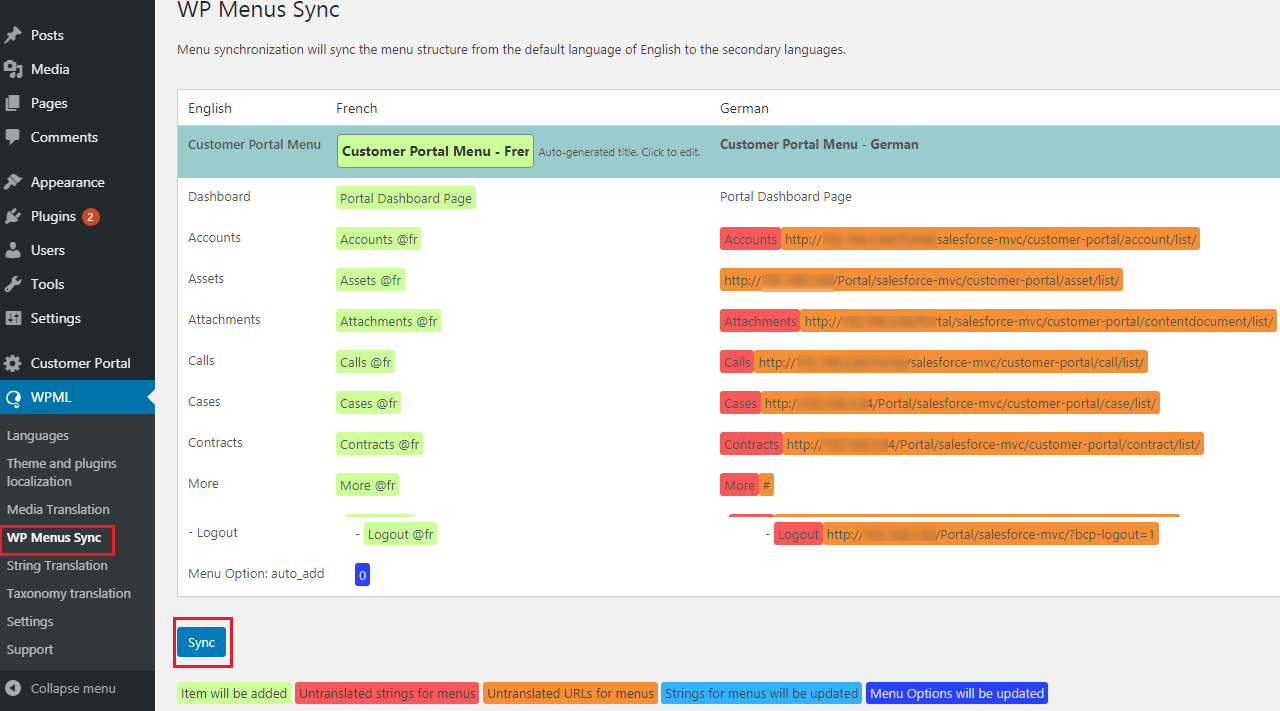
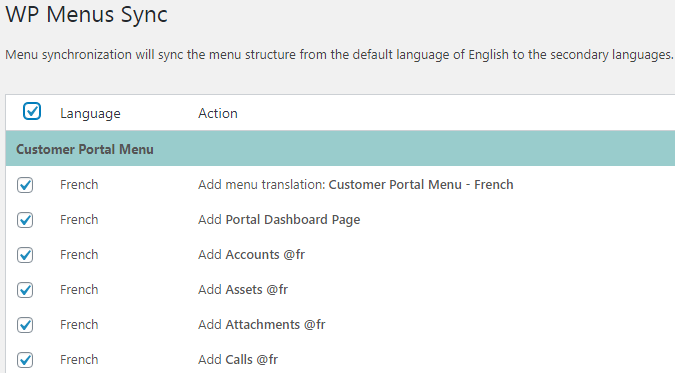
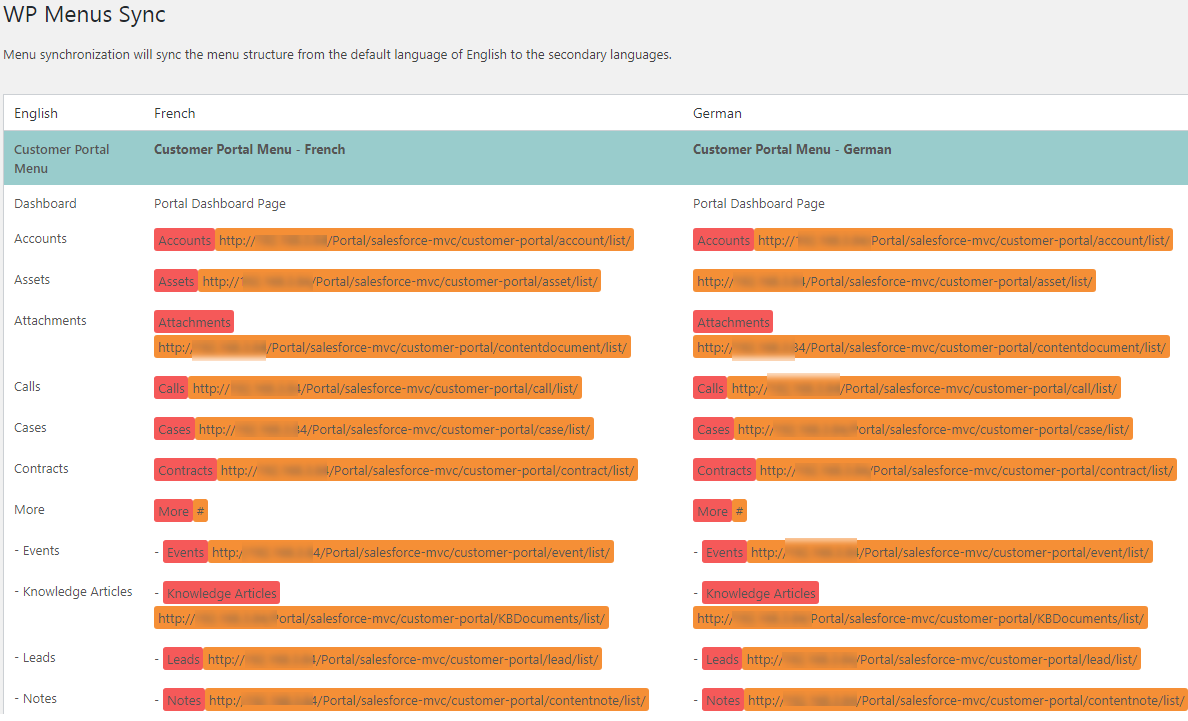
You can sync the menu to keep it in different languages. You can add, remove, and update items from the translated menus to match the default language menu. Navigate to the WPML -> WP Menus Sync.
You will get all the menus that are added or removed from the translated menus. By clicking on the Sync button to perform the selected operations.
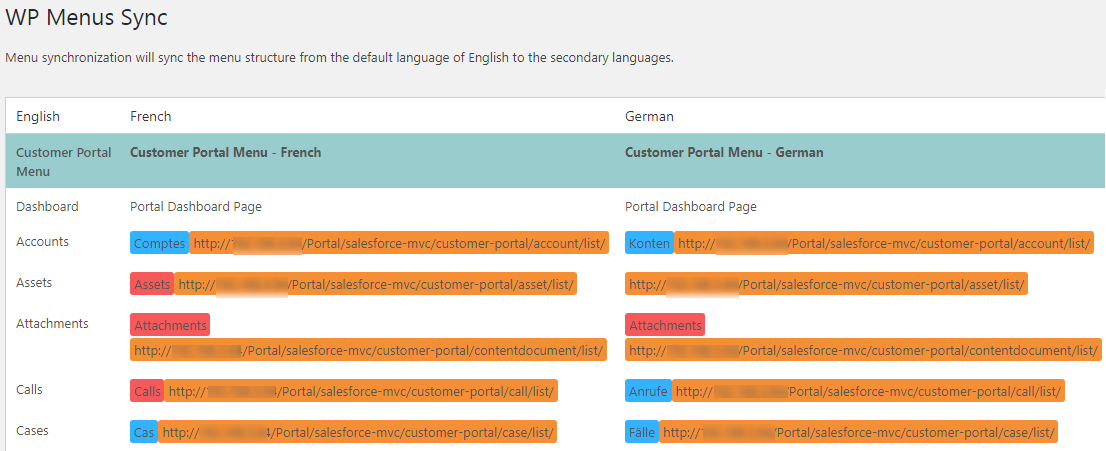
Once the menus are synced, you need to translate under the String Translation.
You need to select the Customer Portal Menu and Add manually to the translations for the language that will be preserved throughout the WPML sync operation.
Menu Language Switcher Configuration
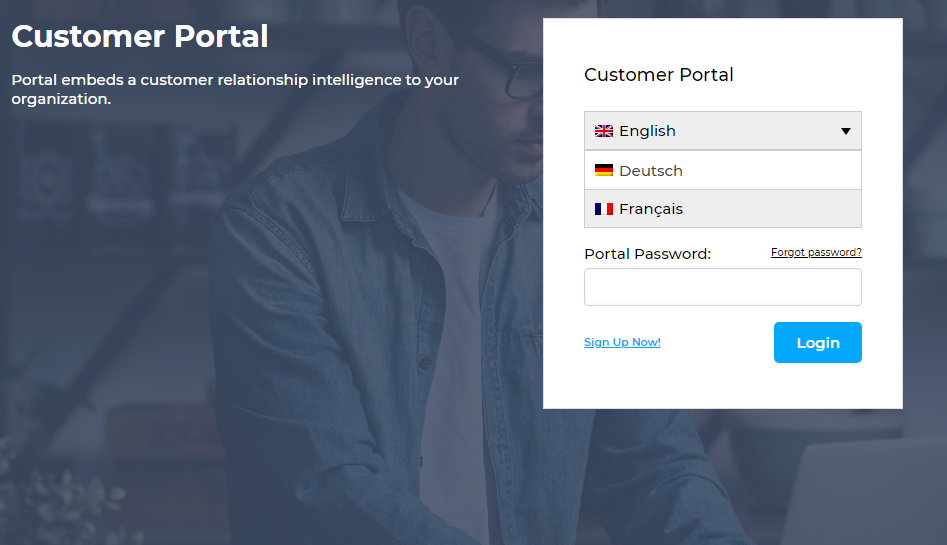
Once all the pages are translated, you can enable the Custom Language Switchers for Login, Registration, and forget password pages. For that, navigate to the WPML → Custom language switchers and enable the module.
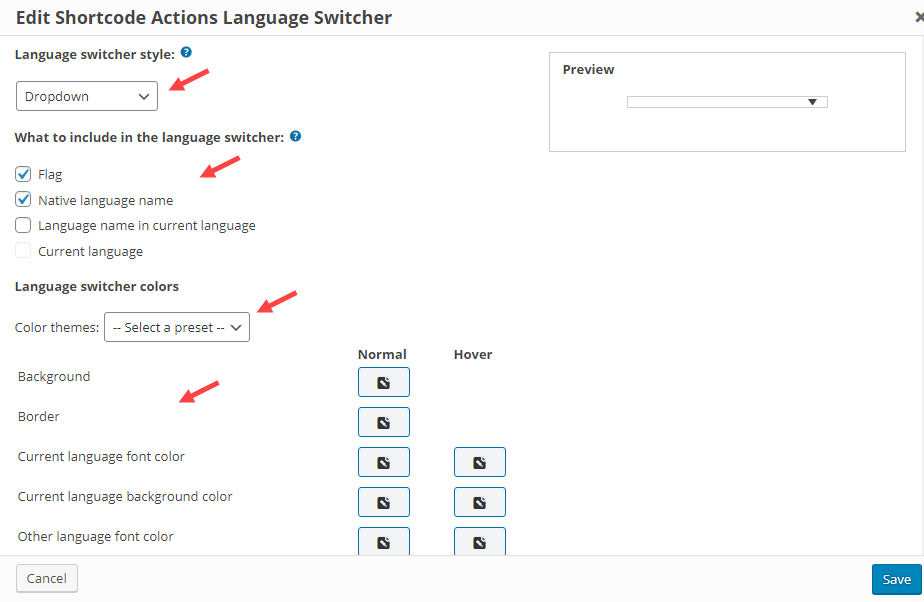
To customize the language switcher style, click on the Customize button. It will customize the Login, Registration, and forget password pages.
– Language Switcher Style: Select a Style for Language Switcher.
– What to include in the language switcher: Include a Flag, Native lang. name, Lang. name in the current language.
– Language switcher colors: Customize the Language switcher colors.
Language Switcher For Customer Portal Menu
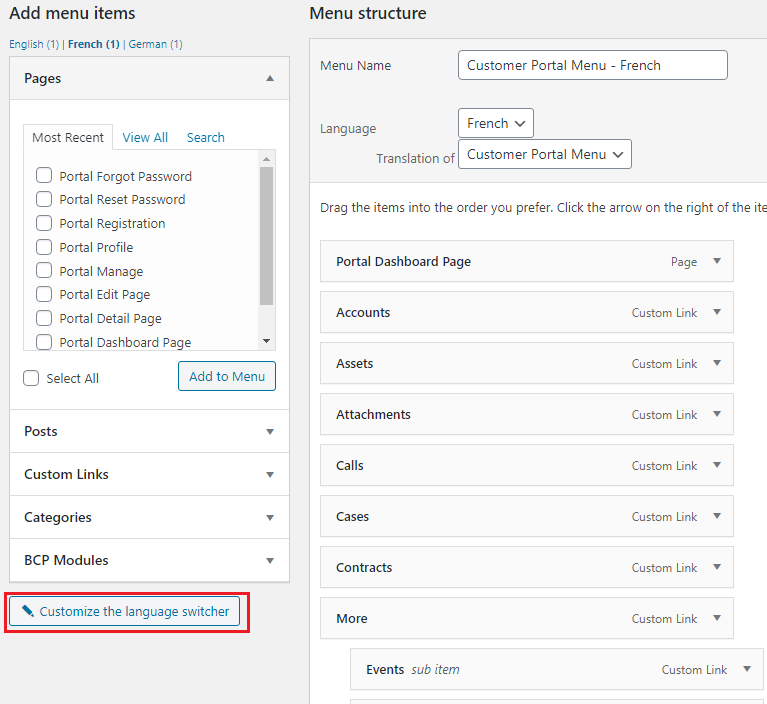
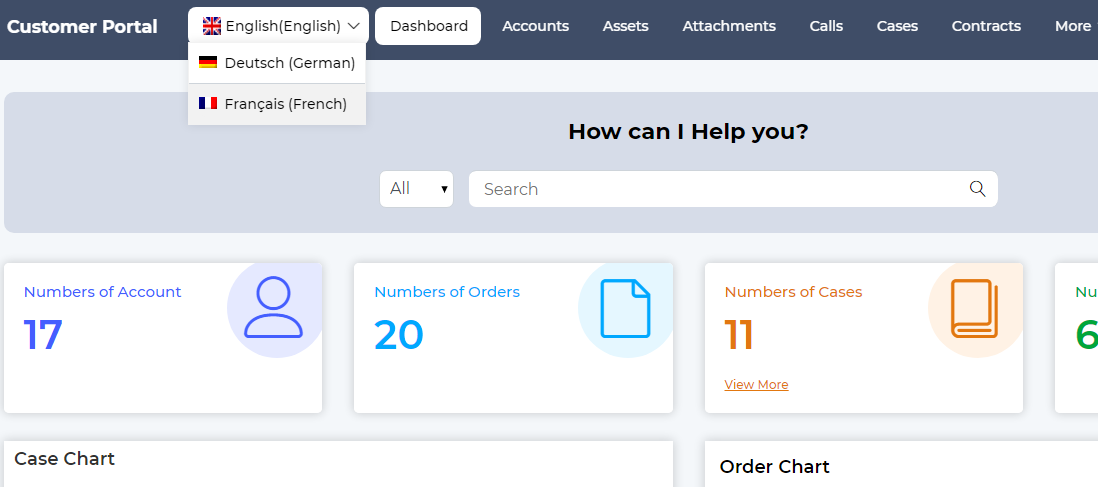
You can customize the Language Switcher for the after portal login pages from Appearance → Menus. Select the language you want to customize the language switcher.
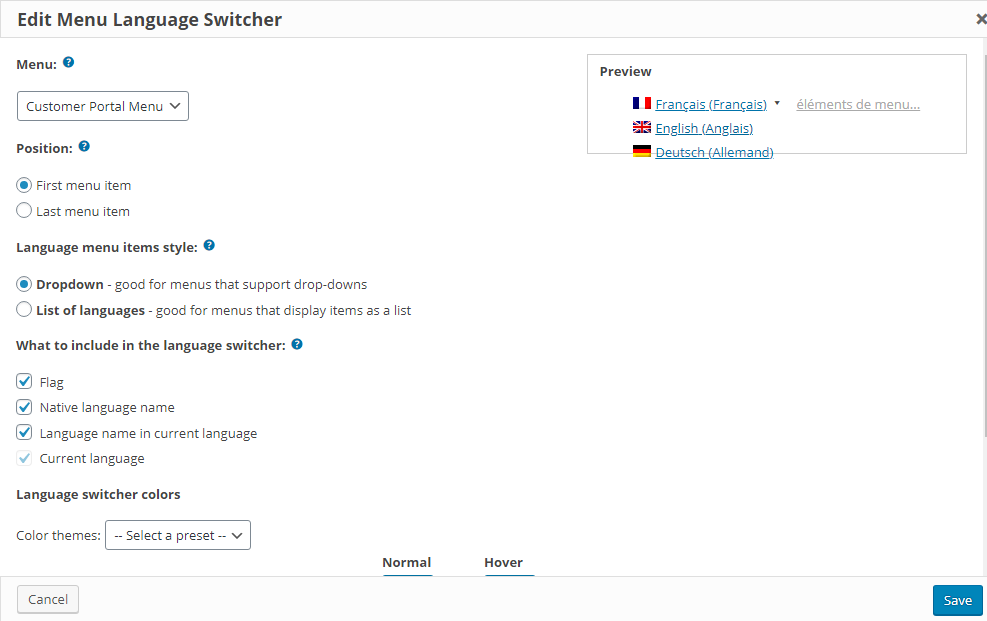
From the left at the end, you will find the Add a language switcher button if the switcher is not added yet else you will get the Customize the language switcher By clicking on it, you will navigate to the “Edit Menu Language Switcher” of WPML setup.
You can configure the following option for the Menu Language Switcher:
– Menu: Select a specific menu (if multiple menus are created).
– Position: Define the position of the Switcher whether before menu (First) or after menu (Last).
– Language menu items style: Select the Language menu style as Dropdown or List (horizontal).
– What to include in the language switcher: Include a Flag, Native lang. name, Lang. name in the current language.
After customizing the Language Switcher, click on the Save button to apply the appearance of the switcher on the portal.
Customer Portal (Front side)
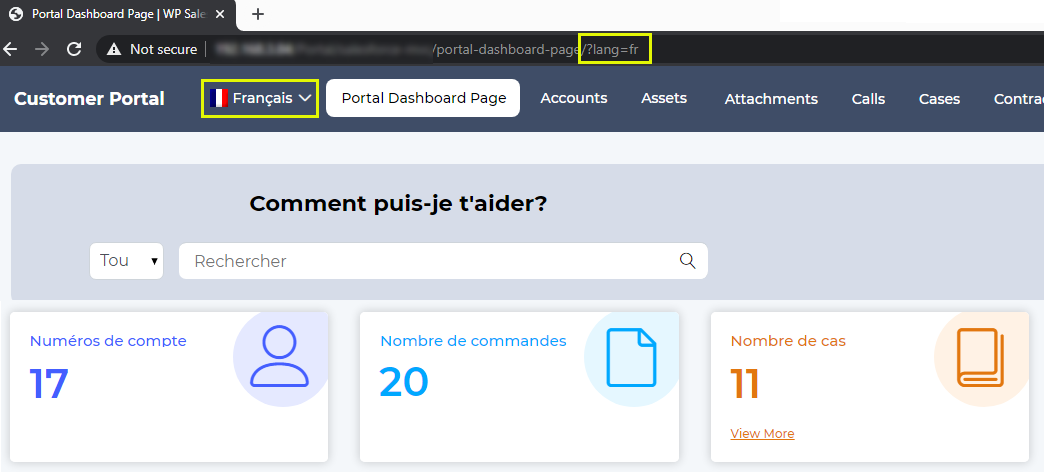
The customers can access the portal by selecting their regional language Once you have installed the plugins for WPML and configure the Salesforce content by syncing.
Language Switcher
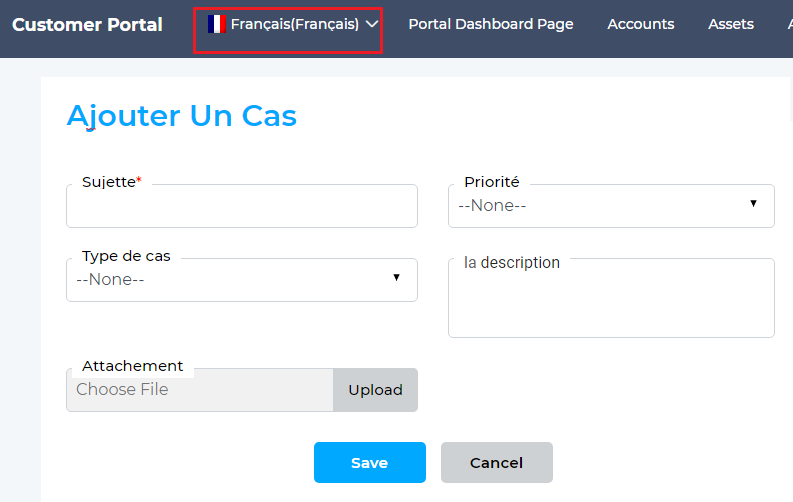
The portal users will get the Language switcher as you have customized under the WPML -> Languages.
Portal users can switch to their regional language and access the customer portals. Once they switch to another language, the URL will also be changed as you have set the format of the Language URL.
Similarly, the portal users will get the Menus and Pages in their selected language as you have translated and configured from the WordPress setup & WPML setup.


