Salesforce WordPress Customer Portal
SalesPort – Salesforce Customer Portal for WordPress
(Lightning & Classic Mode)
Version: 5.7.0
WordPress Compatibility:
WordPress: 4.0 to 6.8.2
Salesforce Compatibility:
Enterprise, Unlimited, Developer, Performance
Introduction
Salesforce Customer Portal for WordPress lets WordPress website owners add a customer portal in their website with Salesforce as the backend framework and WordPress as the front-end interface. With this portal, your customers will be able to log into their accounts and create support or complaint cases that they want to be addressed, manage CRM records, get a personalized dashboard,s and many more.
Through the cases module of your Salesforce system, you will be able to get details of all the open cases and address them as per their priority.
Benefits of Customer Portal
With a CRM integrated portal, you can provide a better customer experience by quickly following up and resolving on all open cases and support requests.
As the customers place their own requests, there are fewer chances of ambiguity and miscommunication.
You can manage your CRM records from the portal and even add attachments for those records.
Mange portal layouts for Edit & Detail page section-wise (page layout break into sections).
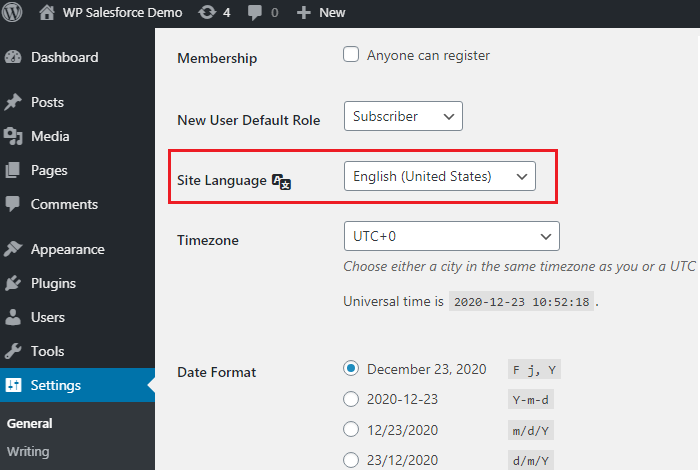
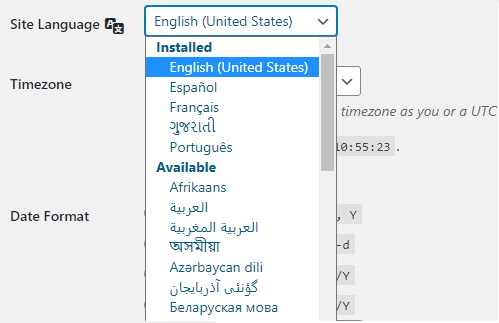
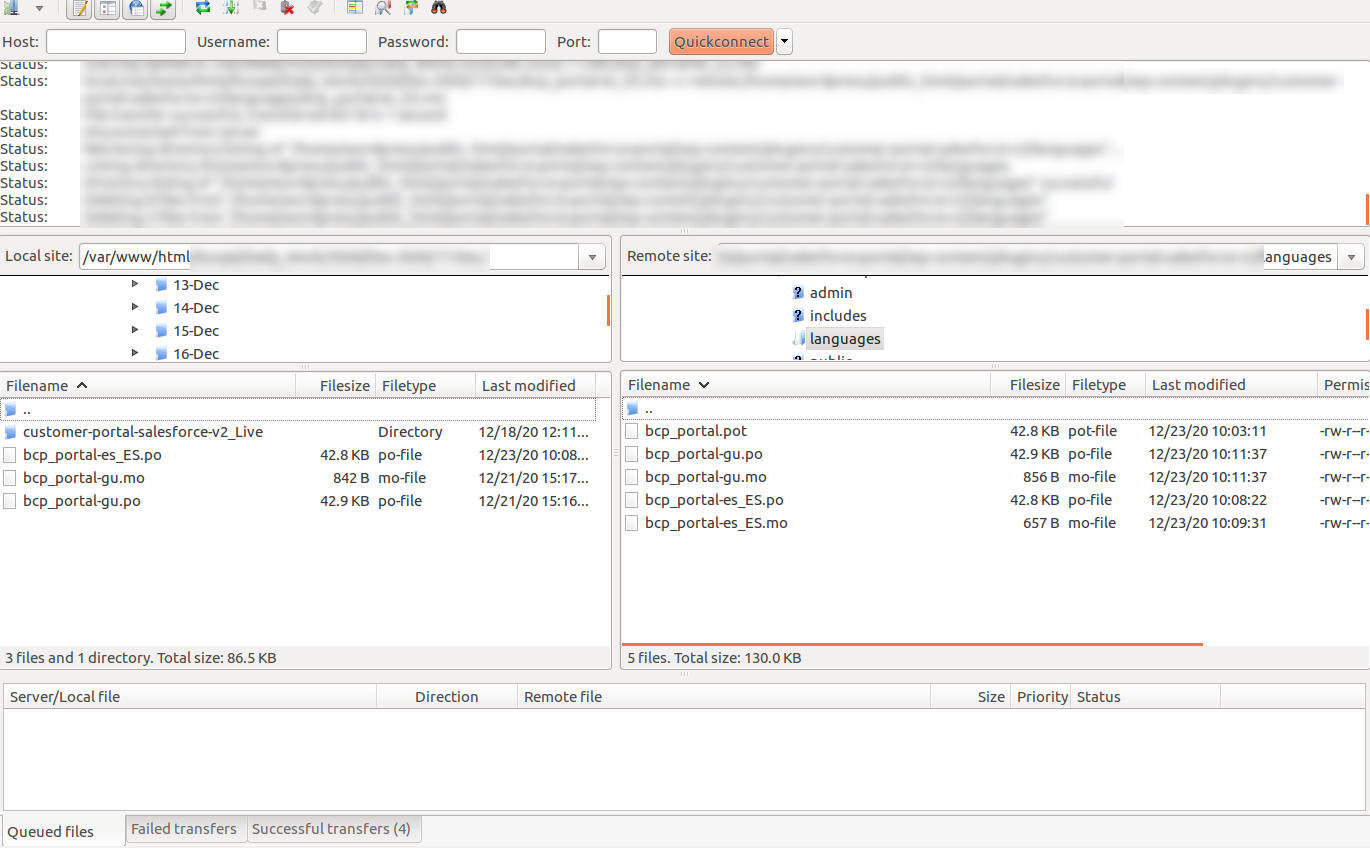
Multi-Language Support to the Portal users by configuring from WordPress.
Our Portal integrates your existing Salesforce with WordPress systems. So, you do not have to invest in additional software or technology infrastructure in creating a support portal for your customers.
WPML Addon support
Prerequisites
The following points must be followed before starting Installation:
-> You should log in as an Administrator in Salesforce.
-> You must have a valid License Key Provided by CRMJetty.
-> Check your WordPress site has compatibility with Customer Portal.
-> Your WordPress site must have an SSL Certificate.
-> You should be able to log in as an admin in your WordPress site.
-> You must create a connected app on the Salesforce side.
-> You should also authenticate the connected app on the WordPress end.
-> Supported Salesforce Editions: Enterprise, Unlimited, Developer, Performance, Professional (API should be enabled).
Installation
To install the app, navigate to Salesforce AppExchange or Open this ‘https://appexchange.salesforce.com/‘ in browser.
Go to the search bar and search ‘Sales port’ and open it, if you don’t find open this https://appexchange.salesforce.com/listingDetail?listingId=a0N3A00000EGye2UAD.
– Select ‘Get It Now’
– Login to AppExchange, using your Salesforce credentials.
– Now select ‘Install in production’.
– Go through terms and conditions and click ‘Confirm and Install‘.
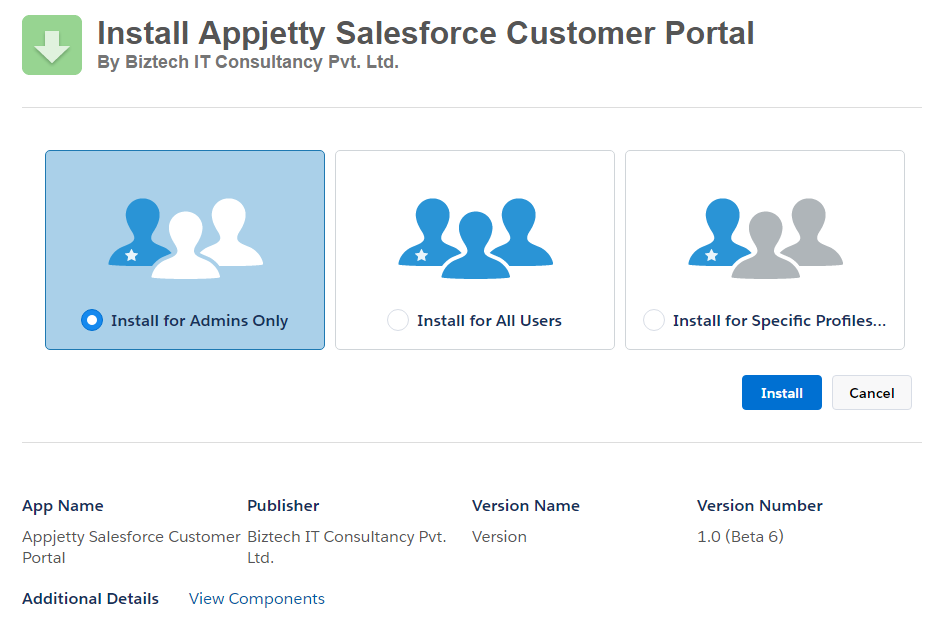
– Now select ‘Install for Admins Only’ and click on ‘Install’.
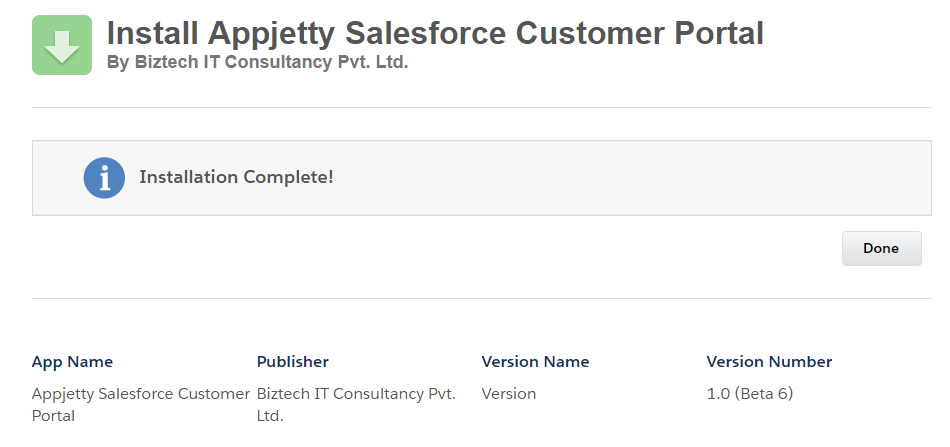
After the installation is completed you will be notified through a notification. And to complete the installation click on ‘Done’ to finish the installation process.
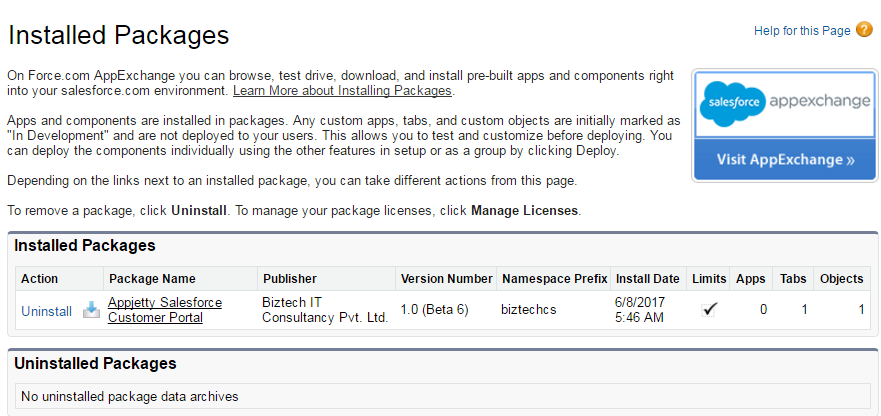
By clicking on the ‘Done’ button, you will be redirected to the Installed Packages page. And installed Customer Portal will be listed in the ‘Installed Packages’ table.
Salesforce App Installation
You can install Customer Portal in the Salesforce through following modes:
– Salesforce Classic
– Salesforce Lightning
Salesforce Classic
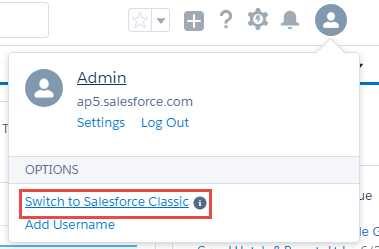
To install the Customer Portal using the Salesforce Classic mode, switch to Salesforce Classic mode.
To switch the mode, navigate to Admin -> Switch on Salesforce Classic.
Salesforce Lightning
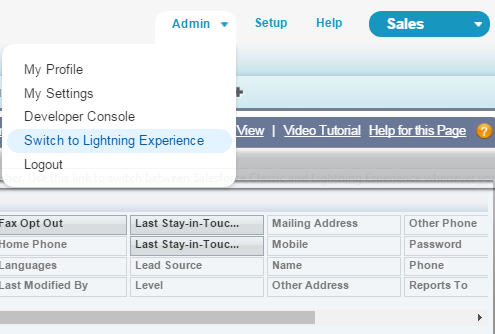
To install the app using the Salesforce Lightning mode, switch to Salesforce Lightning mode.
To switch the mode, navigate to Admin -> Switch on Salesforce Lightning Experience.
Upgrade Package
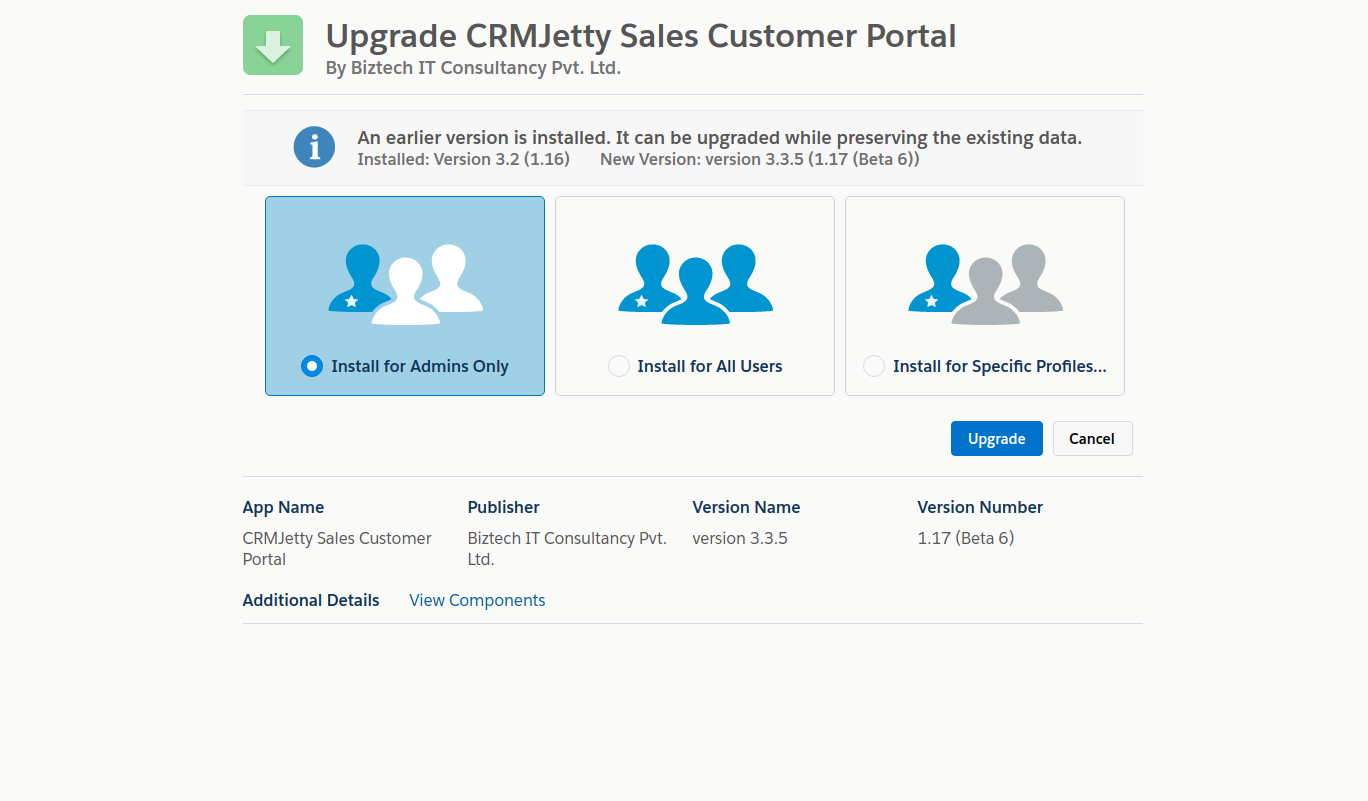
Select ‘Install for Admins Only’ and click on the ‘Upgrade’ button.
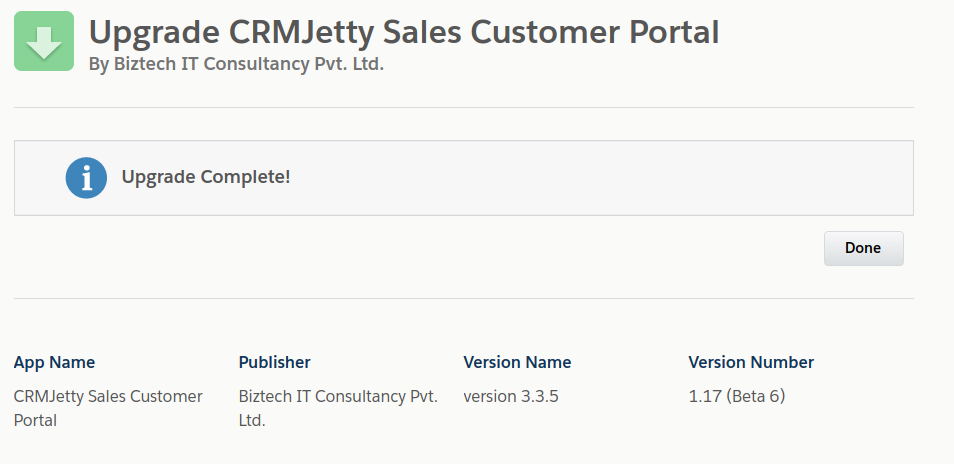
After the upgrade is completed you will be notified through a notification. And to complete the upgrade process click on “Done” to finish the upgradation process.
By clicking on the ‘Done’ button, you will be redirected to the Installed Packages page. And installed Customer Portal will be listed in the ‘Installed Packages’ table
WordPress Manual Plug-in installation
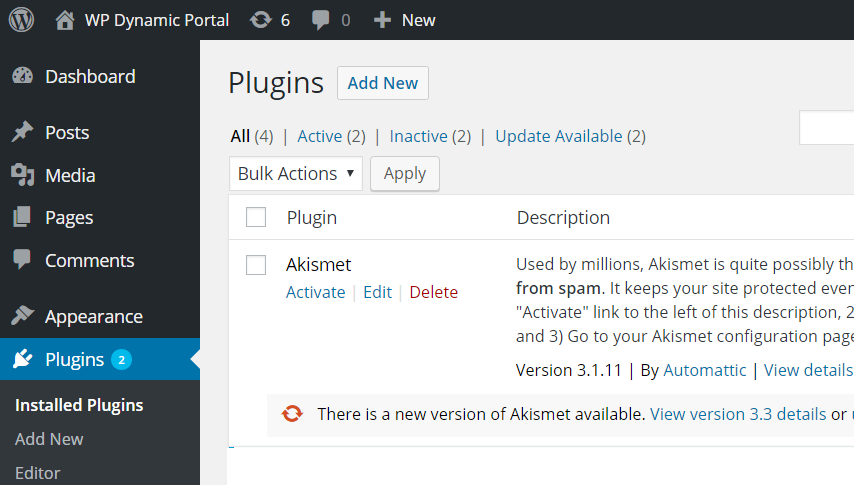
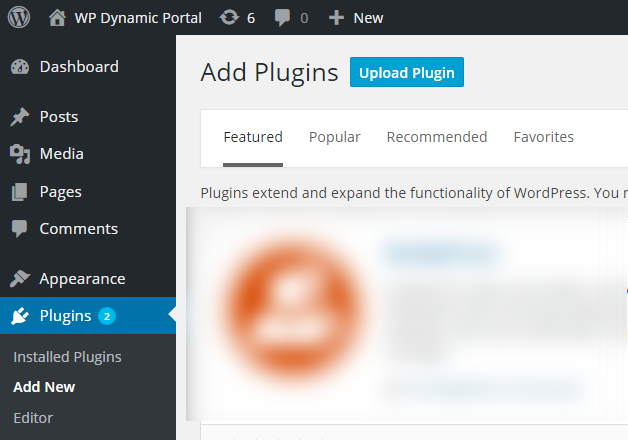
Login to your WordPress site from wp-admin and navigate to the Plugins module. Here you can see the Add New Button. Click on ‘Add New’ button which will redirect you to Add Plugins Page.
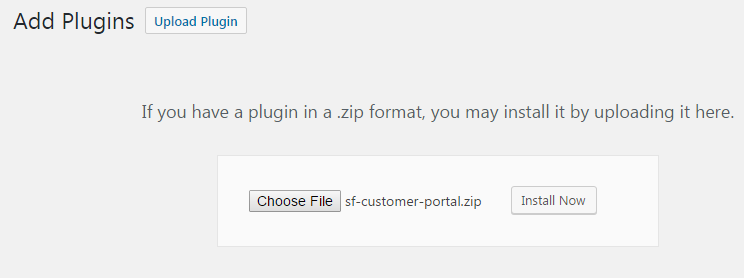
Click on ‘Upload Plugin’ button. Browse the ‘sf-customer-portal’ zip and Install the Plugin.
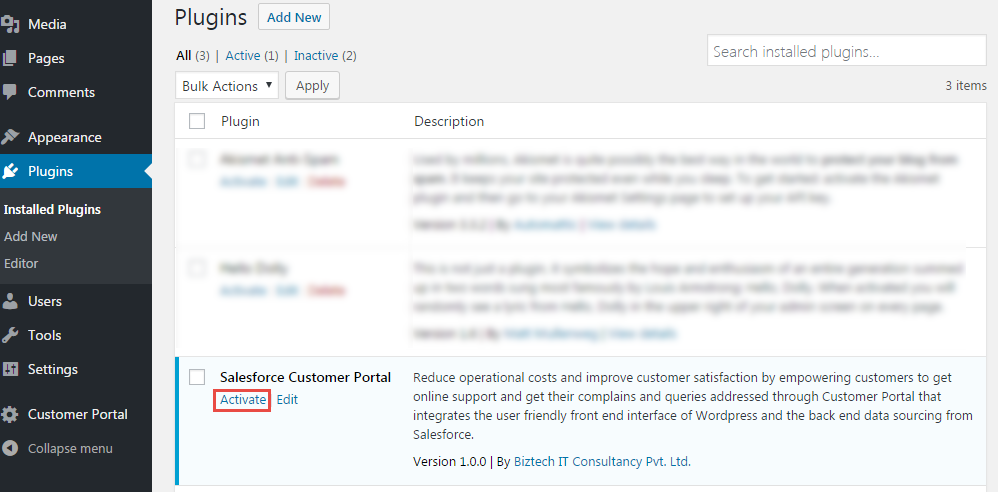
Go to Installed Plugins screen. Here, you can see the Salesforce Customer Portal plugin was successfully installed. But still, it’s Inactive.
Click on ‘Activate’ to activate this newly installed plugin.
Salesforce Plug-in Configuration
Configure for the Customer Portal plug-ins in Salesforce CRM.
Create a Connected App
If you’re creating a connected app to integrate an external application with your Salesforce API, configure the connected app with OAuth authorization settings.
Please follow the below steps to create a “Connected App” for Salesforce Classic & Lightning modes.
Salesforce Classic
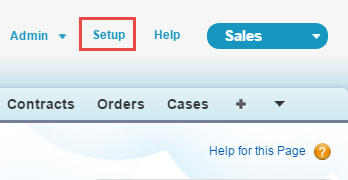
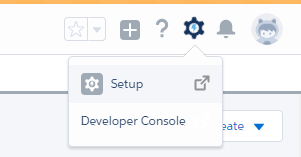
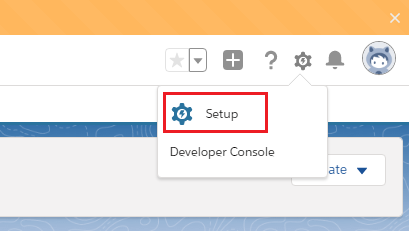
To create a new connected app, click on ‘Setup’ On clicking ‘Setup’ button you will be redirected to the setup page.
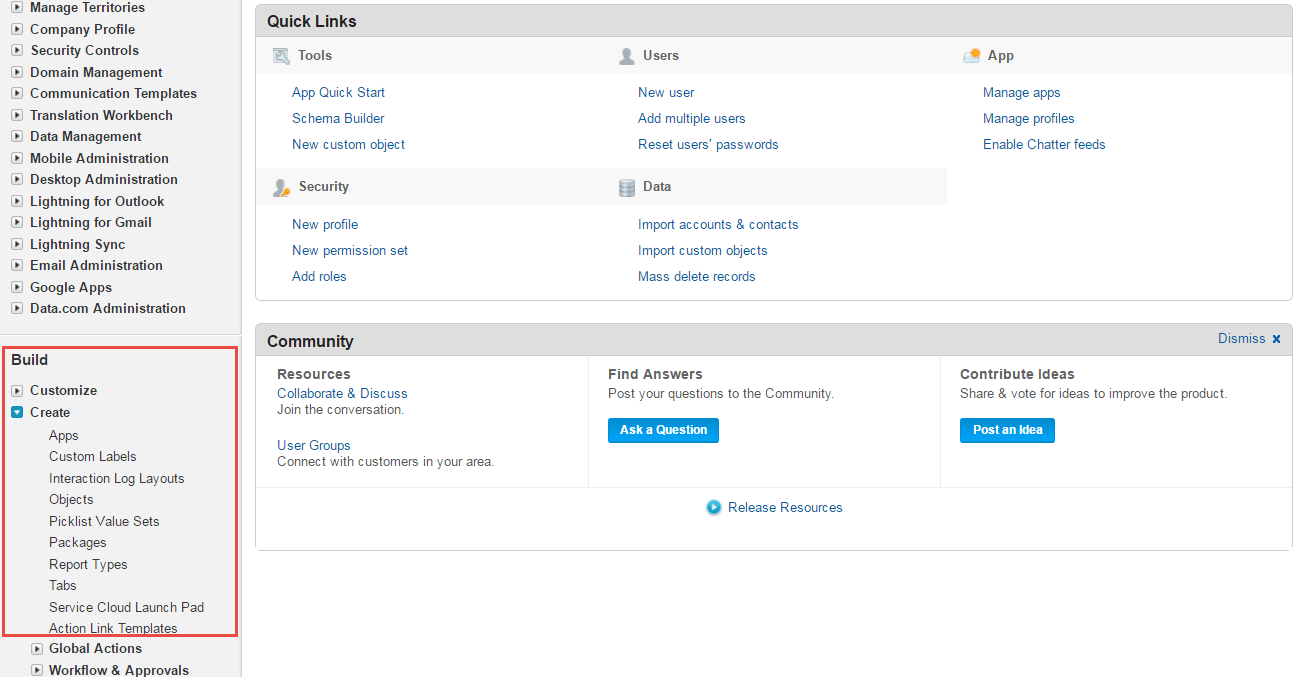
From setup page navigate to Build -> Create -> Apps. On clicking ‘Apps’ link you will be redirected to the Apps page.
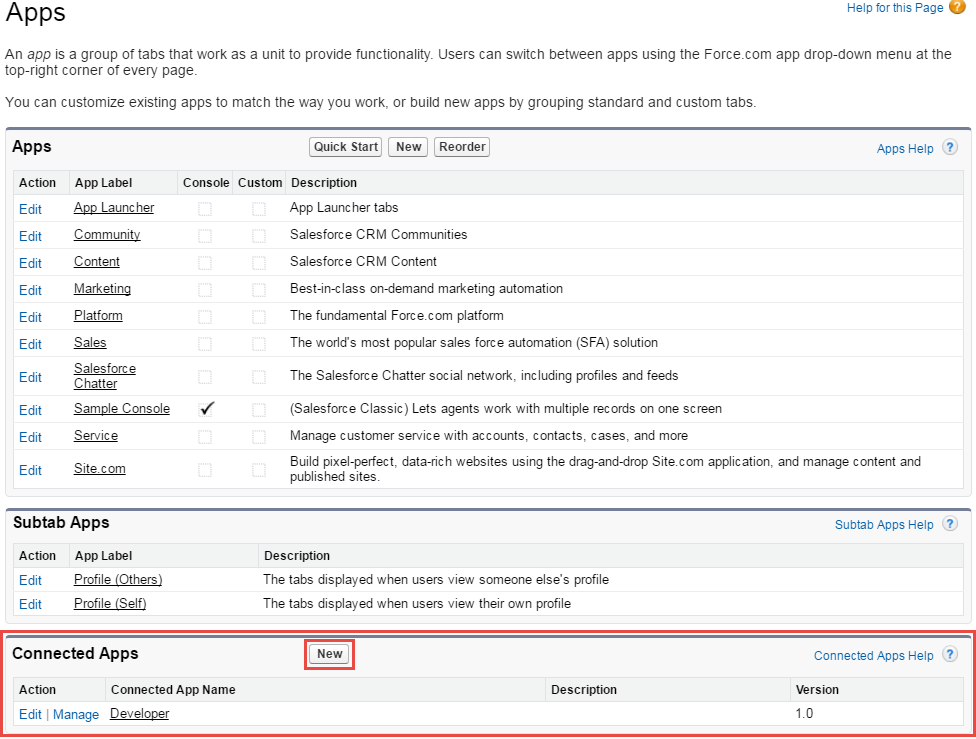
Now navigate to ‘Connected Apps’ section from Apps page and click on ‘New’
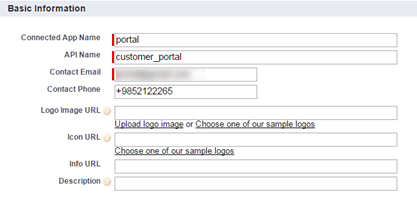
By clicking on ‘New’ button you will be navigated to the New Connected App page. Fill up the following details on this page:
-> Connected App Name: Enter the name of the connected app.
-> API Name: Enter the name of API.
-> Contact Email: Enter the contact email address.
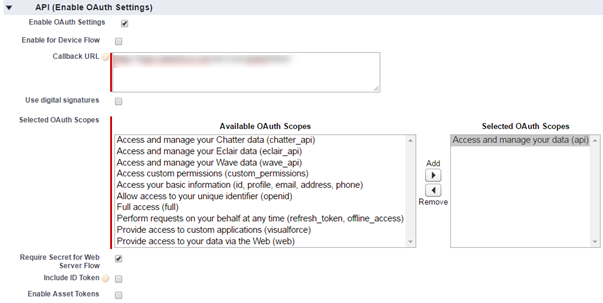
-> Enable OAuth Settings: Check the checkbox to enable the OAuth settings.
After checking the checkbox, you will be presented with the following mandatory fields:
-> Callback URL: Set ‘https://login.salesforce.com/services/oauth2/token’ callback URL.
-> Selected OAuth Scopes: Set ‘Access and manage your data API’ by selecting the field and clicking on the ‘Add’ icon.
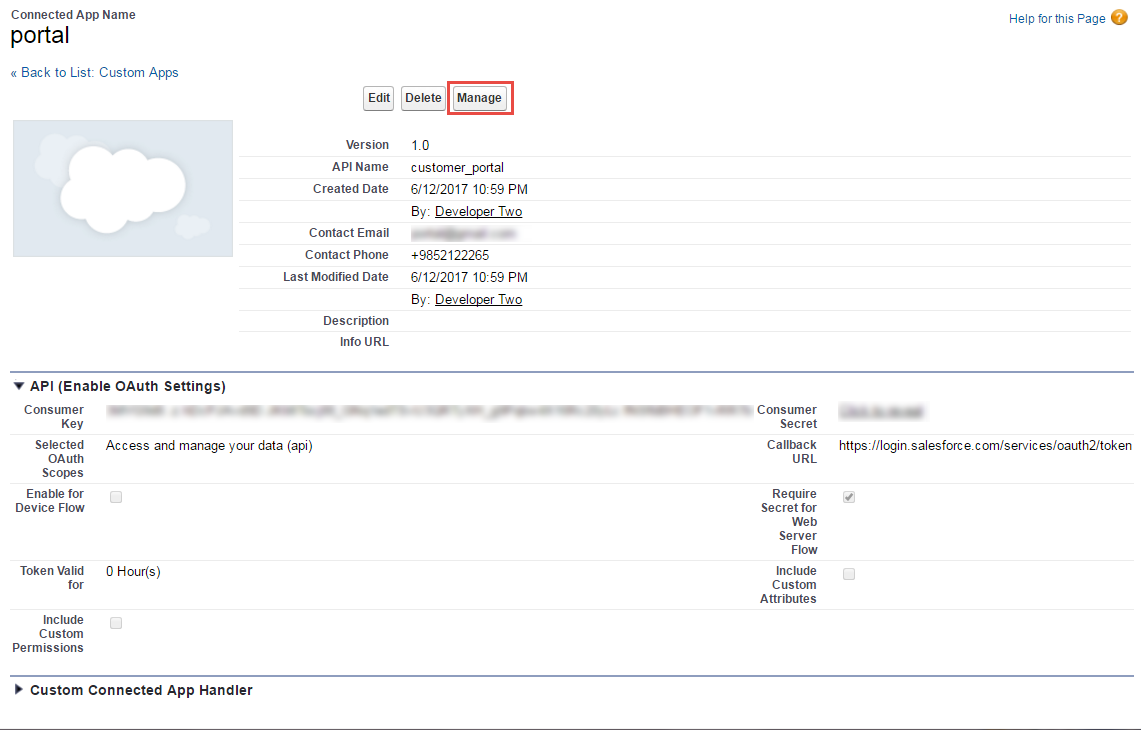
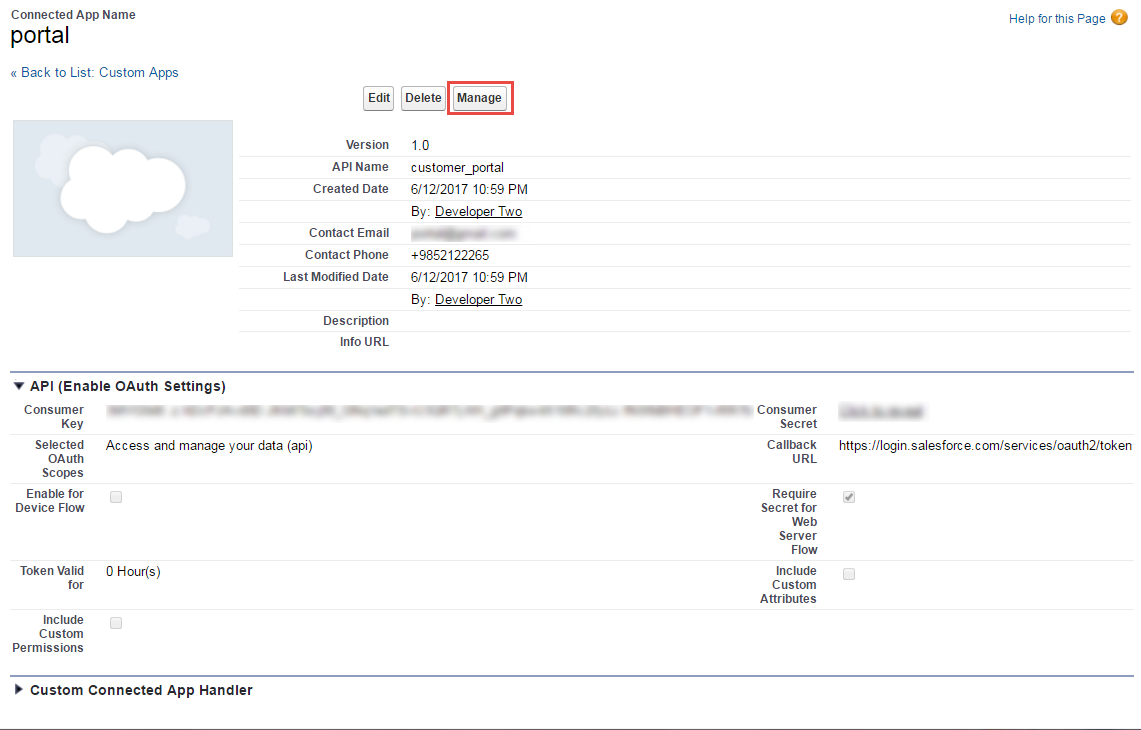
After providing the details, click on the ‘Save’ button to create the connected app. By clicking on the ‘Save’ button you will be redirected to the below screen.
Click on the ‘Continue’ button and you will be provided with the details of the newly created connected app.
To manage the connected app, click on the ‘Manage’ button.
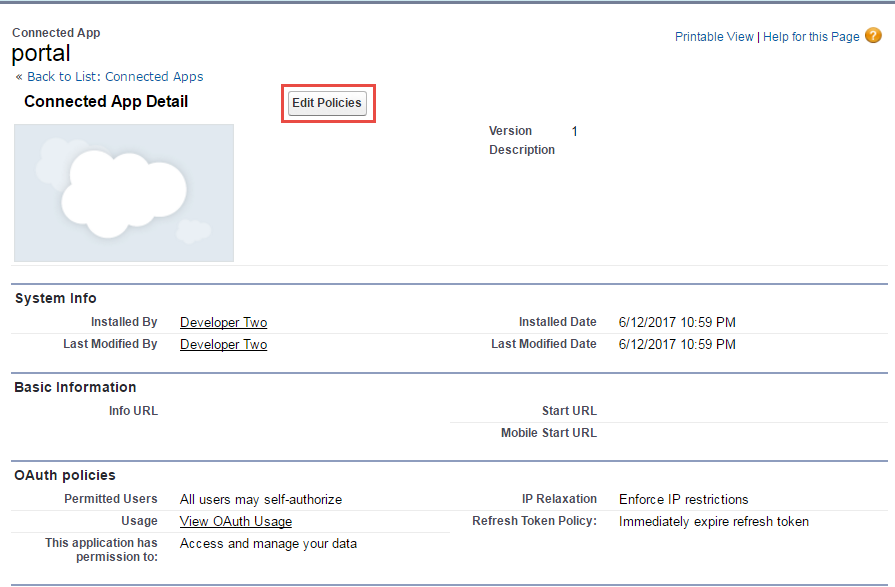
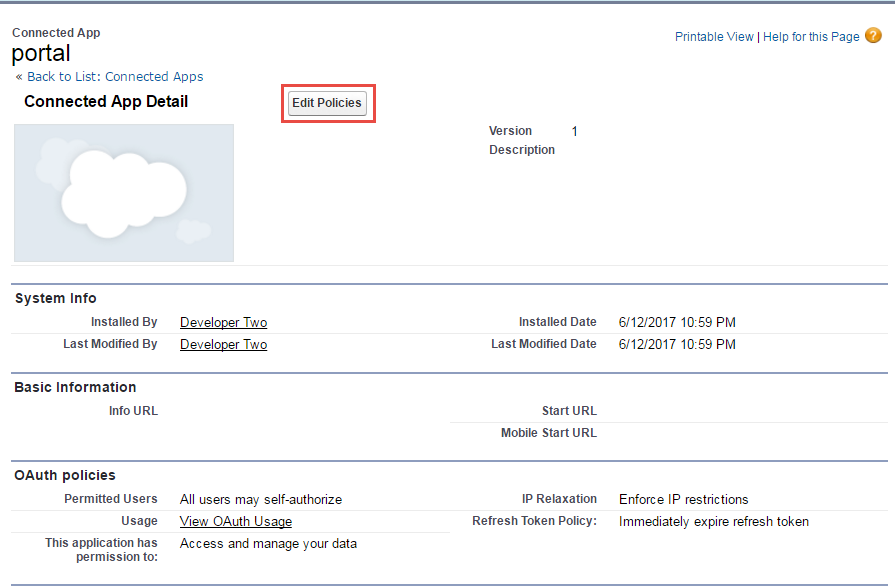
On Clicking the‘ Manage’ button, you will be redirected to the Connected App Detail page.
From this page click on the ‘Edit Policies’ button to edit the policies for the connected app.
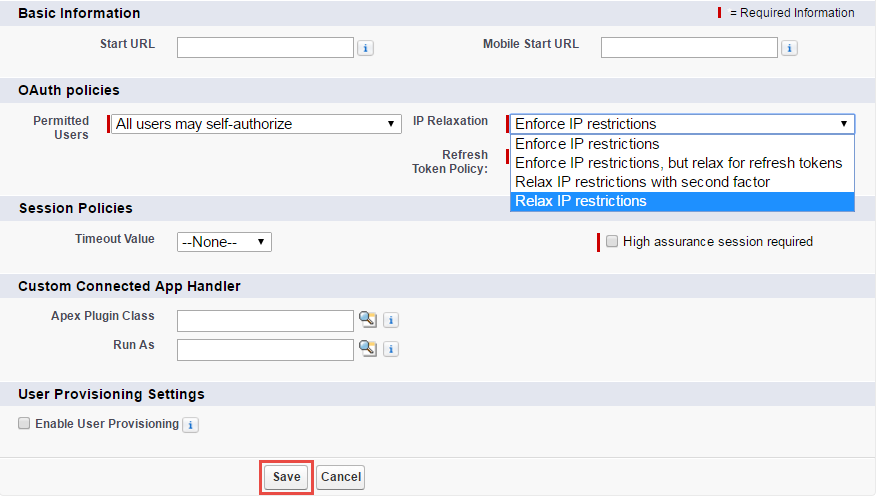
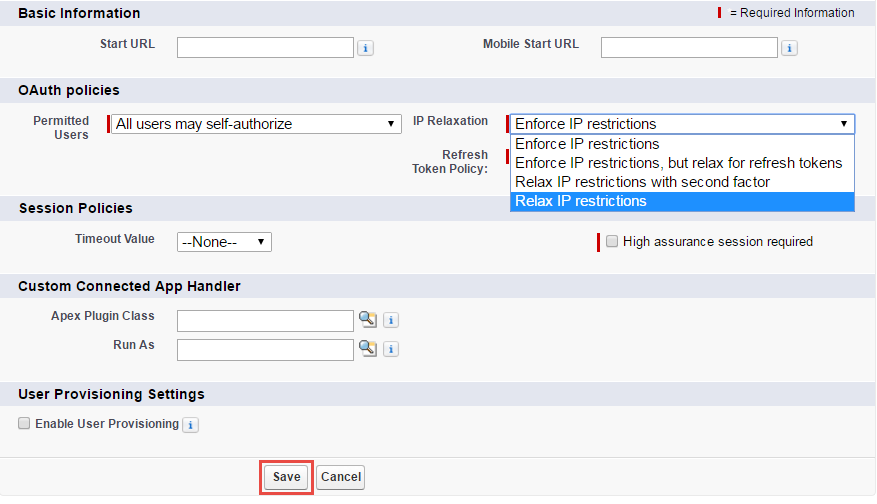
By clicking on the ‘Edit Policies’ button, you will be redirected to the Connected App Edit page. From this page, edit the IP restrictions by selecting the ‘Relax IP Restrictions’ option from the ‘IP Restrictions’ dropdown list.
To save the changes, click on ‘Save’
Salesforce Lightning
To create a new connected app, click on ‘Setup’ On clicking ‘Setup’ button you will be redirected to the setup page.
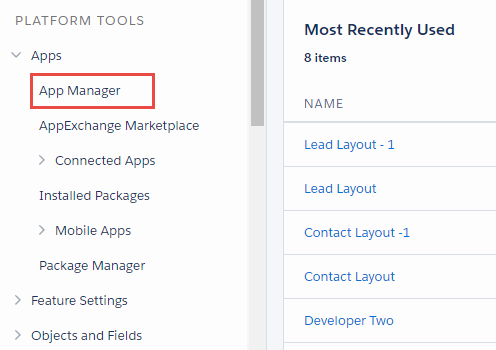
From setup page navigate to Apps -> Apps Manager.
By clicking on the ‘App Manager’ link you will be redirected to the App Manager page.
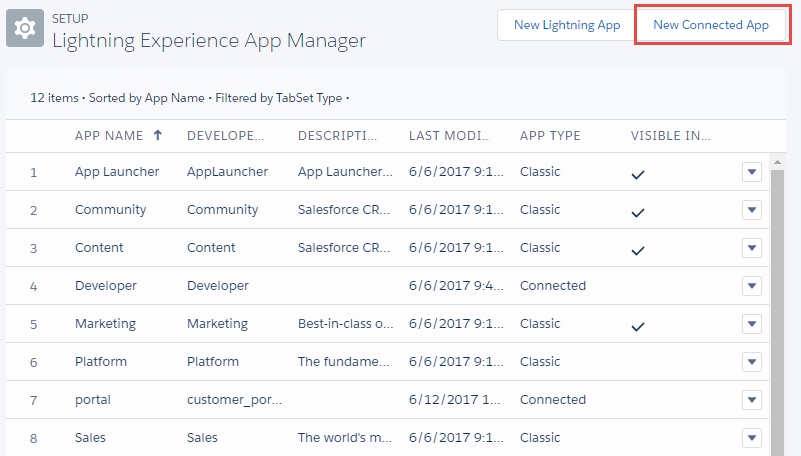
Now click on ‘New Connected App’.
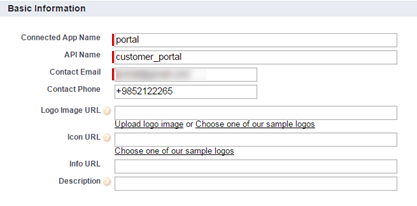
By clicking on the ‘New Connected App’ button you will be redirected to the New Connected App page. Fill up the following fields:
-> Connected App Name: Enter the name of the connected app.
-> API Name: Enter the name of API.
-> Contact Email: Enter the contact email address.
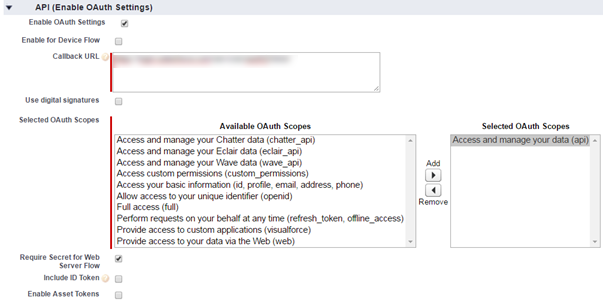
-> Enable OAuth Settings: Check the checkbox to enable the OAuth settings.
After checking the checkbox, you will get with following mandatory fields:
-> Callback URL: Set ‘https://login.salesforce.com/services/oauth2/token’ callback URL.
-> Selected OAuth Scopes: Set ‘Access and manage your data API’ by selecting the field and clicking on the ‘Add’ icon
After providing the details, click on the ‘Save’ button to create the connected app. By clicking on the ‘Save’ button, you will be redirected to the below screen.
Click on the ‘Continue’ button you will be provided with the details of the newly created connected app.
To manage the connected app, click on ‘Manage’ button.
On Clicking the‘ Manage’ button you will be redirected to the Connected App Detail page.
From this page, click on the ‘Edit Policies’ button to edit the policies for the connected app.
By clicking on the ‘Edit Policies’ button, you will be redirected to the Connected App Edit page. From this page edit the IP restrictions by selecting the ‘Relax IP Restrictions’ option from the ‘IP Restrictions’ dropdown list.
To save the changes, click on ‘Save’
SalesPort App
SalesPort classic app tab will contain all configurations and settings related to SalesPort – Salesforce Customer Portal for WordPress.
Please follow the below steps for Salesforce Classic & Lightning modes.
Object Configuration
The Salesforce customer portal provides the feature to enable the default object and the custom object as well from the Salesforce CRM.
Salesforce Classic
The customer portal provides features to enable/disable the Salesforce Objects from the ‘Object Configuration’.
To enable any object, select it under the ‘Disabled Objects’ and click on the right side icon > to enable in the customer portal and to disable any object, select the enabled object and click on the left side icon <.
Note: Attachments are used for uploading files of bigger sizes like images and videos Whereas one can use the file to upload the content-related files.
You can manage the orders under the Enable Objects by selecting the object that you want to move up or down by clicking on the up-down arrow, respectively.
You will also get the Custom objects to enable into the customer portal if any.
Salesforce Lightning
The customer portal provides features to enable/disable the Salesforce Objects from the ‘Object Configuration’.
To enable any object, select it under the ‘Disabled Objects’ and click on the right side icon > to enable in the customer portal and to disable any object, select the enabled object and click on the left side icon <.
Note: Attachments are used for uploading files of bigger sizes like images and videos Whereas one can use the file to upload the content-related files.
You can manage the orders under the Enable Objects by selecting the object that you want to move up or down by clicking on the up-down arrow, respectively.
You will also get the Custom objects to enable into the customer portal if any.
Role Management
The Salesforce customer portal provides features to manage Salesforce Object’s accessibility for their WordPress portal users.
You can decide access to which object should be provided to which customer by role management.
Salesforce Classic
For role settings, click on the ‘All Tabs’ icon and you will be redirected to the All Tabs screen. Now click on ‘Customer Portal Roles’.
Now for adding a new role, click on “New”.
Fill in the required details and click on the “Save” button to add a new role.
– Role Name: Insert the role name.
– Relationship Type: There are two types of relationships 1) Contact-Based Relationship and 2) Account-Based Relationship. Portal will run on any of these relationships which is selected at the CRM side.
– Description: Set the description for the better understanding.
– Owner: In this field you see the owner.
– Is Primary?: Checkmark this option to make this role default for the new users.
Note: By default, there will be one primary role defined which is assigned to newly created user, you can define any role as “Primary Role”.
Once the role is added, open the role and assign contact to that role by clicking on “New Contact”.\
Note: By default, there will be one primary role defined which is assigned to a newly created user, you can define any role as “Primary Role”.
To manage ‘object access’ for a particular role, navigate to the Role detail page -> Object Access tab.
Note: You can also edit the Default Role of the Customer Portal Role.
Object Access Setting
By clicking on the ‘Object Access’, Object Access Setting will popup.
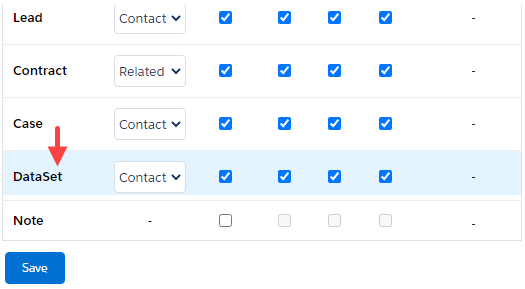
The standard (default) and custom objects that are enabled in the ‘Object Configuration’ will directly reflect in the Object Access Setting.
From here, enable the Objects by checking the Access option and assign the rights to Create/Edit/Delete as per requirement.
Relationship
If the relationship type is selected as Contact-Based then the Contact relationship is visible on the object access page.
If Relationship Type is selected as Account-Based, then two relationship fields will be visible in the Object Access section. One for the Contact and other for the Account.
Based on the relationship type of the role, the portal users can access data accordingly. In an account-based portal, users can access their own data and their account-related data.
Enable Product
To enable the Product selection, you must have enabled that object. Once you enable the access, you can enable the ‘Product’ for that object.
You can also enable the ‘Product’ if you want to provide product selection while adding records in the customer portal.
You can also edit the access rights for the custom object if any.
Enable Sub Panel
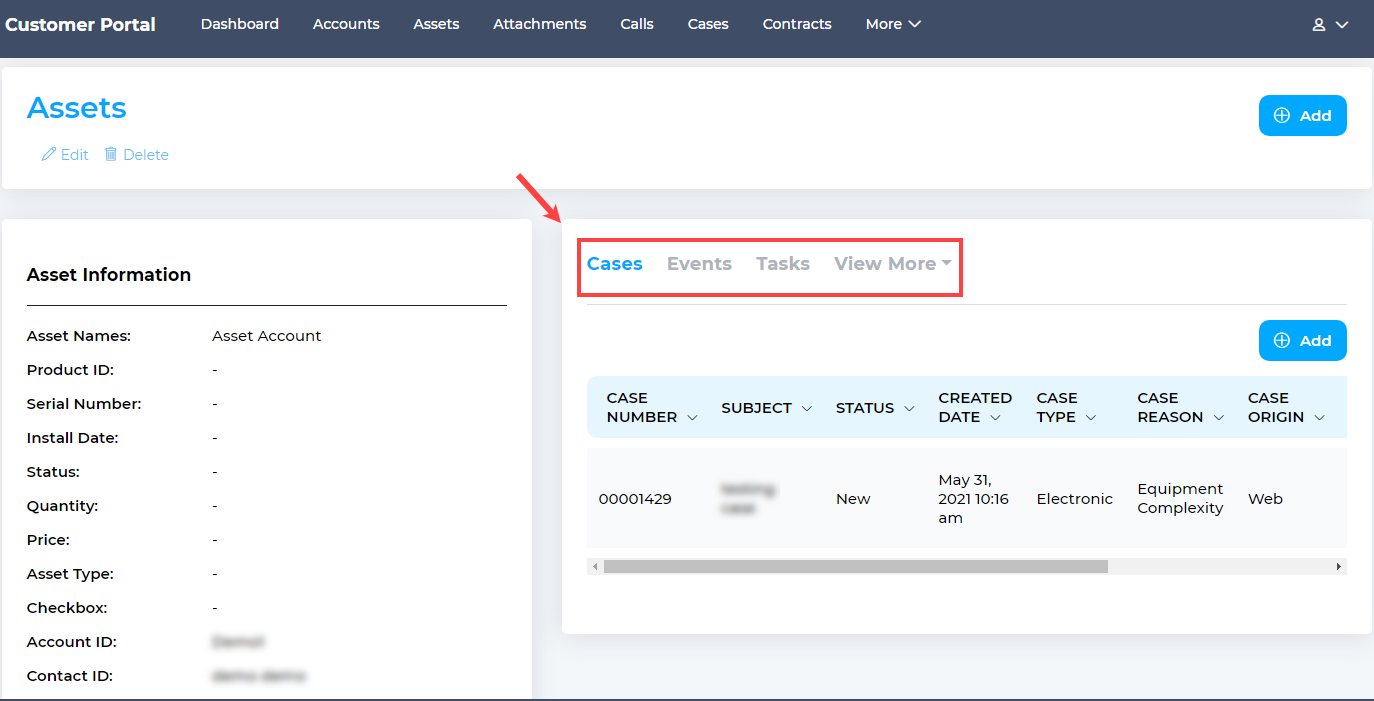
You can enable the sub-panel in the Edit/Detail pages of any object. To enable the Sub Panel of any object, check the Enable Sub Panel options.
By enabling the Sub Panel for any Object, all the data will be shown in the subpanel which is having a relationship with the current page of the object.
The portal users will get the listing in the sub-panel of the Object having a relationship with the contact The portal users will have Add, Edit, and Delete rights as you have enabled the rights for the object.
Select Sub Panel
Users can simply select the sub-panel checkbox in the Object Access page. After that select the sub panel name in the sub-panel dropdown with a checkbox in the Object Access page.
Admins can also select the multiple sub-panels from the dropdown menu to display in the portal front. After selecting the subpanel access for a specific object, Save the object access data and need to re-login into the portal for reflecting changes into the portal.
Note: Notes, Attachments, and Knowledge Articles will not have Sub Panel access.
After configuring the Object Access click on the “Save” button.
If you have enabled the new Object and enabled the access rights, you will be notified to set the Layout for a newly added Object by saving the setting.
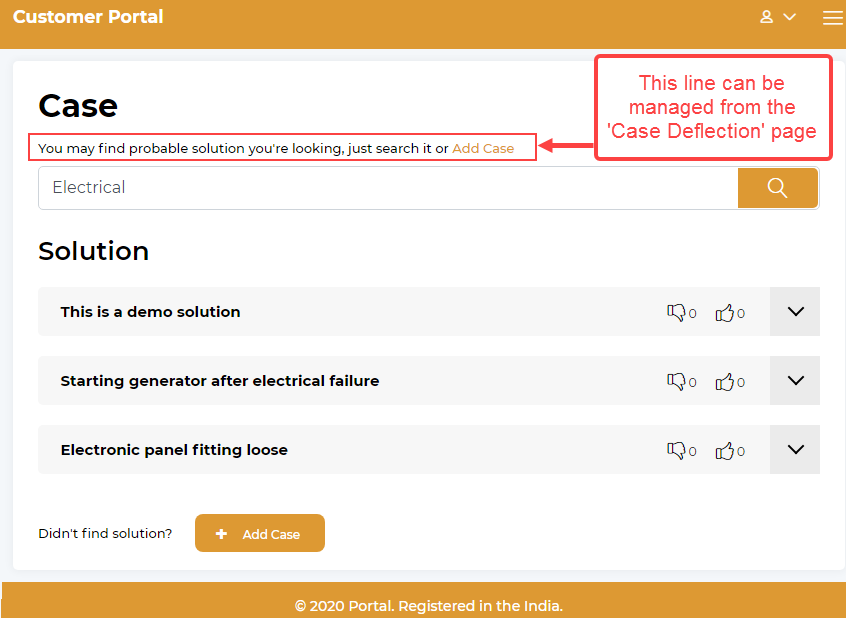
Enable Case Deflection
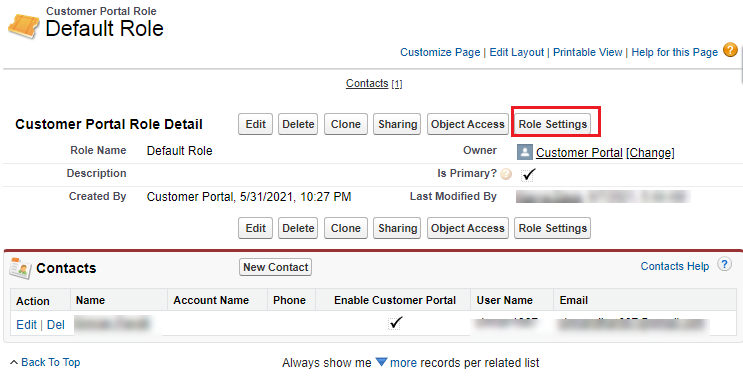
To enable the ‘Case Deflection’, click on Role Settings.
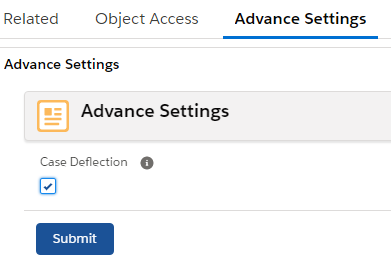
Check the box under the Case Deflection title to enable it. And then click on Submit to save the setting.
Note: Case deflection will only work if the solutions and cases module is enabled.
Assign Role to Contact
Steps to Set fields in contact layout: Go to Setup -> Object manager -> Contact object -> Page layout -> Contact layout -> Drag and drop (Enable Customer Portal, Username and Customer Portal Role).
Note: Here, you do not need to drag and drop the ‘Password’ field for security purposes. The password generation link button is provided separately in the contact details.
For assigning roles to a particular contact, navigate to the list view, and select any contact.
Fill out information i.e. Username, Portal Role, and Enable Portal and click on save.
You can generate a password link for the password by clicking on the “Send Generate Password Link” button and it will directly send a mail with a set password link. From that link, you can generate a new password.
Note: If you are unable to see the “Send Generate Password Link” button, then navigate to Setup -> Object Manager -> Contact object -> Page Layout -> Customer Layout > Drag and drop “Send Generate Password Link” to custom buttons.
Last Login Details
Admin can view the last login details of the contact by opening it in the “Edit” Mode.On the contact details page you will get the “Last Login Date” field.
Salesforce Lightning
For role settings click on the ‘App Launcher icon and you will be redirected to the All Item screen. Now click on ‘Customer Portal Roles’.
Now for adding a new role, click on “New”.
Fill in the required details and click on the “Save” button to add a new role.
– Role Name: Insert the role name.
– Relationship Type: There are two types of relationships 1) Contact-Based Relationship and 2) Account-Based Relationship. Portal will run on any of these relationships which is selected at the CRM side.
– Description: Set the description for the better understanding.
– Owner: In this field you see the owner.
– Is Primary?: Checkmark this option to make this role default for the new users.
Note: By default, there will be one primary role defined which is assigned to newly created user, you can define any role as “Primary Role”.
Once the role is added, open the role and assign contact to that role by clicking on “New”.
To manage module access for a particular role, navigate to Role detail page -> Object Access Tab.
Note: You can also edit the Default Role of the Customer Portal Role.
Object Access Setting
By clicking on the ‘Object Access’, Object Access Setting will appear.
The standard (default) and custom objects that are enabled in the ‘Object Configuration’ will directly reflect in the Object Access Setting.
From here, enable the Objects by checking the Access option and assign the rights to Create/Edit/Delete as per requirement.
Relationship
If the relationship type is selected as Contact-Based then the Contact relationship is visible on the object access page.
If Relationship Type is selected as Account-Based, then two relationship fields will be visible in the Object Access section. One for the Contact and other for the Account.
Based on the relationship type of the role, the portal users can access data accordingly. In an account-based portal, users can access their own data and their account-related data.
Enable Product Selection
To enable the Product selection, you must have enabled that object. Once you enable the access, you can enable the ‘Product’ for that object.
You can also enable the ‘Product’ if you want to provide product selection while adding records in the customer portal.
You can also edit the access rights for the custom object if any.
Enable Sub Panel
You can enable the sub-panel in the Edit/Detail pages of any object. To enable the Sub Panel of any object, check the Enable Sub Panel options.
By enabling the Sub Panel for any Object, all the data will be shown in the subpanel which is having a relationship with the current page of the object.
The portal users will get the listing in the sub-panel of the Object having a relationship with the contact The portal users will have Add, Edit, and Delete rights as you have enabled the rights for the object.
Select Sub Panel
Users can simply select the sub-panel checkbox in the Object Access page. After that select the sub panel name in the sub-panel dropdown with a checkbox in the Object Access page.
Admins can also select the multiple sub-panels from the dropdown menu to display in the portal front. After selecting the subpanel access for a specific object, Save the object access data and need to re-login into the portal for reflecting changes into the portal.
Note: Notes, Attachments, and Knowledge Articles will not have Sub Panel access.
After configuring the Object Access click on the “Save” button.
If you have enabled the new Object and enabled the access rights, you will be notified to set the Layout for a newly added Object by saving the setting.
Enable Case Deflection
To enable the ‘Case Deflection’, click on Role Settings.
Check the box under the Case Deflection title to enable it. And then click on Submit to save the setting.
Note: Case deflection will only work if the solutions and cases module is enabled.
Assign Role to Contact:
Steps to Set fields in contact layout: Go to Setup -> Object manager -> Contact object -> Page layout -> Contact layout -> Drag and drop (Enable Customer Portal, Username and Customer Portal Role).
Note: Here, you do not need drag and drop the ‘Password’ field for the security purpose. The password generation link button is provided separately in the contact details.
For assigning roles to a specific contact, navigate to the list view, and select any contact.
Fill out information i.e. Username, Portal Role, and Enable Portal and click on save.
You can generate a password link by clicking on the “Send Generate Password Link” button and it will directly send mail with set password link. From that link, you can generate a new password.
Note: If you are unable to see “Send Generate Password Link” button, then navigate to Setup -> Object Manager -> Contact object -> Page Layout -> Contact Layout -> Buttons -> Drag and drop “Send Generate Password Link” button to custom buttons.
Last Login Details
Admin can view the last login details of the contact by opening it in the “Edit” Mode.On the contact details page you will get the “Last Login Date” field.
Generate Mass Credentials
Generate portal credentials for already created CRM contacts. Convert these contacts to portal users from salesforce in a single click. An email will be sent to these users with their Portal credentials.
Please follow the below steps to generate ‘Mass Credentials’ for Salesforce Classic & Lightning modes.
Salesforce Classic
To generate mass credentials, navigate to Contacts. Select contacts and click on “Mass Generate Portal Credentials”.
Note:
-> If you are unable to see the “Mass Generate Portal Credentials” list button, then navigate to Set up -> Object manager -> Contact object -> Search layout -> List view > Drag and drop Mass Generate Portal Credentials to selected button from available button.
-> You will get the “Mass Credentials” option only if no filter is applied and the “All Contacts” view is there.
Salesforce Lightning
To generate mass credentials, navigate to contacts from App Launcher.
Select Contacts and click on “Mass Generate Portal Credentials”.
Note:
-> If you are unable to see the “Mass Generate Portal Credentials” list button, then navigate to Set up -> Object manager -> Contact object -> Search layout -> List view > Drag and drop Mass Generate Portal Credentials to selected button from available button.
-> You will get the “Mass Credentials” option only if no filter is applied and the “All Contacts” view is there.
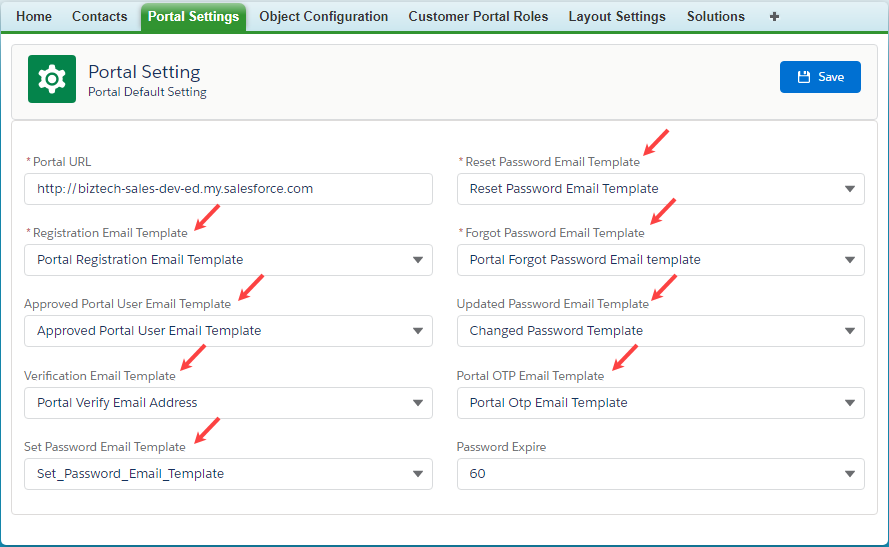
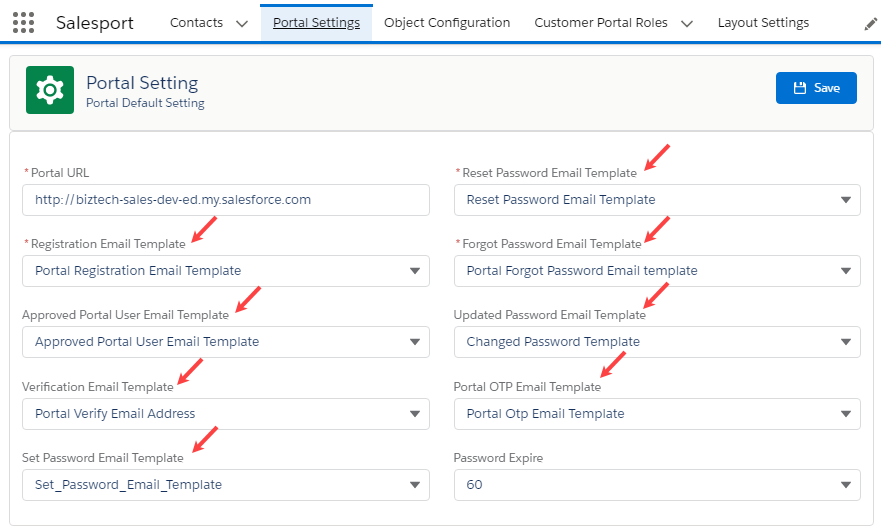
Assign Email Template
When Mass Credentials are generated, the user is registered from the portal or requested for forgot password, then an email will be sent to the portal user with their credentials, for that admin require to set an email template.
Please follow the below steps to ‘Assign Email Templates’ for Salesforce Classic & Lightning modes.
Portal Layout Settings
To avail Salesforce modules into your WordPress portal, it is mandatory to set Portal Layouts for each accessible module. Customer Portal plug-in provides the facility to set Portal Layouts for any module from Salesforce.
Please follow the below steps to setup ‘Portal Layout’ for Salesforce Classic & Lightning modes.
Salesforce Classic
For layout settings, click on ‘All Tabs’ icon and you will be redirected to the All Tabs screen. Now click on ‘Layout Settings’.
By clicking on the ‘Layout Settings’ link you will be redirected to the Layout Settings screen.
OR
Click on the ‘App Menu’ icon and App Menu screen will open. Select the “SalesPort app” from the app menu.
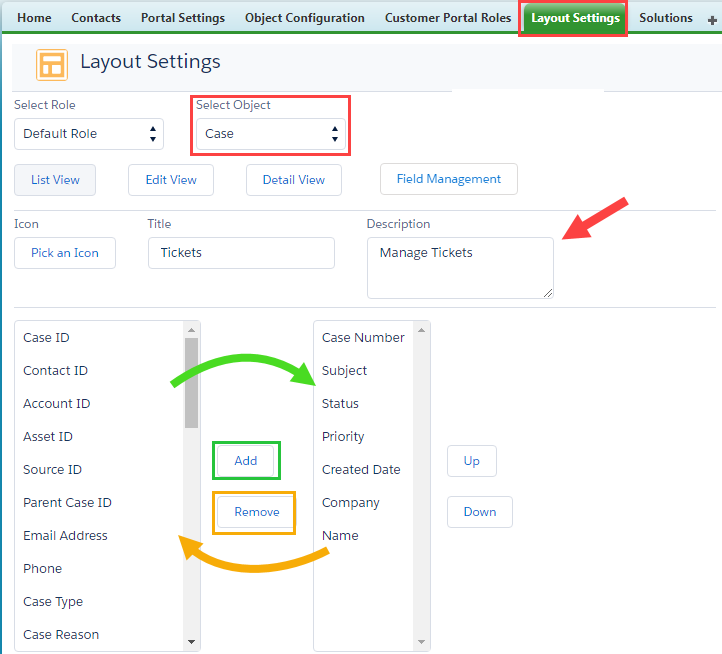
Now, by clicking on the ‘Layout Settings’, you will navigate to the Layout Settings From here, you can set the portal layout of the object as per user role selection and configure the Fields from the Field Management.
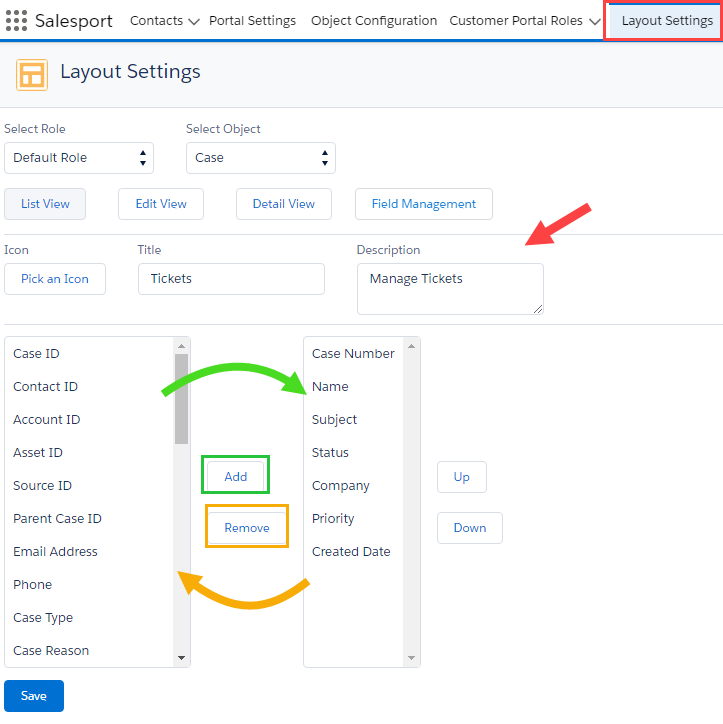
Set Object’s layouts for List view, Edit view, and Detail view. Select the fields from the left column (Available Fields) and click on the right arrow >.
To remove the selected fields from the Selected fields column, select the field and click on the left arrow <.
You can rearrange the order of fields by clicking on ‘Up’ and ‘Down’ Select the fields that you want to rearrange and then click on the ‘Up’ or ‘Down’ icon as you want to rearrange.
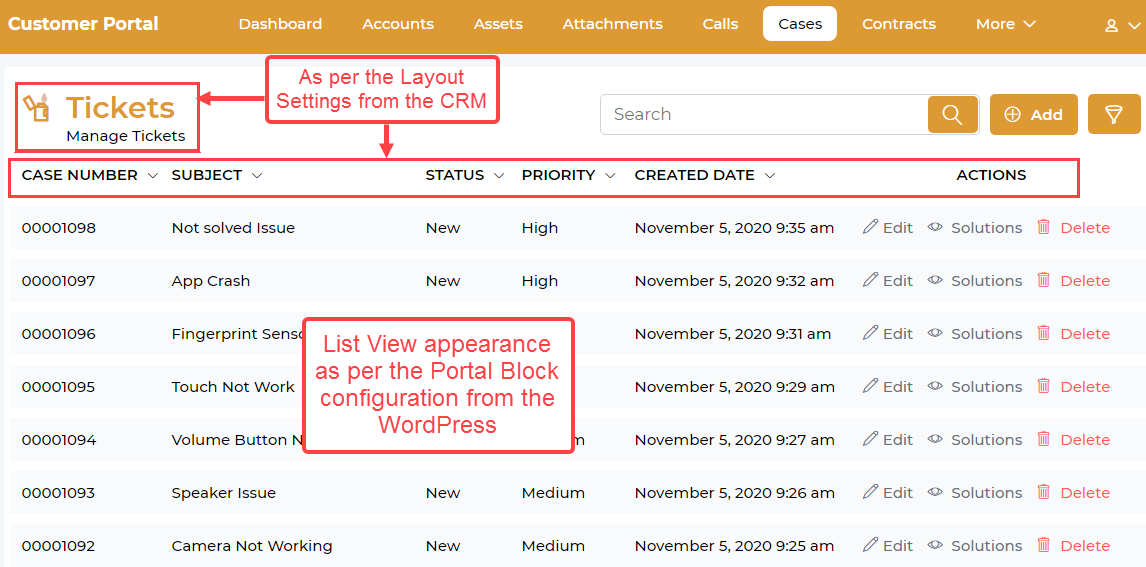
You can insert the Title, Description, and relevant Icon for ListView, Edit View, and Detail View individually that will display in the customer portal.
From the Field Management, you can manage the Field’s validations, configure the Field’s value selection, and configure the Picklist & Multi-picklist.
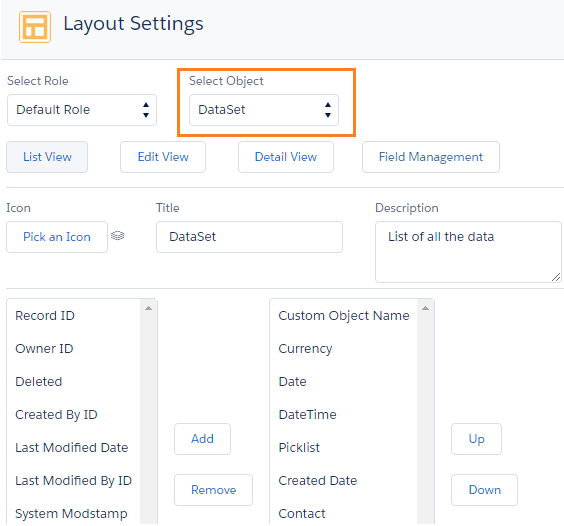
You can set the Layout for the custom object as well.
Note: You cannot set the layout for the Attachment and Call module.
Sync fields from active page layout:
Sync fields from active page layout will allow the user to copy fields from default salesforce record page layout to portal module layout.
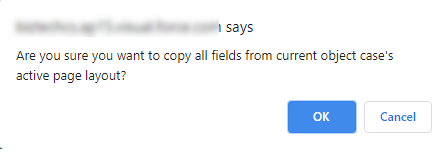
By selecting this option, a popup will appear to confirm the sync of the fields from the active page layout.
By clicking on the OK button, it will load fields to the Selected fields list in the dropdown.
This will be helpful for users who want to provide the same fields to portal end the same as salesforce module record page fields.
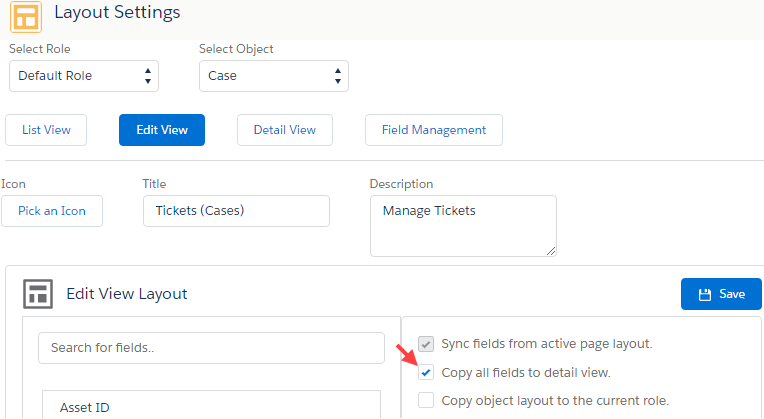
Copy all fields to detail view:
By ticking the “Copy all fields to detail view” option, all the fields that are selected for the “Edit View”, same fields will be copied and selected for the “Detail View”.
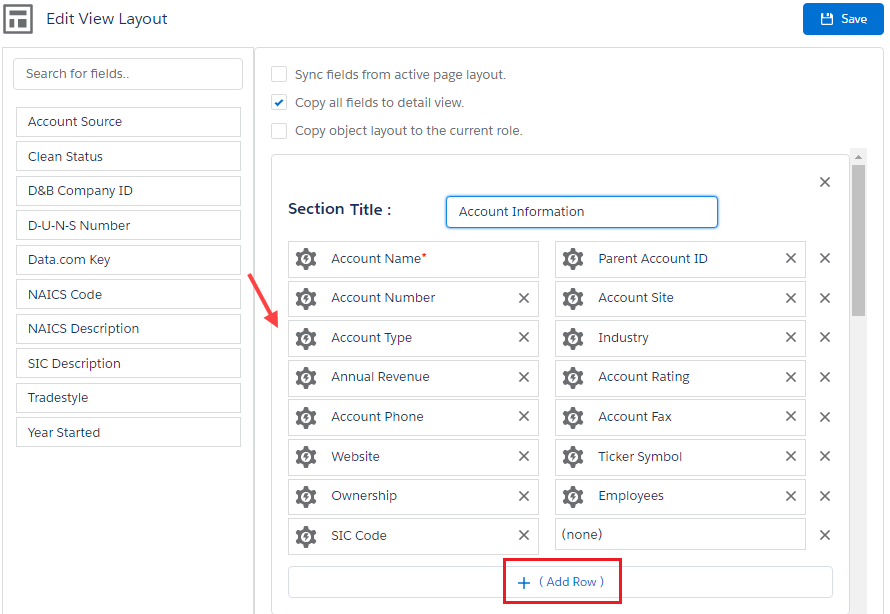
Edit/Detail subpanel section-wise
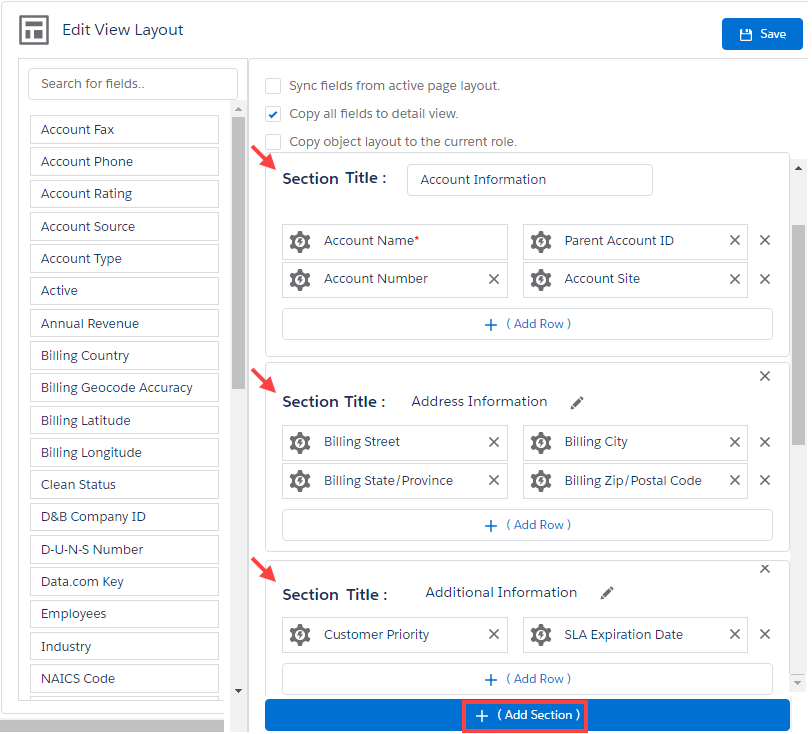
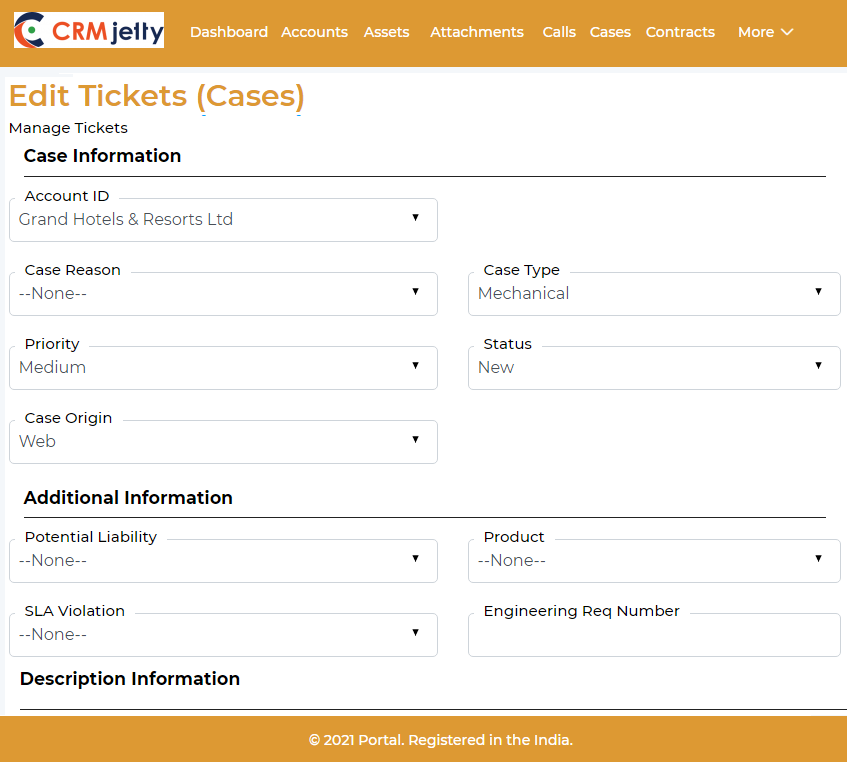
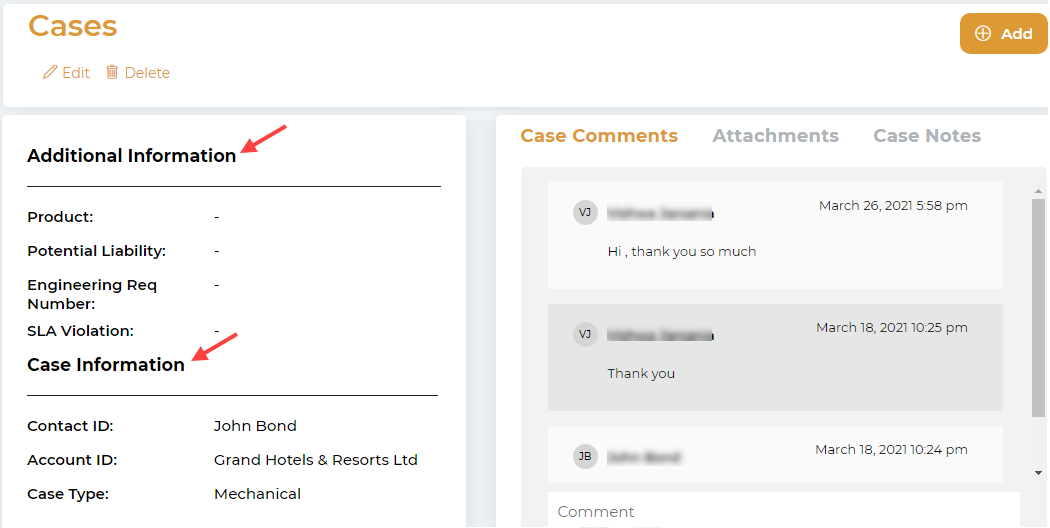
Salesforce admin can manage the page layout by separating the section and add the relevant fields to divide the information in the customer portal.
You can configure the sections that you want to display the details in the customer portal to the users. Insert the ‘Title’ for the section. i.e., Account Information, Additional Information, Address Information, etc., and manage a row into the section.
– Row configuration in Section
Under the section, you will get the two columns, here you can drag & drop the fields from the left (list of the Fields) to right in the row under the specific section.
By clicking on + (Add Row) button, you can add a new row into the section and drag & drop the relevant fields as per the section.
You can remove the unwanted fields just by clicking on Cancel ‘X’ icon and remove the row as well.
– Section Configuration
You can manage the page layout section-wise by selecting the fields for the selected object.
By clicking on the section ‘Title’ text, you can edit the title as you want to display it in the customer portal.
Once all the details are added and configure the page layout, click on the Save button.
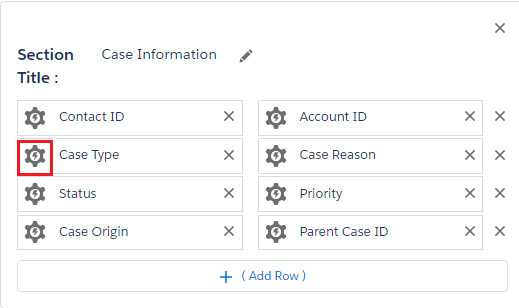
Field Properties
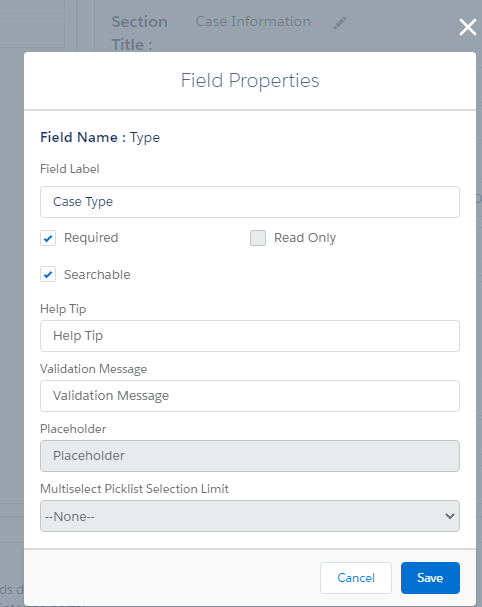
You can also configure the Field properties from the page layout and manage the details of the Field. Besides the Field name, you will find a setting (gear) By clicking on it, you will get a popup named Field Properties on the screen.
You can edit the ‘Field Label’ and configure the field-related details that you can also configure from the “Field Management” section. The Fields will appear as you have set their properties.
So, it will be easy to modify and configure any Field properties from the page layout. Once the Field Properties are configured, click on the Save button.
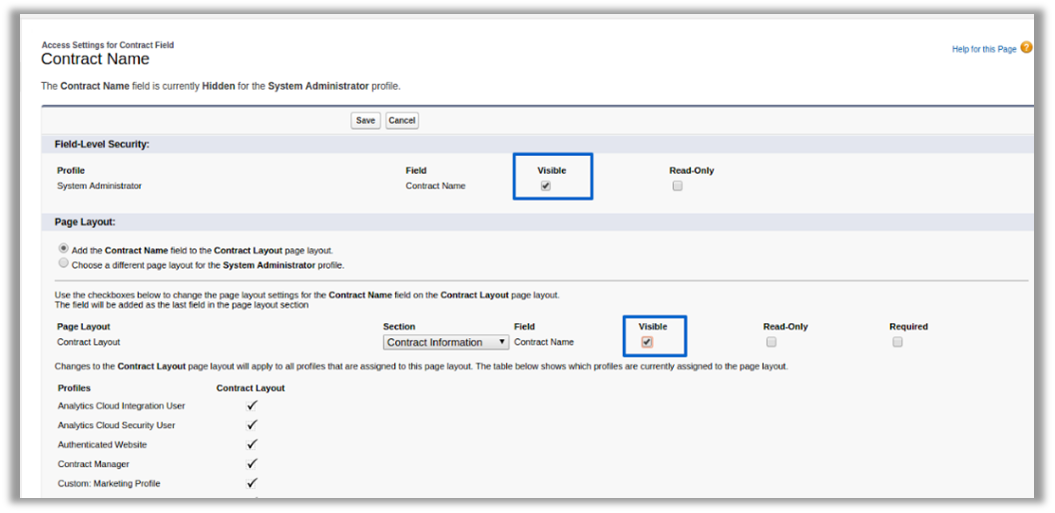
Note: Layout settings page, in selected fields, each field should be accessible or have read-only permission only then it will be visible in front.
To avail of Salesforce modules into your WordPress portal, it is mandatory to set Portal Layouts for each accessible module.
Salesforce Lightning
Customer Portal plug-in provides the facility to set Portal Layouts for any module from Salesforce.
For layout settings, click on the ‘App Launcher’ icon, and the App launcher screen will pop up on the screen. Now click on ‘Layout Settings’ under ‘All Items’
By clicking on the ‘Layout Settings’ link you will be redirected to the Layout Settings screen.
Click on the ‘App Launcher’ icon and search the Salesport. You will navigate to the Salesport dashboard. After clicking on SalesPort, you will be navigated to the SalesPort dashboard.
Now, by clicking on the ‘Layout Settings’, you will navigate to the Layout Settings page. From here you can set the portal layout of the objects as per user role selection.
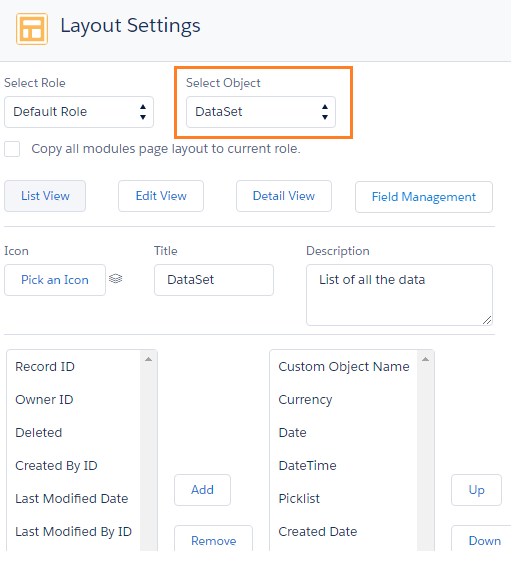
You can select the desired role and module from the ‘Select Roles’ and ‘Select Modules’ dropdown list and set the layout for the selected module.
Set Object’s layouts for List view, Edit view, and Detail view. Select the fields from the left column and click on ‘Add’ After populating the layout, click on the ‘Save’ button to save the layout.
You can rearrange the order of fields by clicking on the ‘Up’ and ‘Down’ icons beside the right column populated with the selected fields.
You can set the Layout for the custom object as well.
Note: You cannot set the layout for the Attachment and Call module.
Sync fields from active page layout:
Sync fields from active page layout will allow the user to copy fields from default salesforce record page layout to portal module layout.
By selecting this option, a popup will appear to confirm the sync of the fields from the active page layout.
By clicking on the OK button, it will load fields to the Selected fields list in the dropdown.
This will be helpful for users who want to provide the same fields to portal end the same as salesforce module record page fields.
Copy all fields to detail view:
By ticking the “Copy all fields to detail view” option, the fields will be selected for the detail view as selected for the edit view.
Edit/Detail subpanel section-wise
Salesforce admin can manage the page layout by separating the section and add the relevant fields to divide the information in the customer portal.
You can configure the sections that you want to display the details in the customer portal to the users. Insert the ‘Title’ for the section. i.e., Account Information, Additional Information, Address Information, etc., and manage a row into the section.
– Row configuration in Section
Under the section, you will get the two columns, here you can drag & drop the fields from the left (list of the Fields) to right in the row under the specific section.
By clicking on + (Add Row) button, you can add a new row into the section and drag & drop the relevant fields as per the section.
You can remove the unwanted fields just by clicking on Cancel ‘X’ icon and remove the row as well.
– Section Configuration
You can manage the page layout section-wise by selecting the fields for the selected object.
By clicking on the section ‘Title’ text, you can edit the title as you want to display it in the customer portal.
Once all the details are added and configure the page layout, click on the Save button.
Field Properties
You can also configure the Field properties from the page layout and manage the details of the Field. Besides the Field name, you will find a setting (gear) By clicking on it, you will get a popup named Field Properties on the screen.
You can edit the ‘Field Label’ and configure the field-related details that you can also configure from the “Field Management” section. The Fields will appear as you have set their properties.
So, it will be easy to modify and configure any Field properties from the page layout. Once the Field Properties are configured, click on the Save button.
You can set the Layout for the custom object as well.
Note: You cannot set layout for the Attachment and Call module.
Sync fields from active page layout:
Sync fields from active page layout will allow the user to copy fields from default salesforce record page layout to portal module layout.
By selecting this option, a popup will appear to confirm the sync of the fields from the active page layout.
By clicking on the OK button, it will load fields to the Selected fields list in the dropdown.
This will be helpful for users who want to provide the same fields to portal end the same as salesforce module record page fields.
Copy all fields to detail view:
By ticking the “Copy all fields to detail view” option, the fields will be selected for the detail view as selected for the edit view.
Edit/Detail subpanel section-wise
Salesforce admin can manage the page layout by separating the section and add the relevant fields to divide the information in the customer portal.
You can configure the sections that you want to display the details in the customer portal to the users. Insert the ‘Title’ for the section. i.e., Account Information, Additional Information, Address Information, etc., and manage a row into the section.
– Row configuration in Section
Under the section, you will get the two columns, here you can drag & drop the fields from the left (list of the Fields) to right in the row under the specific section.
By clicking on + (Add Row) button, you can add a new row into the section and drag & drop the relevant fields as per the section.
You can remove the unwanted fields just by clicking on Cancel ‘X’ icon and remove the row as well.
– Section Configuration
You can manage the page layout section-wise by selecting the fields for the selected object.
By clicking on the section ‘Title’ text, you can edit the title as you want to display it in the customer portal.
Once all the details are added and configure the page layout, click on the Save button.
Field Properties
You can also configure the Field properties from the page layout and manage the details of the Field. Besides the Field name, you will find a setting (gear) By clicking on it, you will get a popup named Field Properties on the screen.
You can edit the ‘Field Label’ and configure the field-related details that you can also configure from the “Field Management” section. The Fields will appear as you have set their properties.
So, it will be easy to modify and configure any Field properties from the page layout. Once the Field Properties are configured, click on the Save button.
Note: Layout settings page, in selected fields, each field should be accessible or have a read-only permission only then it will be visible in front.
Field Management
Under the “Portal Layout Settings”, you will find Field Management to configure the Field of the selected object. You can validate the Fields’ values and set up the condition to visible the Fields in the customer portal.
Salesforce Classic
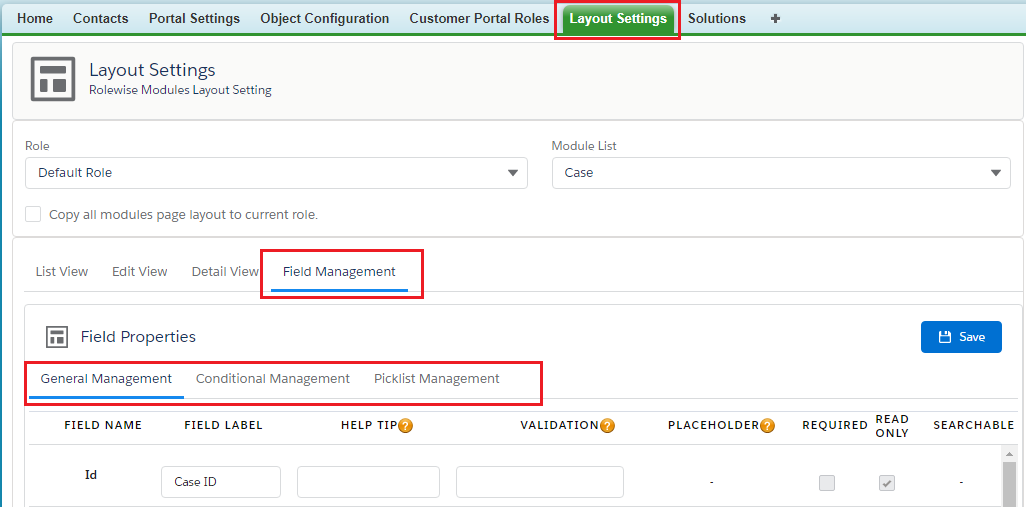
By clicking on Field Management, you can manage and configure the fields of the selected Object.
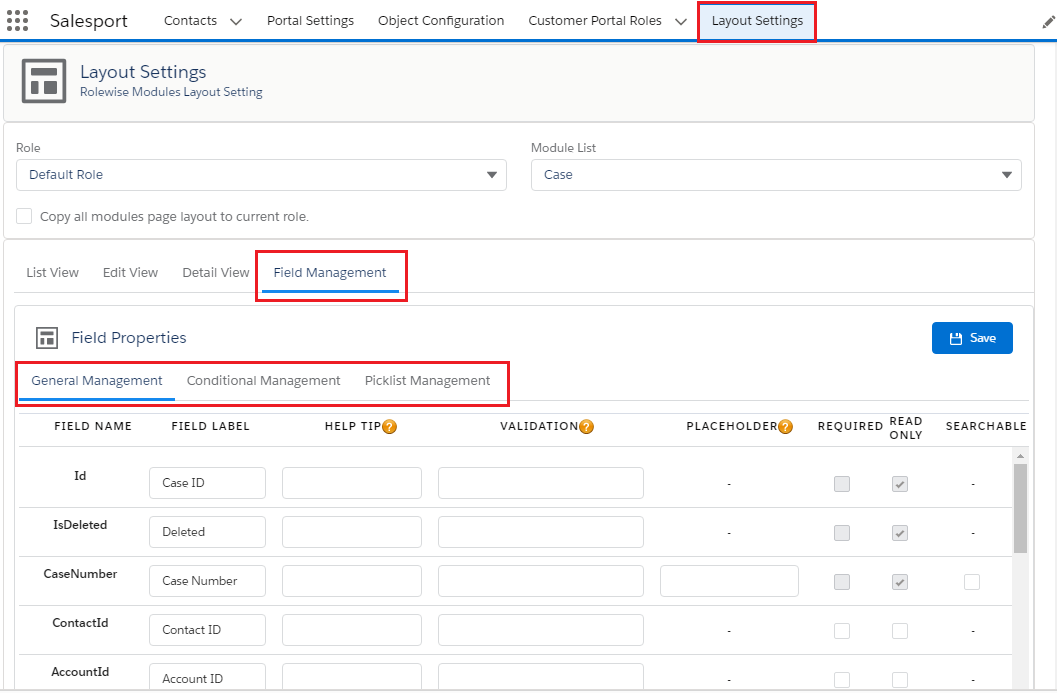
Here you will get three sub-menus under “Field Management Settings”: (Screenshot-1)
– General Management
– Conditional Management
– Picklist Management
– General Management
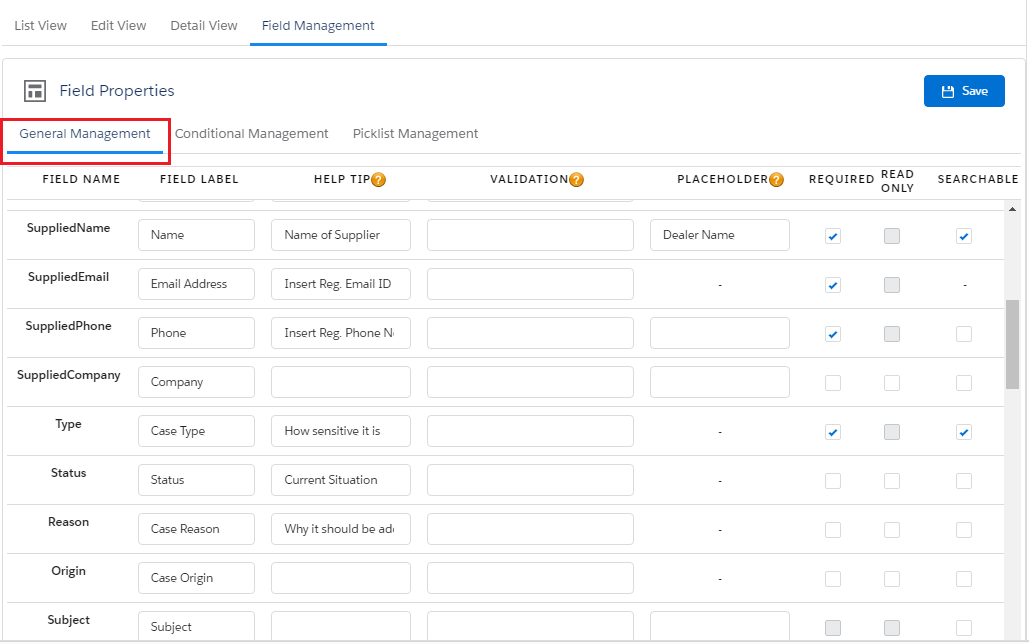
Under the “General Management”, you can manage the Fields related to all the general details and text captions that will be displayed in the customer portal. (Screenshot-2)
– Field Name: You will get the list of the fields as per the selection of the Object under the Portal Layout Settings.
– Field Label: Insert the desired ‘label’ of the field so portal users can easily recognize the fields.
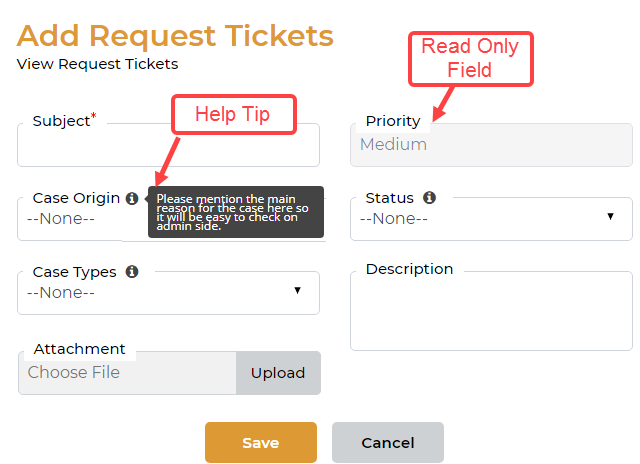
– Help Tip: Insert a short/instructive message regarding the Field.
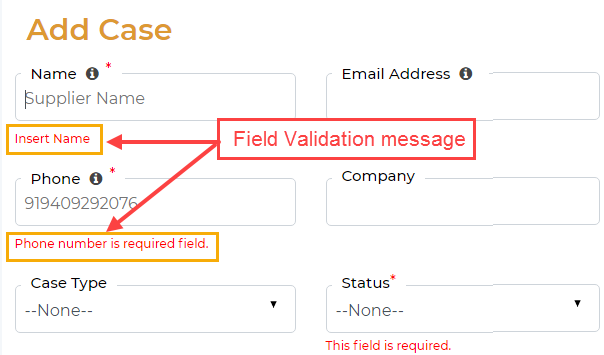
– Validation message: Insert custom validation messages for the Field to give the mandatory instruction.
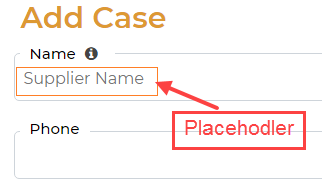
– Placeholder: You can insert a custom Placeholder for any field to display what to insert in the specific field. This placeholder will be applicable only for text fields.
– Required: If any Field is mandatory from the portal side, tick the ‘Required’ option. The portal users will get it as a mandatory field.
– Read Only: If you want to provide a field that should not be editable for the portal user but just want to display there, tick the ‘Read Only’ option.
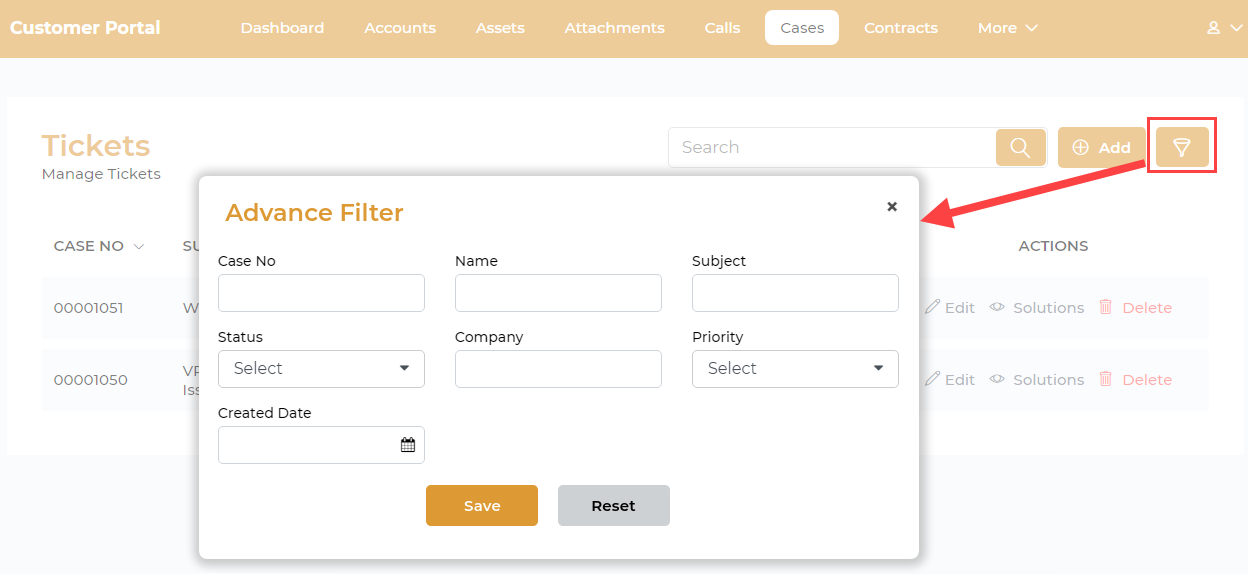
– Searchable: Portal users can filter the records as per the search option. If you want to add the field in the search option in the portal, select that field as ‘Searchable’.
Conditional Management
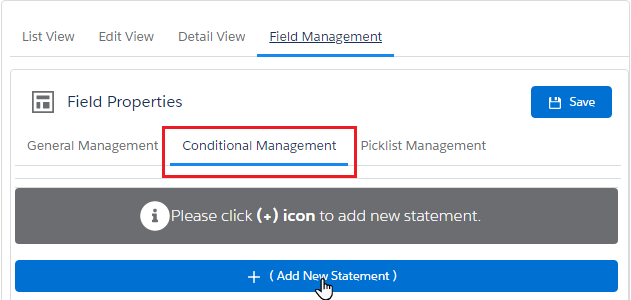
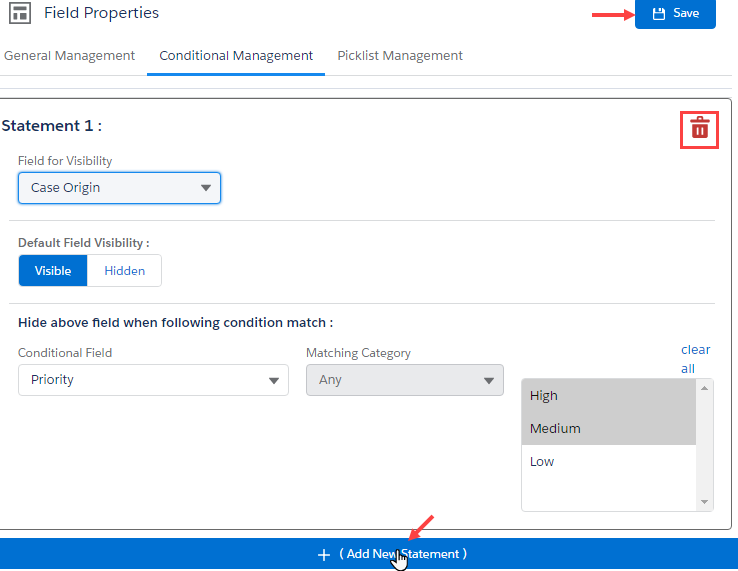
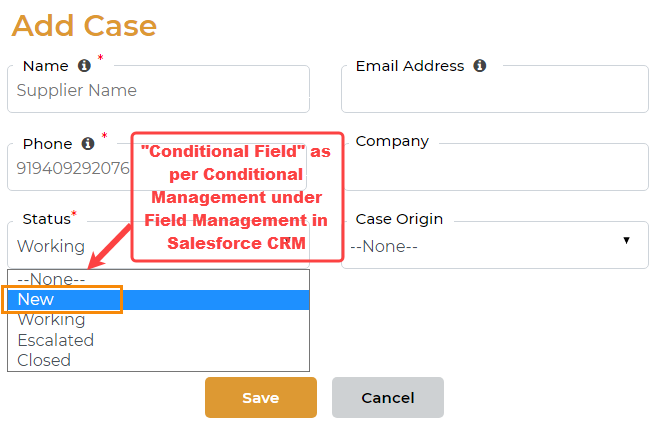
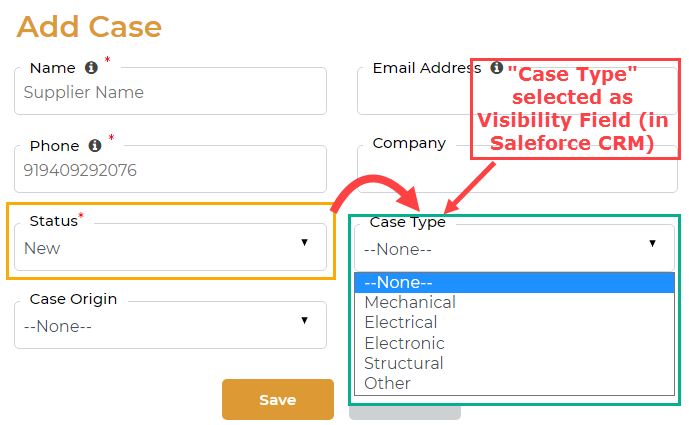
Under the “Conditional Management” for the fields, you can set the condition to make the visibility of the field on the customer portal side. You can configure the Field Visibility and Conditional Field by defining the hide/show for other fields. (Screenshot-3)
Ex. If Field B depends upon Field A and you want to display the “Field B” based on the selection of the ”Field A”, you can define this conditional visibility for the fields under Advance Field Management.
Under the Conditional Management, by clicking on the + (Add New Statement), you can configure the Field Visibility by setting the conditional field’s value. Conditional Field Management will work as follows:
Select Field for visibility:
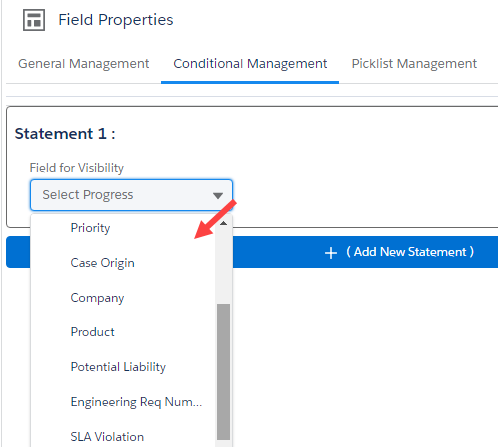
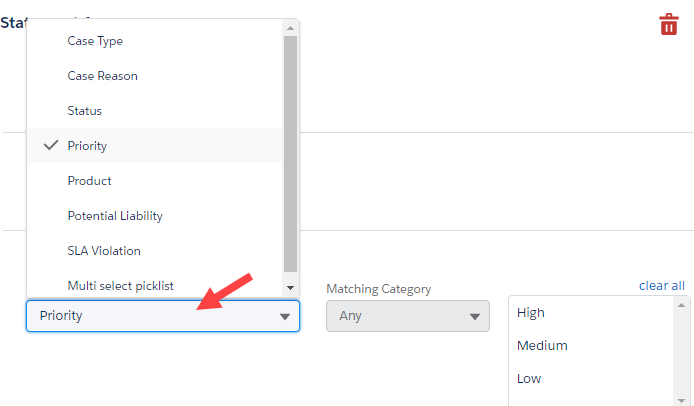
You must select the field for visibility to perform and manage the other conditional field. You will get the fields in the visibility list as per the selection of the Object. (Screenshot-4)
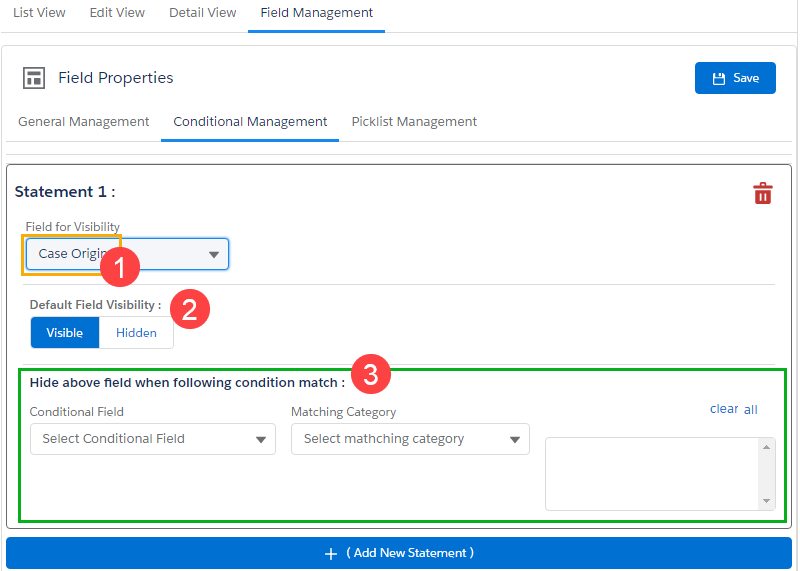
1. The Field for that you want to set the visibility in the customer portal. Either ‘Visible’ or ‘Hide’. (Screenshot-5)
2.Select Default Visibility: (Screenshot-5)
You need to select the ‘default visibility’ for that field. Define what activity (visible/hide) you want to perform when the customer selects the visibility field.
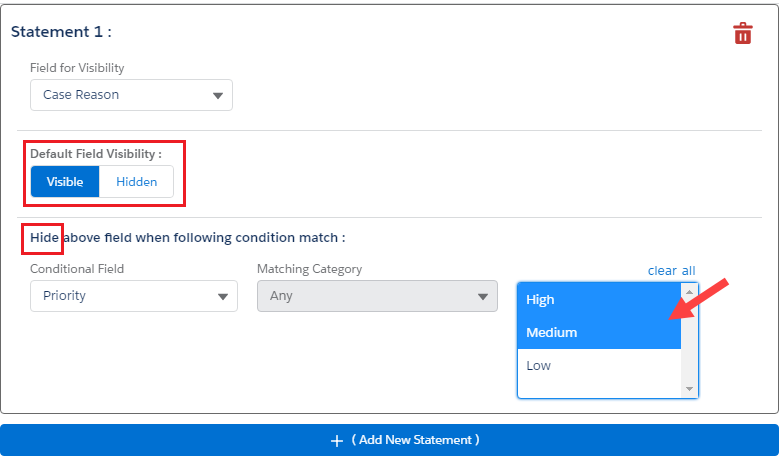
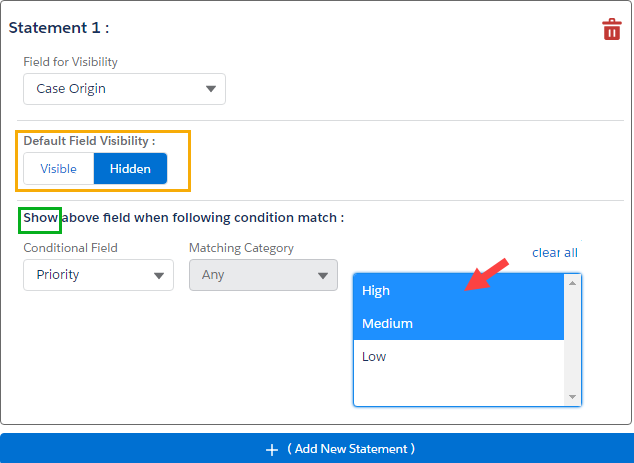
i.e., If you select the visible here, the selected field is visible to the customer in the customer portal. But, If you have selected hidden here, by default the selected field will be hidden.
3.Condition match: (Screenshot-5)
You can define the hide/show for the selected field as per the ‘conditional field’. Based on the Conditional Field, the default field visibility will change.
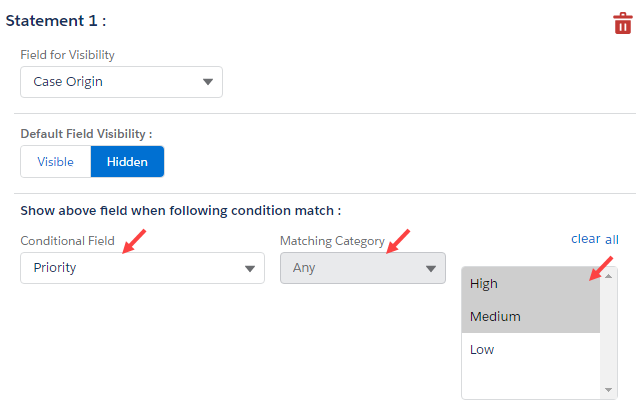
Conditional Field: Select the Field on which you want to perform the field visibility (hide/show). (Screenshot-6)
Case-1 When the “Default Field Visibility” is selected as Visible, if the “Conditional Field” is matched, the default field visibility will be changed to “hidden” and the selected Field will be hidden in the portal. In this case, if the portal user selects the Field which is the “Conditional Field”, the selected field for visibility will be hidden from the portal page. (Screenshot-7)
Case-2 But when the “Default Field Visibility” is selected as Hidden, if the “Conditional Field” is matched, the default field visibility will be changed to “visible”, and the selected Field will be displayed in the portal. In this case, if the portal user selects the Field that is the “Conditional Field”, the selected Field for visibility will be displayed from the portal page. (Screenshot-8)
Multi-Select Matching Category: You can select the condition to match from here. (Screenshot-9)
If you want to set the condition to match any of the values, select the “Any” option. e., OR condition.
If you want to match multiple exact options, select the “ALL” option. i.e., AND condition.
Conditional Field Option: Select the values on which the conditions should match.
After configuring the Conditional Management, click on the Save button to apply the changes.
You can add more field visibility conditions by clicking on the + (Add New Statement) button to provide the conditional field visibility for other Fields.
If any Field visibility management is no longer in use, you can remove it by clicking on the ‘delete’ icon. (Screenshot-10)
Picklist Management
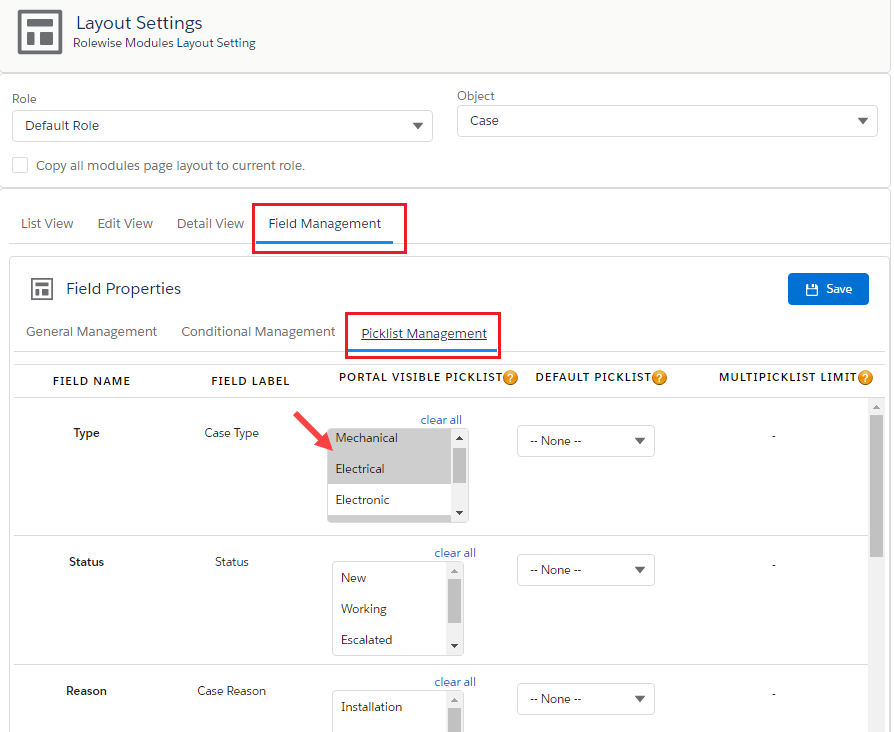
Under the “Picklist Management”, you can manage and configure the Portal Visible Picklist, Default Picklist and Multi-picklist selection for the Fields to provide the picklist options on the portal side.
The Picklist Management is a dynamic picklist selection configuration for the Fields of the selected Object. You can enable the specific Field’s options to allow the customers to select from the customer portal.
Portal Visible Picklist
You will get the picklist options (values) of the Field under the ‘Portal Visible Picklist’ column. You can display the picklist options on the customer portal side by selecting the required options of the Field. (Screenshot-11)
By clicking on clear all options, the selection will be removed. If you have not selected any option from the picklist, all the options will be displayed in the customer portal to the portal users.
Default Picklist
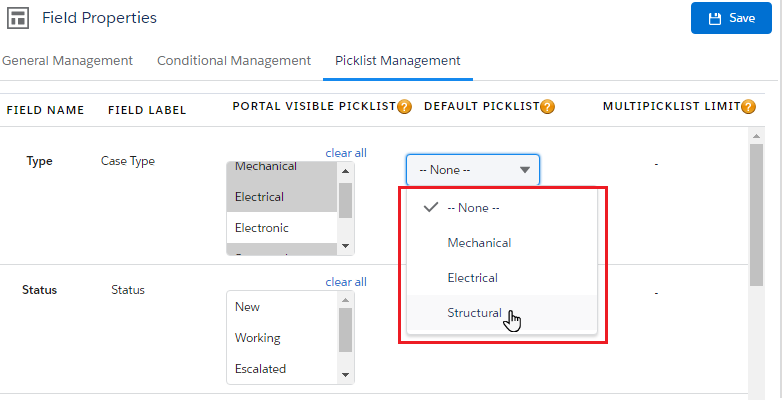
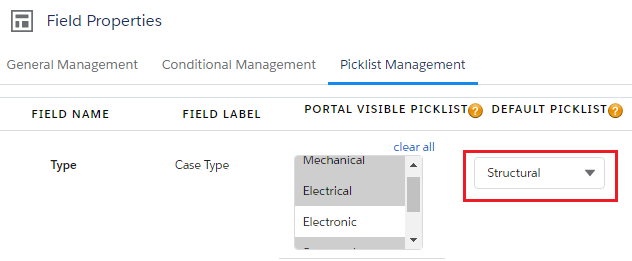
You can select a single picklist option from the dropdown to display by default pre-selected in the customer portal for that Field. You will select only the single picklist option of the Field. (Screenshot-11)
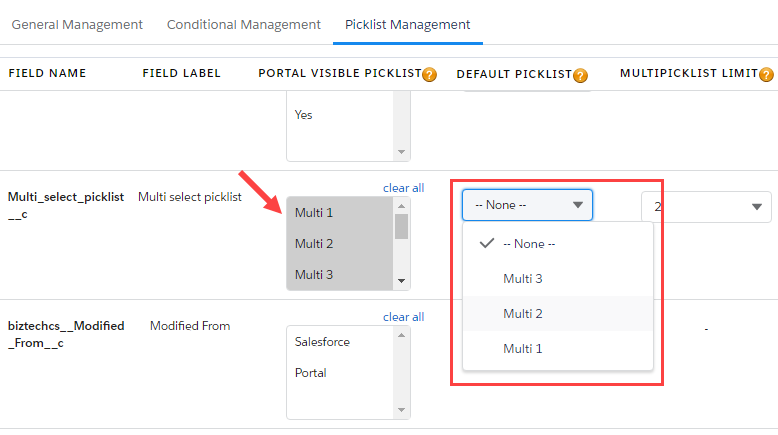
You can also enable only the specific picklist options in the “Portal Visible Picklist”. If you have selected the specific picklist options, you will get only those options in the Default Picklist dropdown list. (Screenshot-12)
If you have not selected any Default Picklist or selected as — None —, the customers will not get any value by default pre-selected on the customer portal side. They need to select the required picklist option of that Field manually. (Screenshot-13)
After configuring the Picklist options, click on the Save button to apply the changes.
Multi Picklist
Some of the CRM Fields have Multi Picklist options that provide multi-selection options to the portal users.
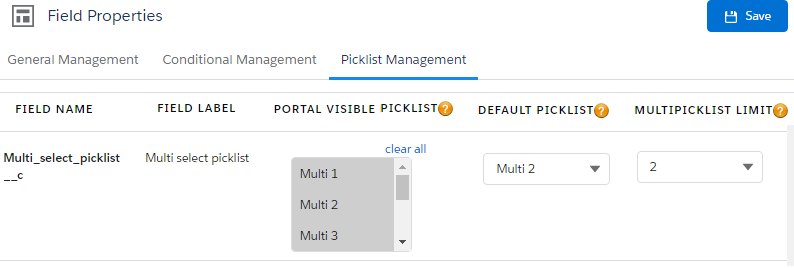
You can also select the picklist options in the Portal Visible Picklist and “Default Picklist”. (Screenshot-14)
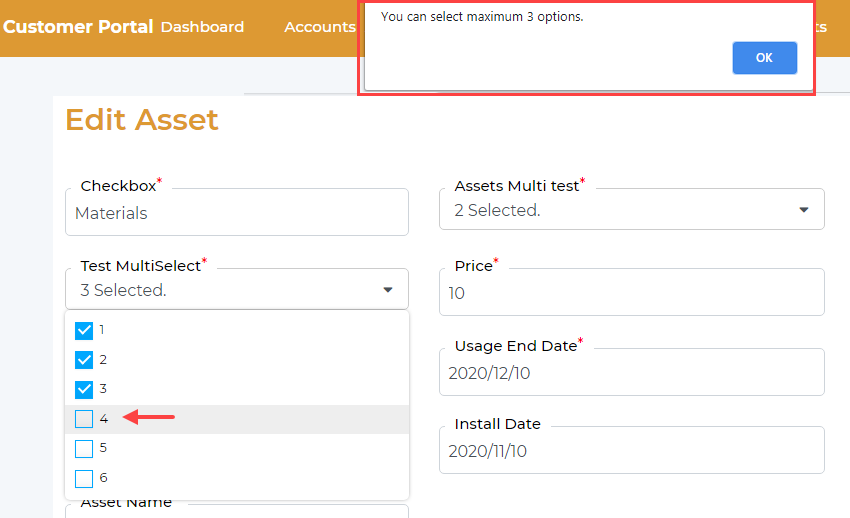
By using ‘Multi Picklist’ selection, you can define the limits of the selection from the Picklist option to allow the customers to select the multiple Fields options for the customer portal. (Screenshot-15)
i.e., If there are 3 options in the picklist but you want to allow a maximum of 2 options out of 3 options, the portal users can select up to 2 options in the portal. The customers cannot select more than 2 picklist options.
You can customize and provide the Multi-Pick list options of the Field as you have configured here. After configuring the Picklist options, click on the Save button to apply the changes. (Screenshot-16)
Salesforce Lightning
By clicking on Field Management, you can manage and configure the fields of the selected Object.
Here you will get three sub-menus under “Field Management Settings”: (Screenshot-1)
– General Management
– Conditional Management
– Picklist Management
– General Management
Under the “General Management”, you can manage the Fields related to all the general details and text captions that will be displayed in the customer portal. (Screenshot-2)
– Field Name: You will get the list of the fields as per the selection of the Object under the Portal Layout Settings.
– Field Label: Insert the desired ‘label’ of the field so portal users can easily recognize the fields.
– Help Tip: Insert a short/instructive message regarding the Field.
– Validation message: Insert custom validation messages for the Field to give the mandatory instruction.
– Placeholder: You can insert a custom Placeholder for any field to display what to insert in the specific field. This placeholder will be applicable only for text fields.
– Required: If any Field is mandatory from the portal side, tick the ‘Required’ option. The portal users will get it as a mandatory field.
– Read Only: If you want to provide a field that should not be editable for the portal user but just want to display there, tick the ‘Read Only’ option.
– Searchable: Portal users can filter the records as per the search option. If you want to add the field in the search option in the portal, select that field as ‘Searchable’.
Conditional Management
Under the “Conditional Management” for the fields, you can set the condition to make the visibility of the field on the customer portal side. You can configure the Field Visibility and Conditional Field by defining the hide/show for other fields. (Screenshot-3)
Ex. If Field B depends upon Field A and you want to display the “Field B” based on the selection of the ”Field A”, you can define this conditional visibility for the fields under Advance Field Management.
Under the Conditional Management, by clicking on the + (Add New Statement), you can configure the Field Visibility by setting the conditional field’s value. Conditional Field Management will work as follows:
Select Field for visibility:
You must select the field for visibility to perform and manage the other conditional field. You will get the fields in the visibility list as per the selection of the Object. (Screenshot-4)
1. The Field for that you want to set the visibility in the customer portal. Either ‘Visible’ or ‘Hide’. (Screenshot-5)
2.Select Default Visibility: (Screenshot-5)
You need to select the ‘default visibility’ for that field. Define what activity (visible/hide) you want to perform when the customer selects the visibility field.
i.e., If you select the visible here, the selected field is visible to the customer in the customer portal. But, If you have selected hidden here, by default the selected field will be hidden.
3.Condition match: (Screenshot-5)
You can define the hide/show for the selected field as per the ‘conditional field’. Based on the Conditional Field, the default field visibility will change.
Conditional Field: Select the Field on which you want to perform the field visibility (hide/show). (Screenshot-6)
Case-1 When the “Default Field Visibility” is selected as Visible, if the “Conditional Field” is matched, the default field visibility will be changed to “hidden” and the selected Field will be hidden in the portal. In this case, if the portal user selects the Field which is the “Conditional Field”, the selected field for visibility will be hidden from the portal page. (Screenshot-7)
Case-2 But when the “Default Field Visibility” is selected as Hidden, if the “Conditional Field” is matched, the default field visibility will be changed to “visible”, and the selected Field will be displayed in the portal. In this case, if the portal user selects the Field that is the “Conditional Field”, the selected Field for visibility will be displayed from the portal page. (Screenshot-8)
Multi-Select Matching Category: You can select the condition to match from here. (Screenshot-9)
If you want to set the condition to match any of the values, select the “Any” option. e., OR condition.
If you want to match multiple exact options, select the “ALL” option. i.e., AND condition.
Conditional Field Option: Select the values on which the conditions should match.
After configuring the Conditional Management, click on the Save button to apply the changes.
You can add more field visibility conditions by clicking on the + (Add New Statement) button to provide the conditional field visibility for other Fields.
If any Field visibility management is no longer in use, you can remove it by clicking on the ‘delete’ icon. (Screenshot-10)
Picklist Management
Under the “Picklist Management”, you can manage and configure the Portal Visible Picklist, Default Picklist and Multi-picklist selection for the Fields to provide the picklist options on the portal side.
The Picklist Management is a dynamic picklist selection configuration for the Fields of the selected Object. You can enable the specific Field’s options to allow the customers to select from the customer portal.
Portal Visible Picklist
You will get the picklist options (values) of the Field under the ‘Portal Visible Picklist’ column. You can display the picklist options on the customer portal side by selecting the required options of the Field.
By clicking on clear all options, the selection will be removed. If you have not selected any option from the picklist, all the options will be displayed in the customer portal to the portal users.
Default Picklist
You can select a single picklist option from the dropdown to display by default pre-selected in the customer portal for that Field. You will select only the single picklist option of the Field. (Screenshot-11)
You can also enable only the specific picklist options in the “Portal Visible Picklist”. If you have selected the specific picklist options, you will get only those options in the Default Picklist dropdown list. (Screenshot-12)
If you have not selected any Default Picklist or selected as — None —, the customers will not get any value by default pre-selected on the customer portal side. They need to select the required picklist option of that Field manually. (Screenshot-13)
After configuring the Picklist options, click on the Save button to apply the changes.
Multi Picklist
Some of the CRM Fields have Multi Picklist options that provide multi-selection options to the portal users.
You can also select the picklist options in the Portal Visible Picklist and “Default Picklist”. (Screenshot-14)
By using ‘Multi Picklist’ selection, you can define the limits of the selection from the Picklist option to allow the customers to select the multiple Fields options for the customer portal. (Screenshot-15)
i.e., If there are 3 options in the picklist but you want to allow a maximum of 2 options out of 3 options, the portal users can select up to 2 options in the portal. The customers cannot select more than 2 picklist options.
You can customize and provide the Multi-Picklist options of the Field as you have configured here. After configuring the Picklist options, click on the Save button to apply the changes. (Screenshot-16)
Approval and Verification for Portal Users
If you want to provide access to the portal only to people/customers who are approved by admin, then navigate to WordPress Admin Panel -> Customer Portal Settings page.
Tick the checkbox next to User Approval flow to enable the approval process flow for customer registration.
Now, whenever a portal user registers from the portal, they will be added to the Contacts module in CRM with pending status.
You can apply an advance filter on the contact’s list view and get the list of Unapproved Portal Users.
To approve pending contacts, select contacts from the filtered contacts list view and click on the action’s dropdown.
Now select the ‘Approve Portal User’ option from button list actions.
This will convert pending CRM Contacts to portal users and a list of imported contacts will be displayed.
If verification flow is enabled, the user will need to verify their account then only they can proceed further for login.
You can also select an email template for approval and email verification emails.
After this approval process, it will also send an email to portal users notifying that they are approved and can access the portal.
Note: Once the contact is approved, you cannot change the approval status of that contact.
Instead of mass contacts approval, you can also navigate to the detailed view of any contacts and approve them by changing the approval status from the portal user information tab.
If verification flow is enabled, the user will need to verify their account then only they can proceed further for login.
You can also select an email template for approval and email verification emails.
Navigate to SalesPort app, from top right corner app dropdown menu -> portal settings tab and you can select approval template and email verification template.
Email Notification
Email notification workflows are directly set when the SalesPort package is installed, so portal user and admin will receive a mail notification when any of the following activities are performed.
-> Case Created From salesforce: If the case is created from salesforce, it will send an email with basic case details.
-> Case Created From portal: If the case is created from the portal, it will send an email with basic case details.
-> Case status changed from salesforce: If any status of the case is changed from salesforce, it will send an email with basic case details.
-> Case status changed from portal: If any status of the case is changed from the portal, it will send an email with basic case details.
-> Case Comment added from portal: If any case comment is added from the portal, it will send an email with case comment and basic case details.
-> Case Comment added from salesforce: If any case comment is added from salesforce, it will send an email with case comment and basic case details.
-> Order Created: If an order is created, it will send an email with basic order details.
Admin can also change the email template. Navigate to App Launcher -> SalesPort -> Portal Settings tab.
Select the appropriate template and click on “Save”.
Admin can also de-activate email notification.
For De-activating email notification navigate to Setup and search ‘Workflow Rules’ in the search bar.
Click on the ‘Deactivate’ option, to deactivate email notification.
Note: By default, all workflow will be activated when the package is installed.
Enable fields for Approval Status and Email Verification Button
To enable ‘Approval Status’ and ‘Is verify’ field in layout for email verification, go to Setup -> Object Manager Tab -> Contact -> Page Layout -> Contact Layout.
Now drag and drop “Is Verify” and “Approval Status” to contact layout and save it.
Other Configurations
Configure the Objects in the Salesforce to integrate with Customer Portal from the Object Manager.
Salesforce Classic
From setup page navigate to Build -> Customize -> Contacts -> Page Layouts.
By clicking on the ‘Page Layouts’ link, you will be redirected to the Contact Page Layout page.
Now click on the ‘Edit’ button beside ‘Contact Layout’ to edit that layout.
On clicking the ‘Edit’ button, you will be redirected to the Edit View of the Contact Layout.
Now drag the ‘Username, Password, Customer Portal Role and Enable Portal Checkbox’ field to the Contact Detail section and click on the ‘Save’ button to save the changes.
Salesforce Lightning
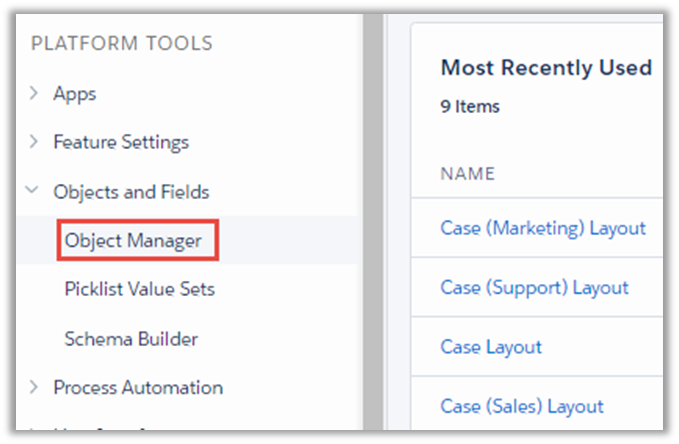
From setup page navigate to Objects & Fields -> Object Manager.
On clicking ‘Object Manager’ you will be redirected to the Object Manager screen.
Select ‘Contact’.
By clicking on the ‘Contact’ module, you will be navigated to the Contact details page.
Click on ‘Page Layouts’ to manage the contact page layout.
On clicking ‘Page Layout’, you will be presented with the Page Layouts page. Click on ‘Contact Layout’ to edit the layout.
By clicking on the ‘Contact Layout’ link, you will be redirected to the Edit view of the Contact Layout.
Salesforce Classic
From setup page navigate to Build -> Customize -> Contracts -> Page Layouts.
By clicking on the ‘Page Layouts’ link you will be redirected to the Contract Page Layout page.
Now click on the ‘Edit’ button beside ‘Contract Layout’ to edit that layout.
Drag the ‘Related Contact’ field to the Contract Detail section and click on the ‘Save’ button to save the changes.
Salesforce Lightning
To set the contract layout, click on the ‘Setup’ button and you will be redirected to the Setup page.
From setup page navigate to Objects & Fields -> Object Manager.
On clicking ‘Object Manager’ you will be redirected to the Object Manager screen.
Now Select ‘Contract’.
By clicking on the ‘Contract’ module, you will be navigated to the Contract details page. Click on ‘Page Layouts’ to manage the contract page layout.
By clicking on the ‘Contract Layout’ link you will be redirected to the Edit view of the Contract Layout.
Now drag the ‘Related Contact’ field to the Contract Detail section and click on the ‘Save’ button to save the changes.
Salesforce Classic
To set the order layout, click on the ‘Setup’ button and you will be redirected to the Setup page.
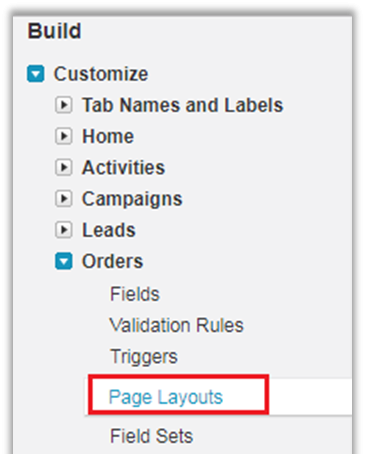
From setup page, navigate to Build -> Customize -> Order -> Page Layouts.
By clicking on the ‘Page Layouts’ link, you will be redirected to the Order Page Layout page.
Now click on the ‘Edit’ button beside ‘Order Layout’ to edit that layout.
Now drag the ‘Related Contact’ field to the Order Detail section and click on the ‘Save’ button to save the changes.
Salesforce Lightning
From setup page navigate to Objects & Fields -> Object Manager.
On clicking ‘Object Manager’ you will be redirected to the Object Manager screen.
By clicking on the ‘Order’ module, you will be navigated to the Order details page. Click on ‘Page Layouts’ to manage the order page layout.
On clicking ‘Page Layout’, you will be presented with the Page Layouts page. Click on ‘Orders Layout’ to edit the layout.
By clicking on the ‘Order Layout’ link, you will be redirected to the Edit view of the Order Layout.
Now drag the ‘Related Contact’ field to the Order Detail section and click on the ‘Save’ button to save the changes.
WordPress Plug-in & Page Builder Configuration
Login to WordPress admin to configure the Customer Portal Settings by authenticating with the SalesforceCRM.
Customer Portal Settings
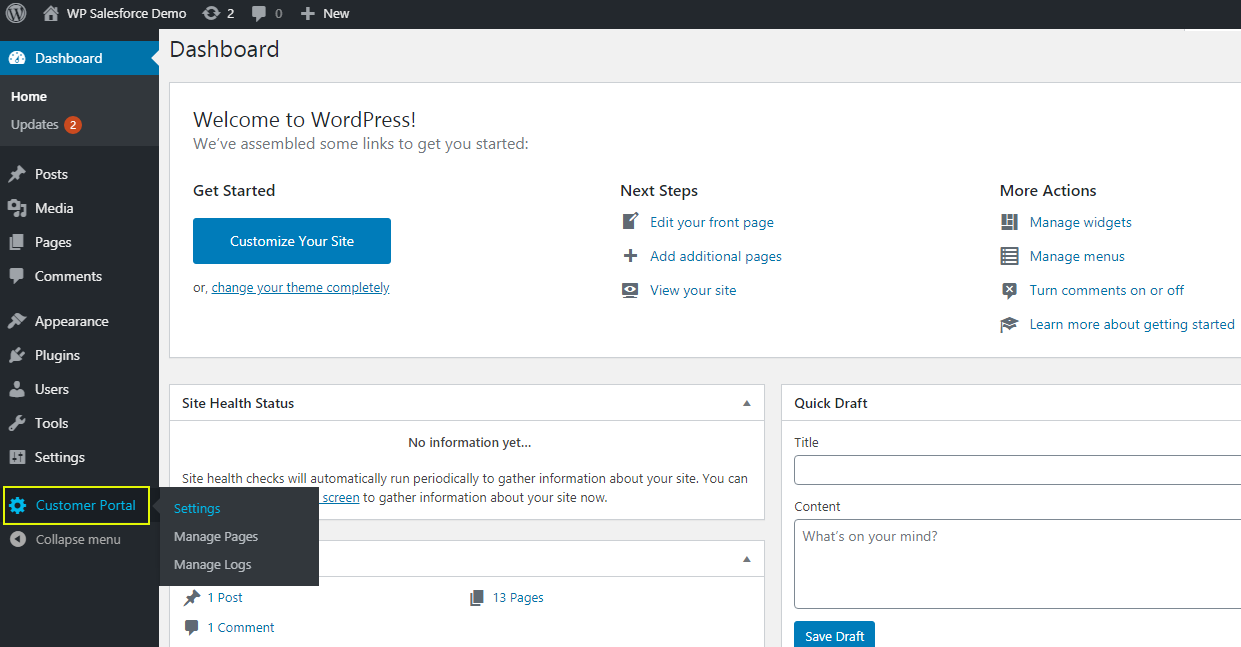
Once you have installed the Salesforce Customer Portal plug-in, navigate to the ‘Customer Portal’ menu and click on ‘Setting’ to configure the Salesforce Customer Portal setting.
You can navigate to the ‘Manage Pages’ from here and you can manage the ‘Menu locations’ to display in the portal.
License & Authentication
– License:
To add the license key, navigate to the ‘License’ section in the Salesforce Customer Portal Settings page, and enter the license key in the ‘License Key’ field.
– Authentication Methods: user needs to select the method available from OAuth 2.0 Username-Password Flow and OAuth 2.0 JWT Bearer Flow.
To authenticate your Salesforce Customer Portal, fill up the following fields based on the authentication method:
OAuth 2.0 Username-Password Flow
– Consumer Key: Enter Connected App consumer’s key.
– Consumer Secret: Enter Connected App consumer’s secret key.
– Username: Enter the Username for Salesforce account.
– Password: Enter the Password for Salesforce account.
– Security Token: Enter the Security Token for Salesforce account.
– Operation Mode: Select operation mode as sandbox or live.
– OAuth 2.0 JWT Bearer Flow
– Consumer Key: Enter Connected App consumer’s key.
– Username: Enter the Username for Salesforce account.
– Private Key: Enter the Private Key for the Salesforce account.
– Public Key: Enter the Public Key for the Salesforce account.
– Operation Mode: Select operation mode as sandbox or live.
Notes:
If you already have a Security Token enter it or else reset your Security Token.
How to reset Security Token?
-> To Reset your Security Token, navigate to your personal settings, enter Reset in the Quick Find box, then select Reset My Security Token.
-> Click Reset Security Token. The new security token will be sent to the email address in your Salesforce personal settings.
-> For More Reference visit this link.
To generate the private & public key follow the below link:
https://docs.crmjetty.com/knowledgebase/how-to-generate-private-public-key-for-authentication/
General Settings
Navigate to the General tab by clicking on Customer Portal à Here you will find some of the options for “Salesforce Customer Portal”:
-> Name: Insert the relevant name of the Portal.
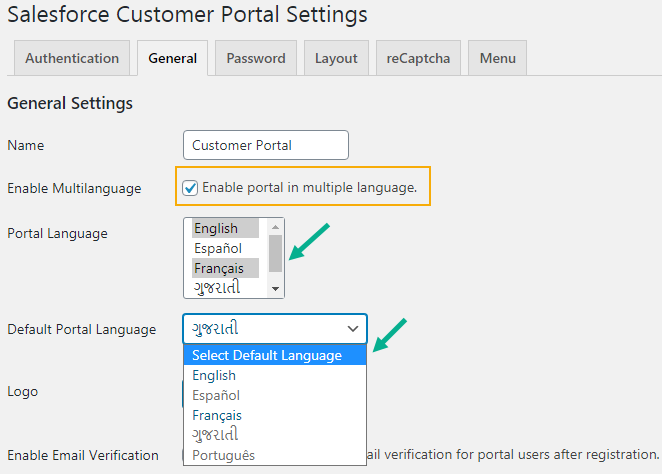
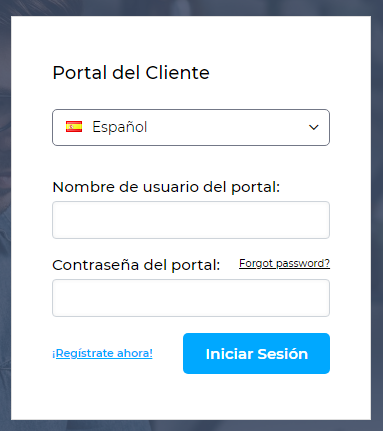
-> Enable Multilanguage: Enable Portal in multilanguage.
-> Portal Language: Select the active language(s) to display to the portal users.
-> Default Portal Language: Select the default language for the portal to display when the users access the login page.
Note: Portal Multi-language supports explained individually.
-> Logo: Select the logo image from the local drive.
-> Enable Registration: Select the checkbox to enable registration for portal users.
-> Enable Email Verification: If enabled, users need to verify their email addresses before using the portal.
-> Enable User Approval: This will enable user approval flow from CRM. registered users will not be able to use the portal until you approve the same from CRM.
-> Two-Step Authentication: If enabled it will allow users to access the interface only after adding valid OTP (received in email).
-> Mobile Menu Title: Add a title for the mobile menu of your portal.
-> Custom CSS: Insert the CSS code if any.
-> Standalone Footer Text: This will display in the footer in the standalone template.
Layout Settings
There are two types of templates provided: “Default Template” and “Standalone Template”.
-> Default Template: It is the default page template that includes the WordPress header, WordPress footer, and WordPress content area.
-> CRM Standalone Template: It is the page template with a custom header, portal custom footer, and content part.
Note: When the plugin is activated then portal pages are set as the “Standalone Template” by default.
-> Theme Color: Please select the color using a color picker tool to set the color in the Customer portal.
reCaptcha Settings
The reCaptcha protects your website/web portal against spam and other types of automated abuse.
– reCaptcha Site Key (public key): It is used to render the reCAPTCHA within a page.
– reCaptcha Secret Key (Private key): It is used for performing server-side validation.
Note: You can get the reCaptcha Site key & Secret key from here.
Menu Settings
You will get the Customer Portal Menu to display the menu when the user login into the customer portal. You can change the following settings for the Menu:
-> Menu Location: Select the menu location from the dropdown list which are available in the Theme. The original menu will be updated with the portal menu.
-> Menu Selection: Select the custom portal menu name which you have created from the WordPress menu section. (Appearances→ Menus).
Layout Sync
When the plugin authenticates successfully with CRM, then by default, all layouts of an accessible object will be synced to the WordPress side.
You can also sync specific object layouts. This feature will reduce the heavy load on the sync process when there is a long data of object in CRM.
So, if you have updated only the “Case” layout in the CRM side, then you can sync only the “Case” object in WordPress by selecting the Case object from the checkbox.
Manage Menus
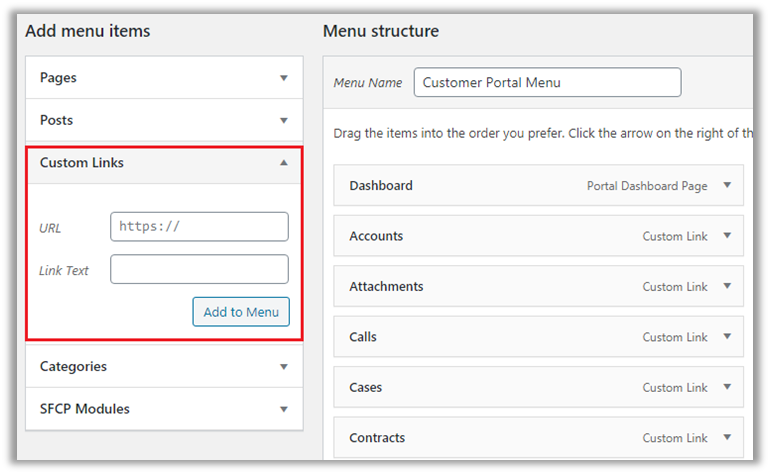
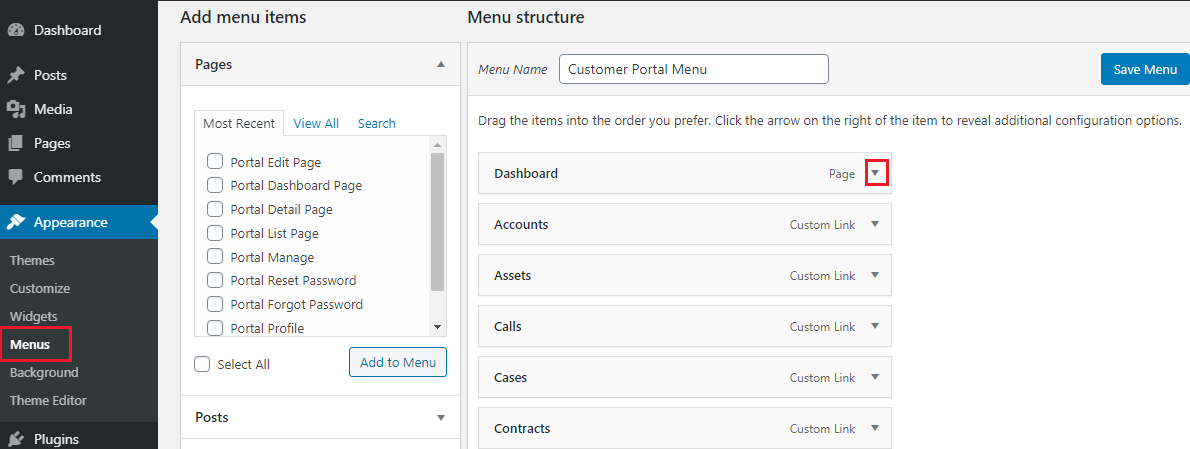
Navigate to Appearances → Menus to manage the navigation of menus and order of menu as you prefer.
Select the Pages you want to add to the Menu under the Menu structure.
You can also add the Custom Link to the Menu.
Select and add the Salesforce Portal modules/submodules for the customer portal option. Select the modules and by clicking on the Add to Menu button the selected modules will be added on the right side under the Menu structure.
Under the Menu structure, you can manage the menu & its submenu by dragging up-down any menu to change the order of the inserted menu.
From here, you will get the Custom Object, if you have enabled from the CRM.
After changes, click on the Save Menu button to save all the Menu item changes.
If Product is enabled for any object like Order and Opportunity, then you can add the Product object on the portal side.
Note: if any new object is enabled/disable from the CRM side, you can add to the menu manually.
OR
Follow these steps:
1. Delete the whole customer portal menu.
2. Navigate to the Customer Portal settings, Just click the Save Changes
3. New Customer portal menu will be created in the Menu tab.
4. Navigate to Customer Portal Settings > Menu.
5. Select the Menu (Customer Portal Menu) and Menu Location and Save the changes.
- After managing the menu, click on the Save Menu button. Now you can reorder the menu as per your requirement.
After managing the menu, click on the Save Menu button.
..WordPress Page Builder
Once you have inserted the license key and successfully done the authentication on the Salesforce side, you will get the Gutenberg editor in WordPress that will enable the Page builder blocks to customize the customer portal pages.
Portal Blocks
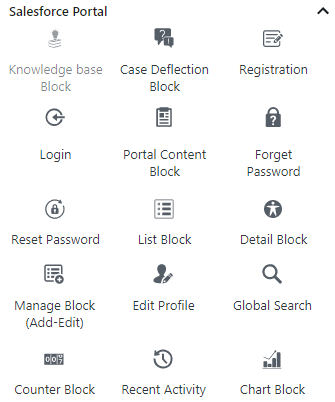
There are major 13-predefined Portal blocks provided particularly for Salesforce Portal:
-> Login
-> Forget Password
-> Reset Password
-> Registration Block
-> Counter Block
-> Chart Block
-> Recent Activity Block
-> List Block
-> Detail Block
-> Manage Block (Add-Edit)
-> Case Deflection
-> Portal Knowledgebase
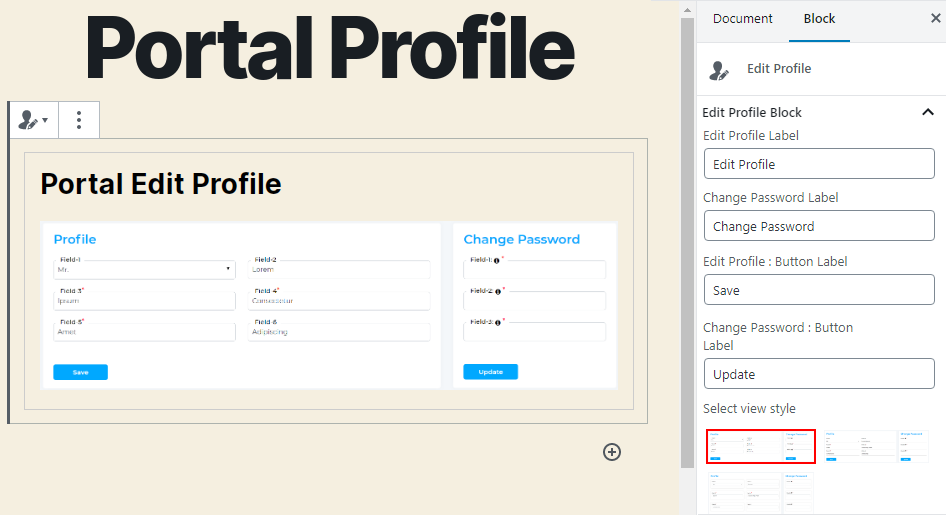
-> Edit Profile Block
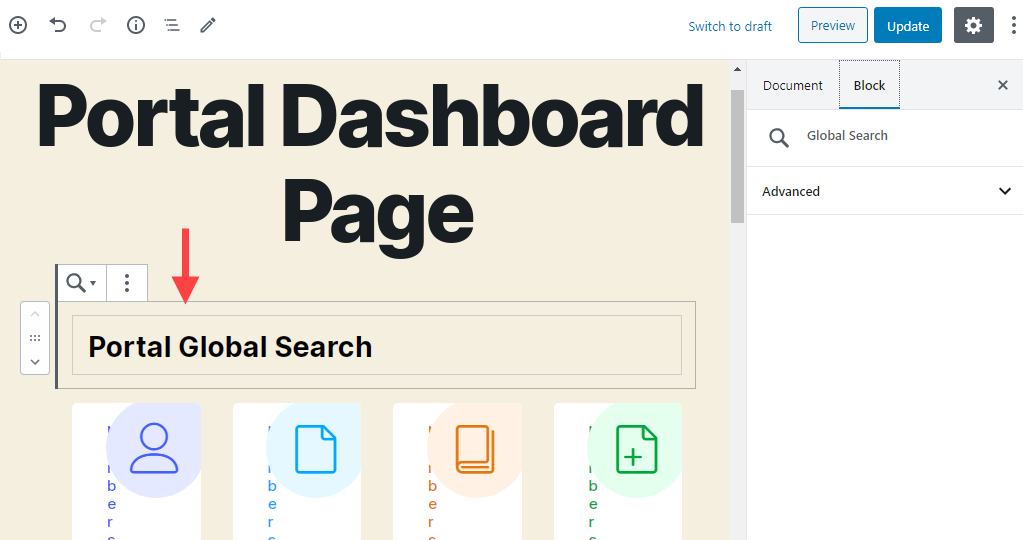
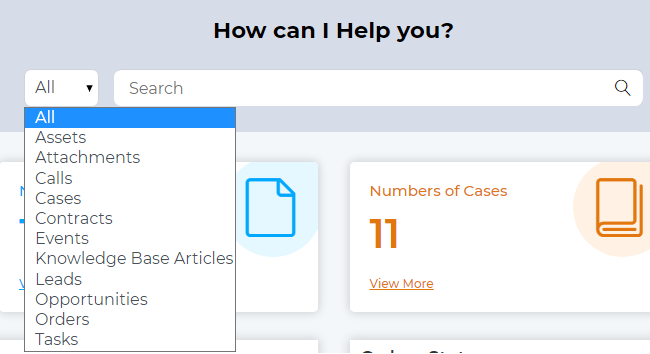
-> Global Search
-> Content Block
About Page Builder and Block Editor
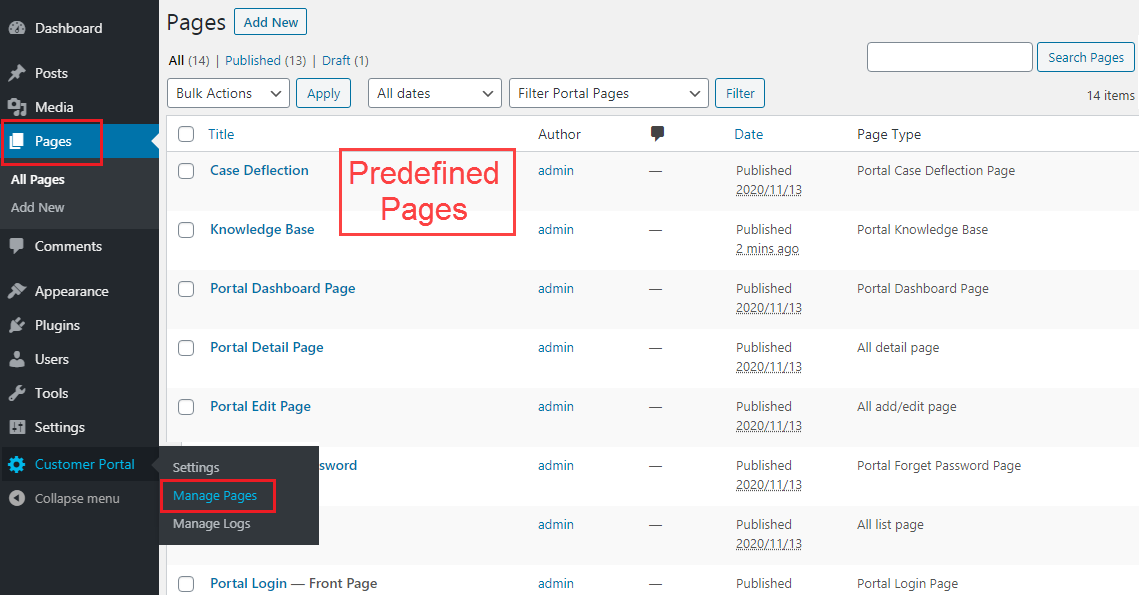
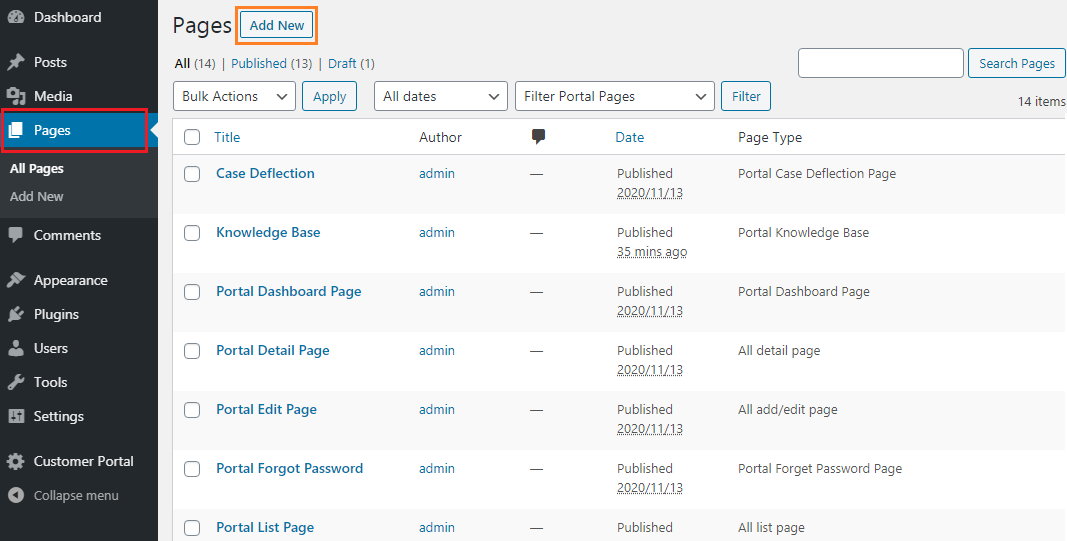
To create a new page or make changes in predefined pages, Login to the WordPress admin. Navigate to Pages. You will find the predefined pages which you can edit as you want to display in the Customer Portal.
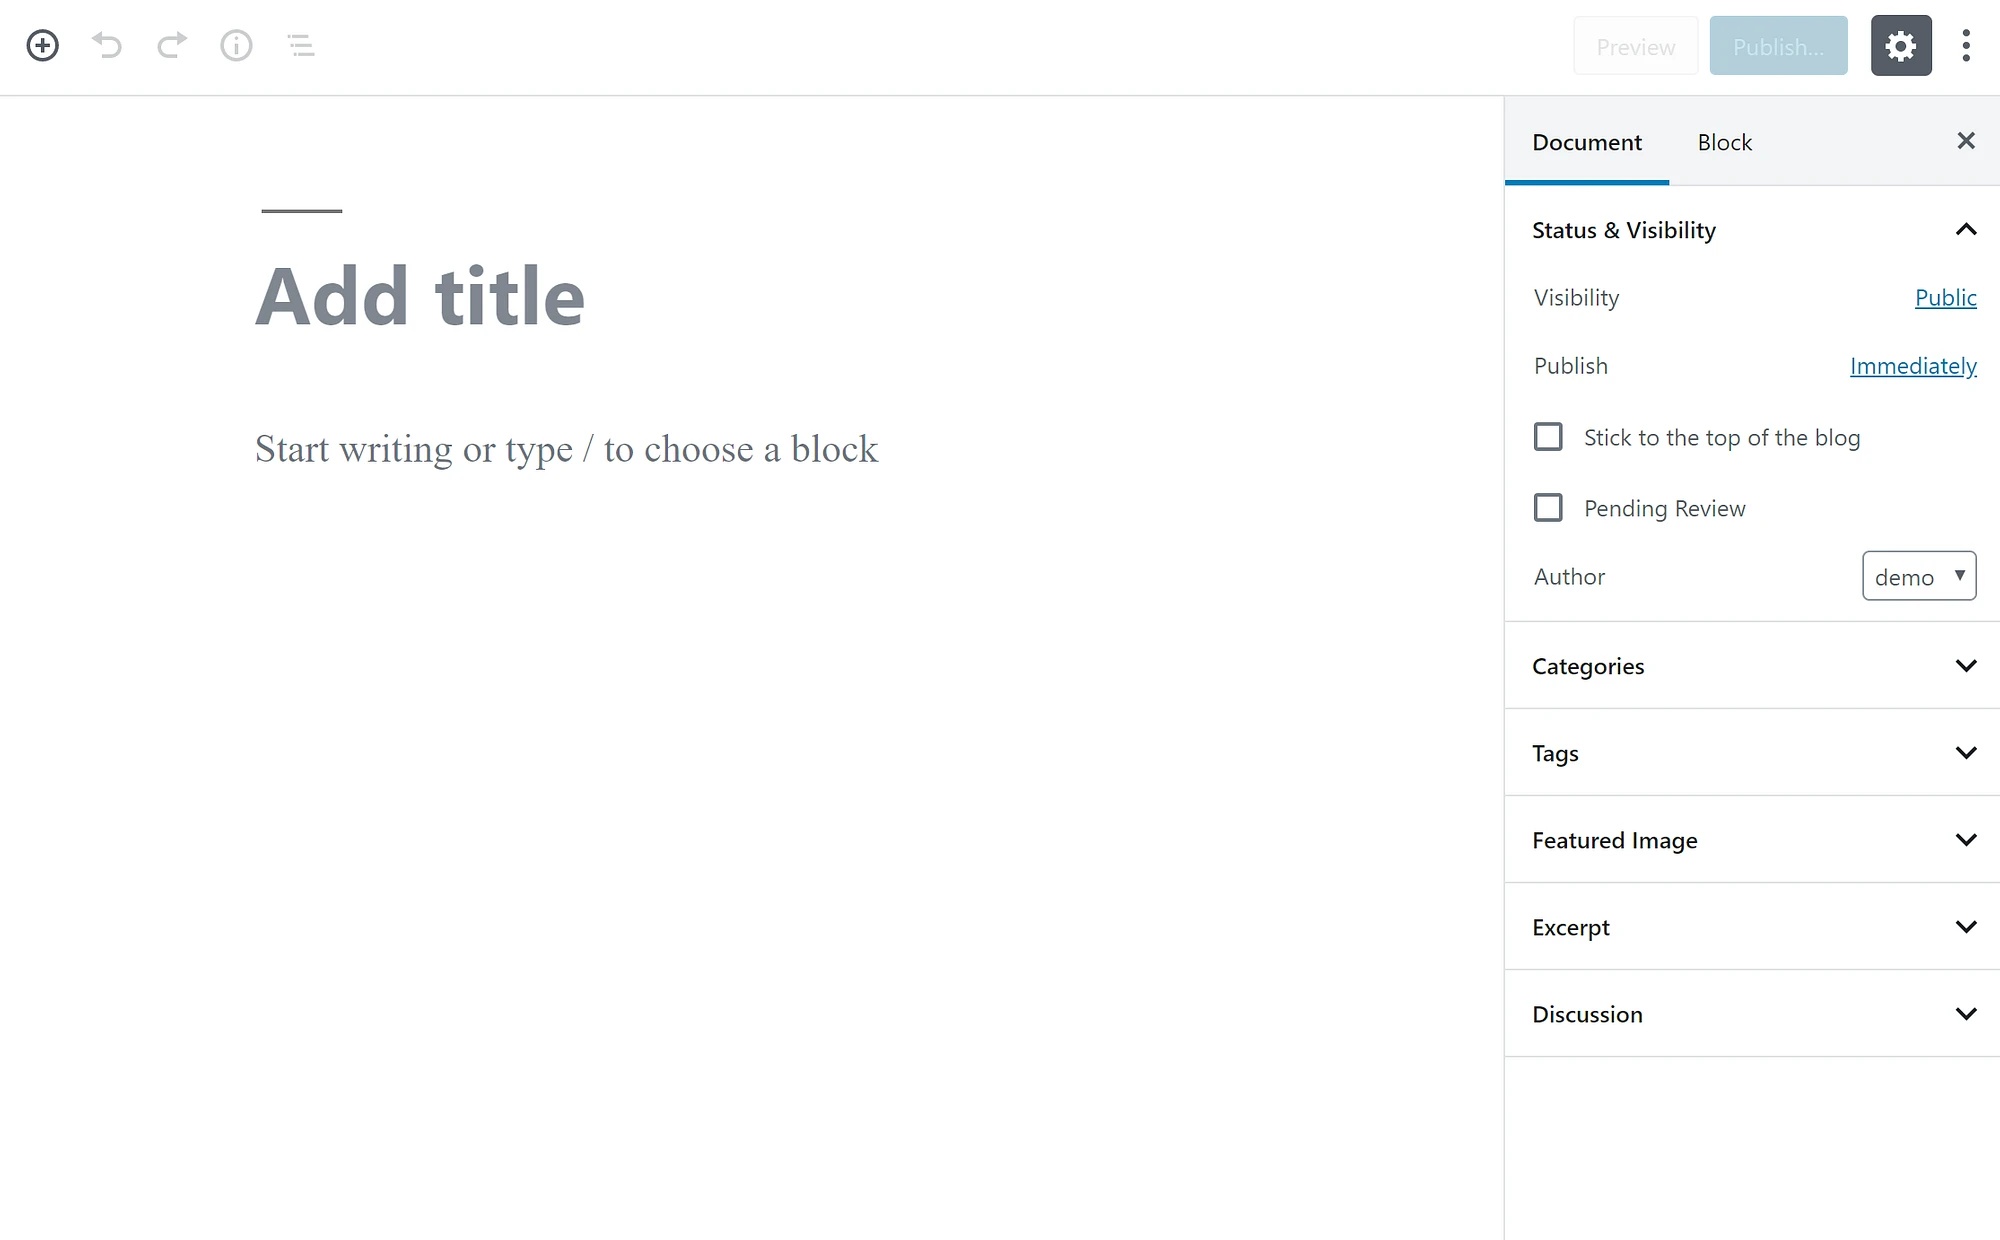
To make changes in any of the default pages, click on any page, you will be navigated to the Edit block page of that page.
Navigate to Pages or Customer Portal -> Manage Pages. You will find some of the predefined portal pages that you can edit as you want to display in the Customer Portal.
You will get the Predefined pages except for the Case Deflection and Knowledge base. You need to add those pages and configure the blocks manually.
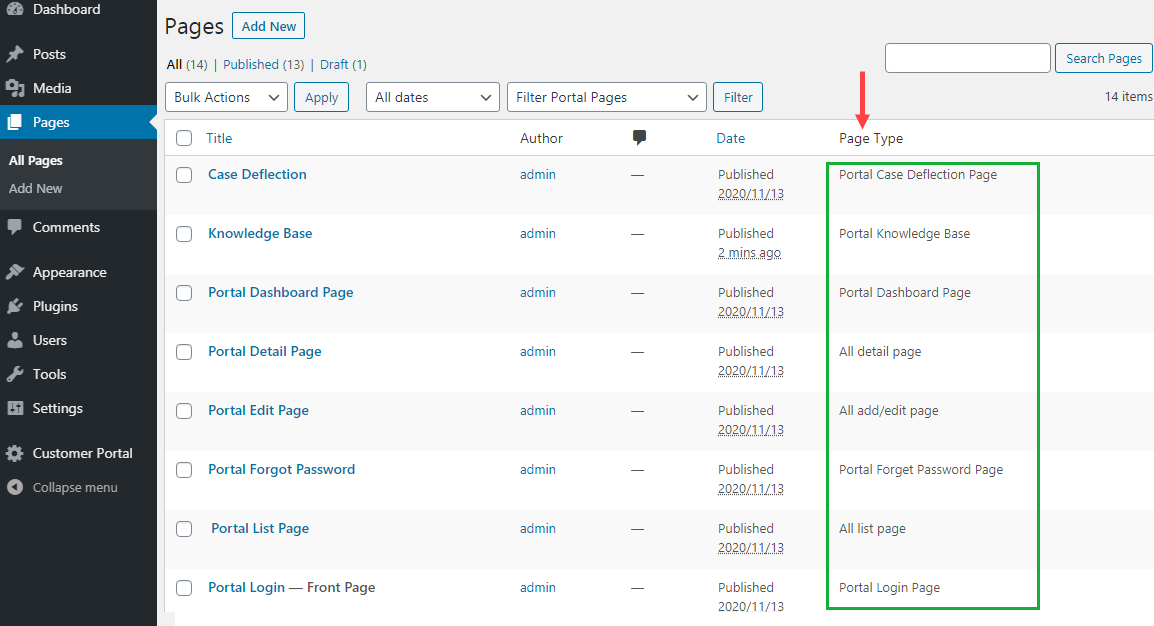
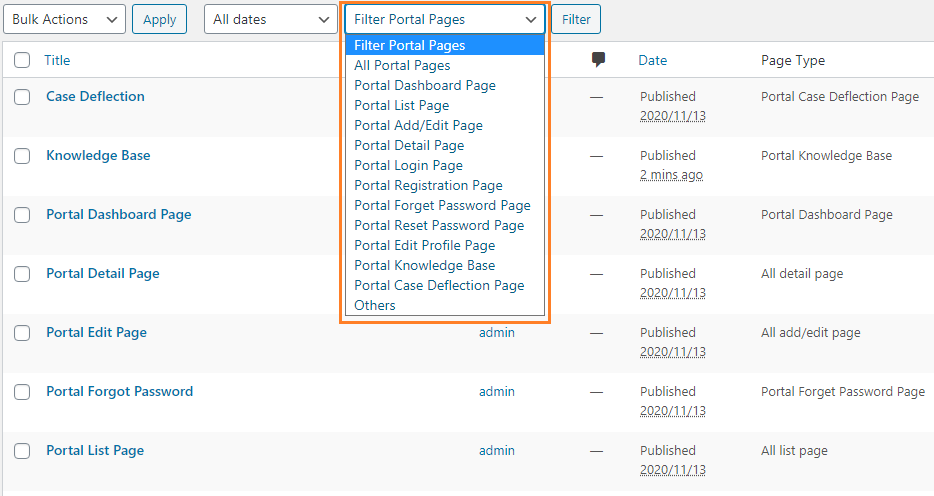
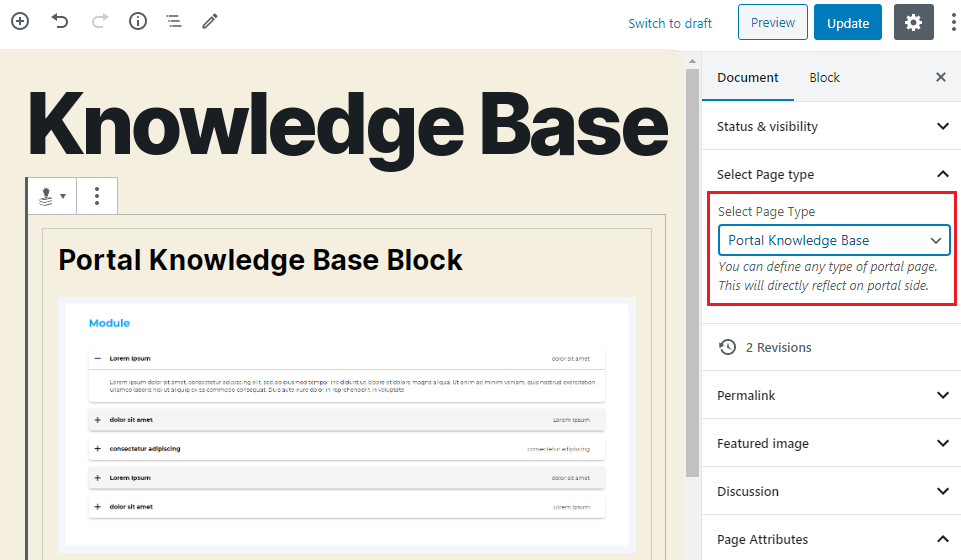
Page Type
Here you will find the Page Type column to identify whether it is a portal page or a general website page.
Filter Portal Pages
You can easily search the portal page as per the page type using Filter Portal Pages option from the Pages.
You can add a new Page by clicking on the Add New By clicking on it, you will navigate to the new page from where you can add the Portal blocks for the customer portal.
or
To make changes in existing portal pages, click on any page, you will navigate to the ‘Edit block’ page of that portal page.
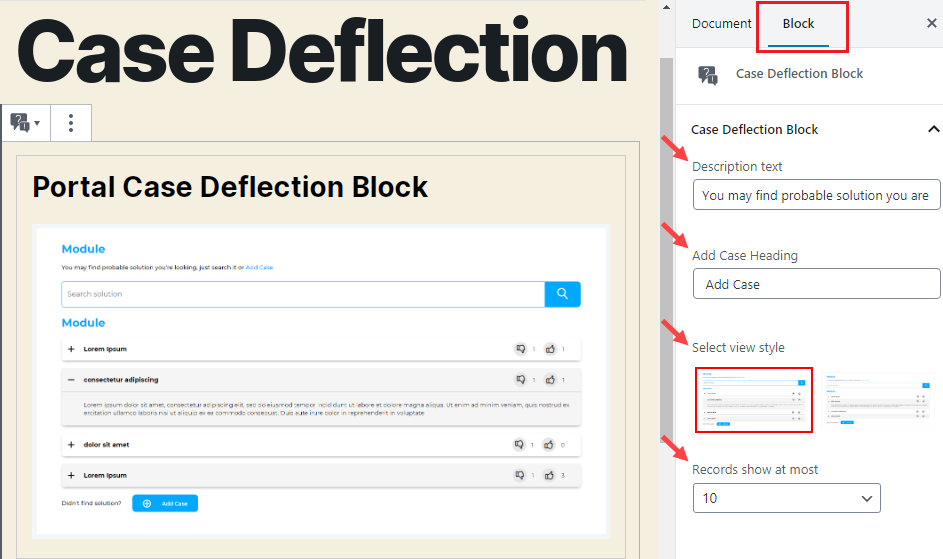
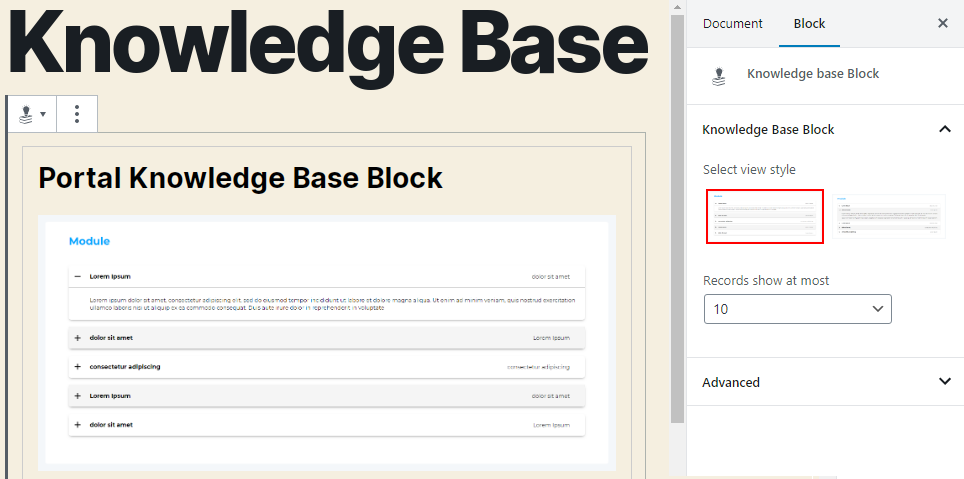
You can change the Block Style and other relevant options of the added block from the Block tab.
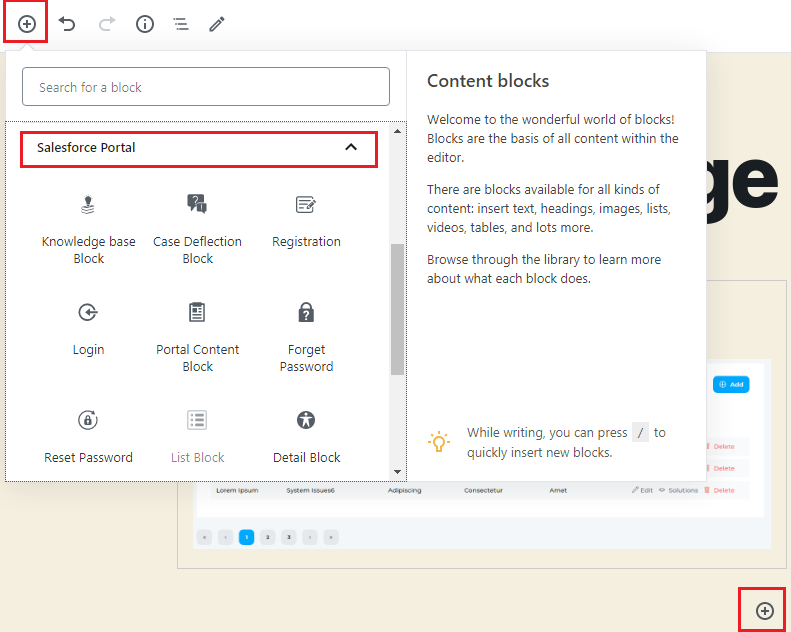
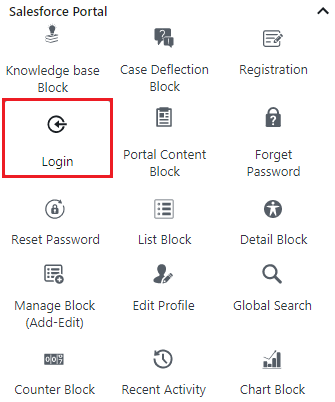
By clicking on the + (Add) icon, you will find the ‘Search for a block’ popup, by scrolling down, you will get the ‘Salesforce Portal’ option to add the different blocks for the Salesforce Customer portal.
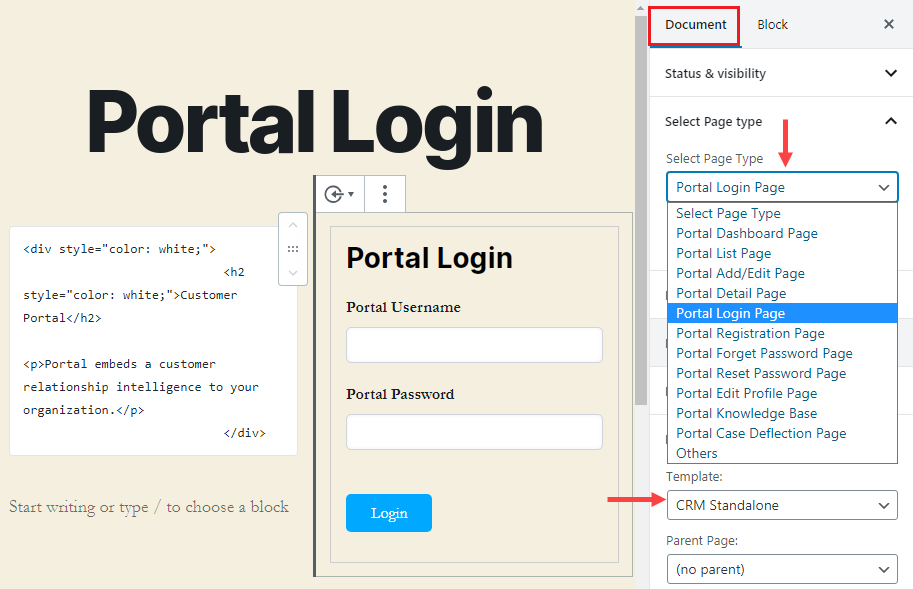
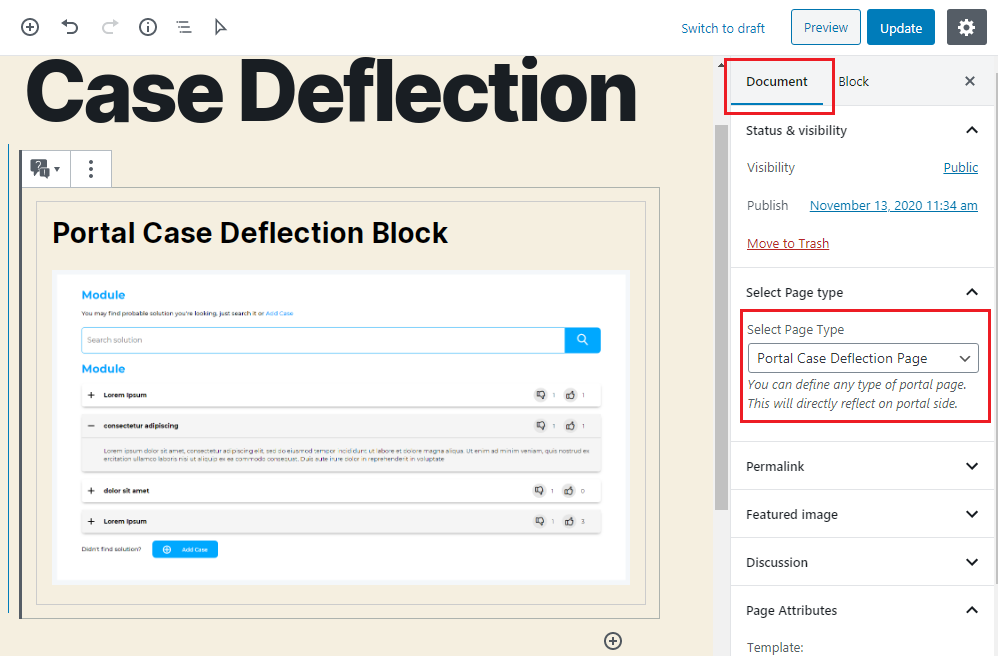
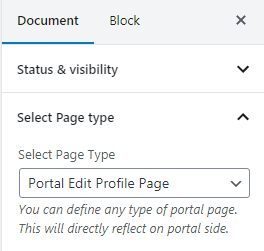
While creating a page for the module, you need to select a Page type under the ‘Document’ tab.
You can select the ‘Template’ as per your requirement. For the customer portal, you need to select the CRM Standalone in the Template option.
From the ‘Block’ tab, you can edit the details like Records show at most, styles, and many other options as per the block selection.
Whenever a new custom page is created for Portal Listing, Portal Edit, or Portal Detail page for a specific module, it will automatically redirect to the newly created page. So, you will not need to change your menu URL to a new page URL. It will be managed automatically.
i.e. If you have created an order listing page and there is a counter block or recent activity with the order module, it will redirect the user to the new listing page instead of on the default listing page.
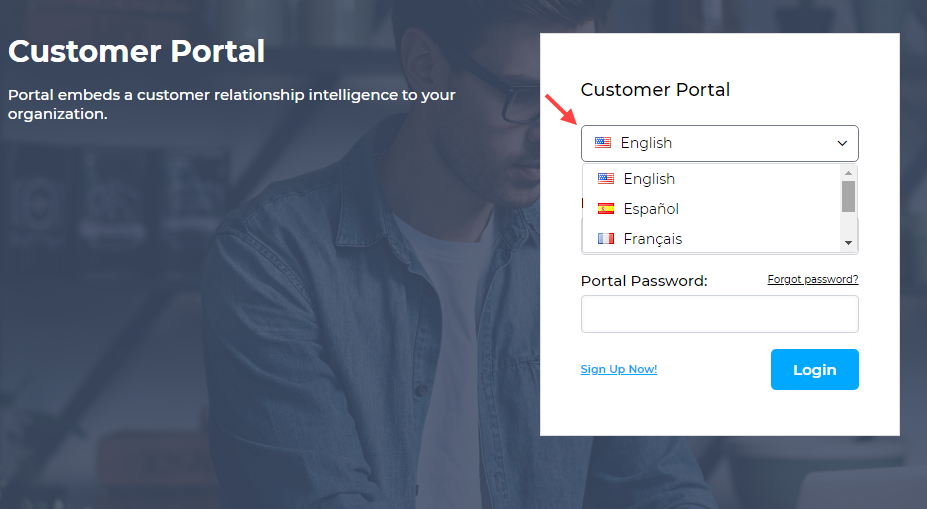
Login Block
You can add the “Login” element to the page by adding a new block page or editing the existing block page using the Login block.
You can find the Login block icon under the Salesforce Portal.
Select the Portal Login Page in the ‘Page Type’ and as per your requirement you can select the Template.
Once the Block is selected, you can edit the block accordingly.
Select the Block content and click on the Block.
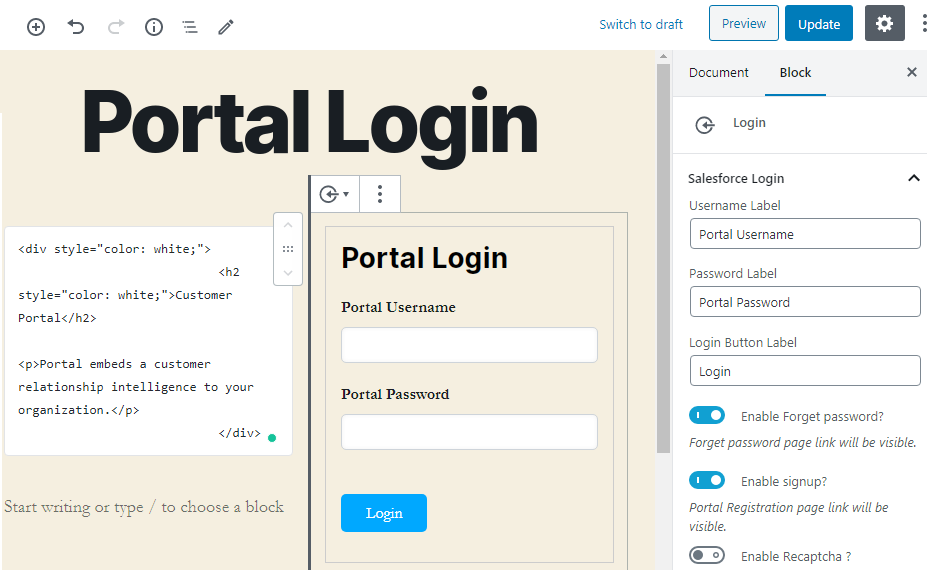
You will find the Portal Login related options:
-> Username text: Edit the label of the Username
-> Password text: Edit the label of the Password.
-> Login Button text: Edit the label of the Login button.
You can enable/disable the following options on the customer portal login block:
-> Forgot Password: Enable the Forgot Password option to reset a new password.
-> Enable Signup: Enable the signup/registration option for the new users.
-> Enable Recaptcha: Enable this option If you want to showcase the captcha option.
Note: If the user clicks on “Forgot Password” & “Signup” options they will redirect to the page of the selected option. For Forget Password and for the Signup (Portal Registration), the predefined pages are already provided.
From the left, you can add the content using HTML Editor.
Once you edit and change the settings, click on the Update button on the header. You can preview the Login page if you want to check how it will look for the user.
Based on the Login block page settings, the customer portal user will get the Login screen.
Forgot Password
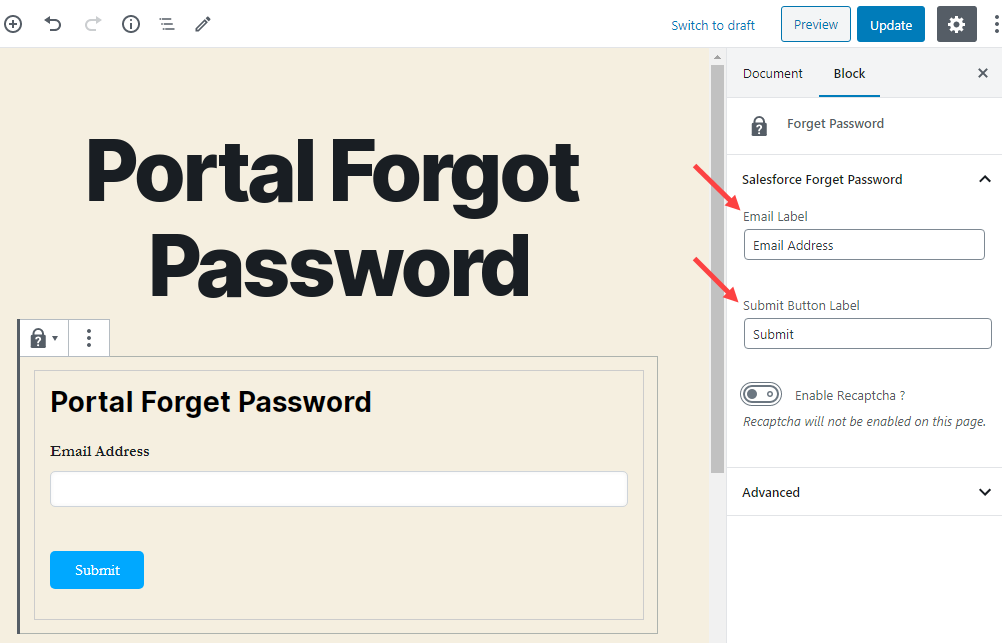
You can display the “Forgot Password” element by creating a new page or editing the existing block page using the Forgot Password block.
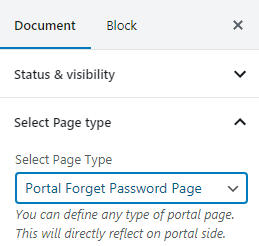
By adding the “Forgot Password” block from the Salesforce Portal, you need to select the Portal Forgot Password Page in the ‘Page Type’.
Now, click on the Block tab and configure the Forgot Password options.
You will find the following options for the Forgot Password block:
-> Email text: Edit the label of the Email field.
-> Submit Button text: Edit the label of the Submit button.
-> Enable Recaptcha: Enable this option If you want to showcase the captcha option.
The user will get the Forget Password layout based on the settings done in the Portal Forgot Password block.
Reset Password
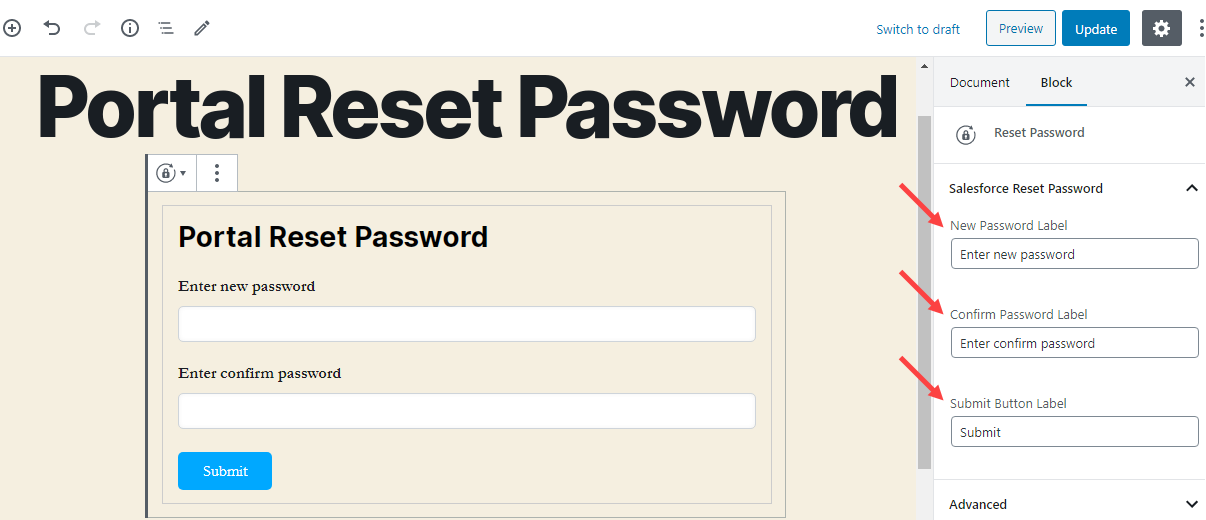
To display the “Reset Password”, you can create a new page or edit the existing page using the Reset Password. The user will be able to reset the forgotten password and create a new one.
You need to select the Portal Reset Password Page in the Page Type under the ‘Document’ tab.
Once you select the Reset Password block, by selecting the block content, you can edit the following options:
-> New Password Text: Insert the label for the New Password field.
-> Confirm Password Text: Insert the label to Confirm Password field.
-> Submit Button: Insert the label for the Submit button.
The customer will get the ‘Reset Password’ page as per the settings in the Portal Reset Password block.
Registration Block
When the new user wants to log in, they must register first by clicking on the sign-up button.
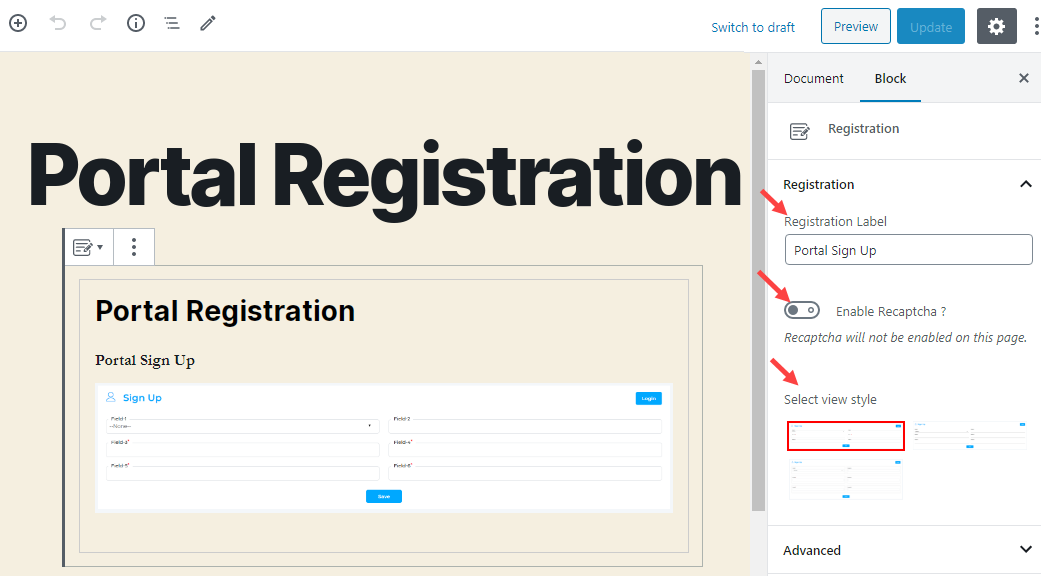
To display the “Registration” form, you can create the new block or edit the existing block to set up the layout and view of the Registration form.
You need to select the Portal Registration Page in the Page Type under the ‘Document’ tab.
Select the Registration block from the Salesforce Portal and select the block content.
By selecting the ‘Block’ tab, you can edit the following options:
-> Sign Up Title: Insert the label for Sign Up field.
-> Enable Recaptcha: Enable this option If you want to showcase the captcha option.
-> Select View style: Here you will find the three predefined styles of the ‘Registration’ layout. By selecting the style, the change will appear on the left side as well for preview.
Note: The fields will be fetched from the CRM Side.
Counter Block
You can select and edit the view of the record counter of a specific module. You can create a new page or edit the existing page for the Counter block.
You can add the Counter block in the Portal Dashboard page and the Portal Listing page as well. You need to select the Page Type as per the Portal page.
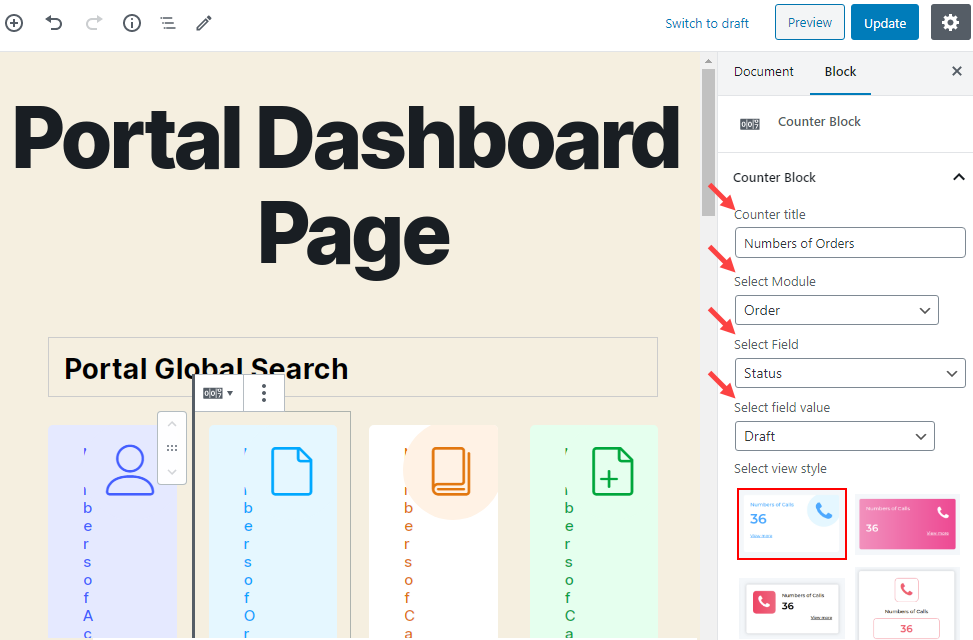
By selecting the Counter Block content, in the Block tab option, you will find the following options:
-> Counter Title: Insert the relevant Counter Title. i.e. Total Records, Updated records.
-> Select Module: Select the module from the list. i.e. Account, Case, Attachment, Contract, Call, Order.
-> Select Field: As per the Module selection the Field will be fetched. Select the fields whose type is Picklist or Multi picklist.
-> Select Field value: As per the Field selection, the Field values will be fetched. Select the field values.
Ex.: If you select a case module, then it will display the fields whose type is Picklist or Multi picklist, and then it will get the value for the selected fields and module.
-> Select View Style: Select the ‘Style’ to display the Counter with the look and feel. The 6-different style of Counter Block.
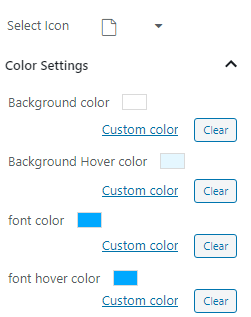
-> Select Icon: By scrolling down in the Block, you can also select the ‘icon’ to display a unique identity.
You can set the color for the content of the counter by using a custom color picker tool:
-> Background Color: Select the color for the background color of the counter.
-> Background Hover color: Select the background color when the mouse cursor moves on the content.
-> Font color: Select the text color the content.
-> Font hover color: Select the Font hover color when the mouse cursor moves on the content.
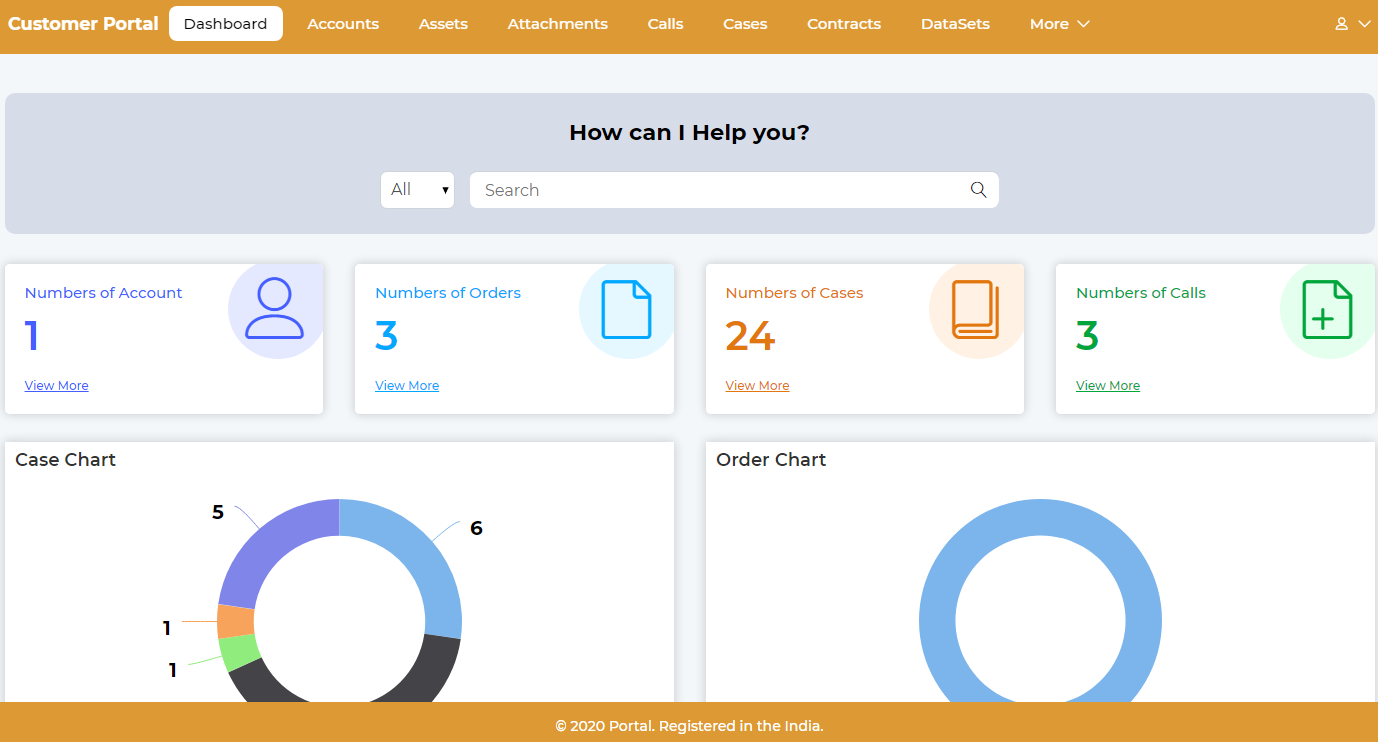
The user will get the Counter block as per the editing in the Counter block and the selection of style & color settings.
Chart Block
You can select and edit the view of the charts to display in the Customer Portal. You can create a new page or edit the existing page for the Chart block.
You can add the Chart on the Portal Dashboard or Portal Listing page as well. You need to select the Page Type.
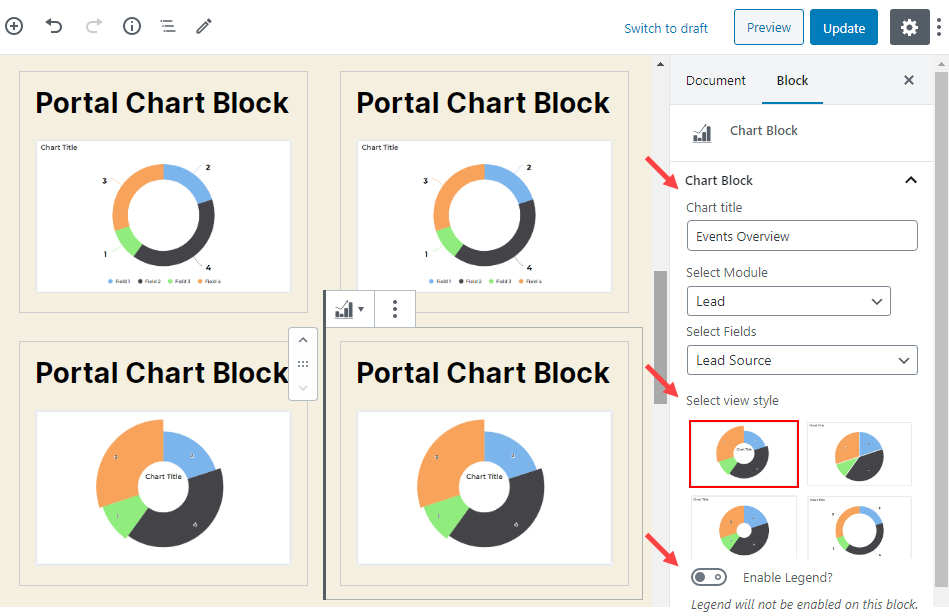
By selecting the Chart block content, in the Block tab option, you will find the following options:
-> Chart Title: Insert the relevant Chart Title like Total Records, Updated records.
-> Select Module: Select the module from the list like Account, Case, Attachment, Contract, Call, Order.
-> Select Fields: As per the Module selection the Field will be fetched. Select the fields whose type is Picklist or Multi picklist.
Ex.: If you select a case module and the status, then it will display the graph with all the status.
-> Select the ‘Style’ to display the Chart. The 4-different style of Chart Block.
Recent Activity Block
You can select and edit the view of the Recent Activity which is performed in the backend to display in the Customer Portal. You can create a new page or edit the existing page to add the Recent Activity block.
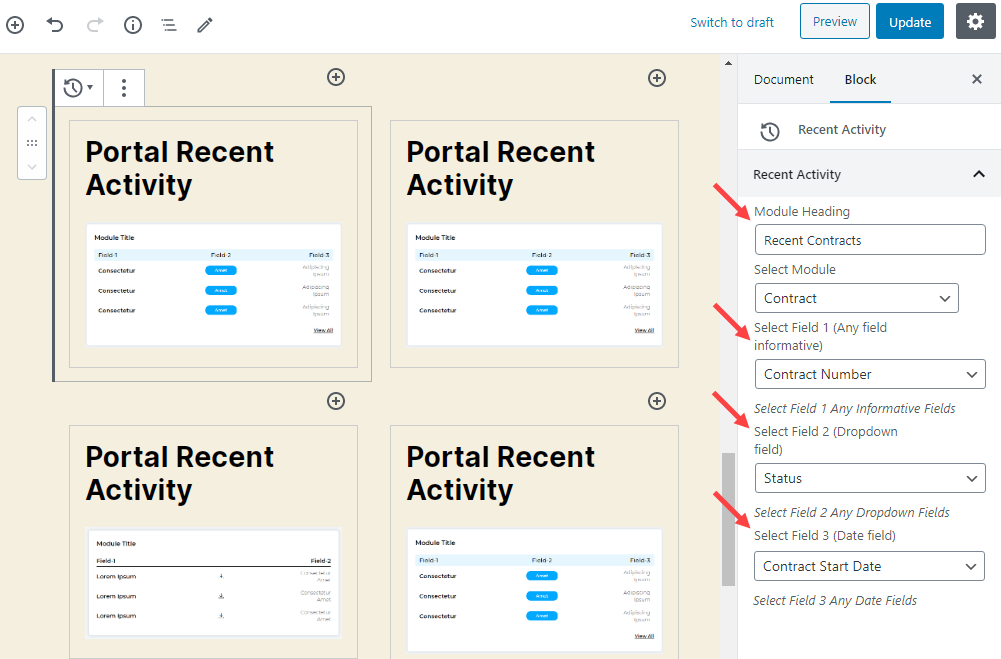
By selecting the Recent Activity block content, in the Block tab option, you will find the following options:
-> Module Heading: Insert the relevant Module Heading. i.e. Recent Activity, Recent Update.
-> Select Module: Select the module from the list. I.e. Account, Case, Attachment, Contract, Call, Order.
-> Select Field: Based on the module selection, you can select the three different fields to display in the Recent Activity. Select Field 1– Informative Filed, Select Field 2– Field 1 related selection and Select Field 3– Date Field, i.e. Closed, Created, etc.
You can select the view style from the five predefined styles for Recent Activity:
Note: The Background color option is provided for Style 3 and Style 4 only. This block is used to show the recent 5 records with different styles.
Portal Listing
You can select and edit the List view of any objects to display in the Customer Portal. You can create a new page or edit the existing page to add Portal List view.
You can segregate page creation of the Portal Listing page for each available module which is enabled from the Salesforce CRM.
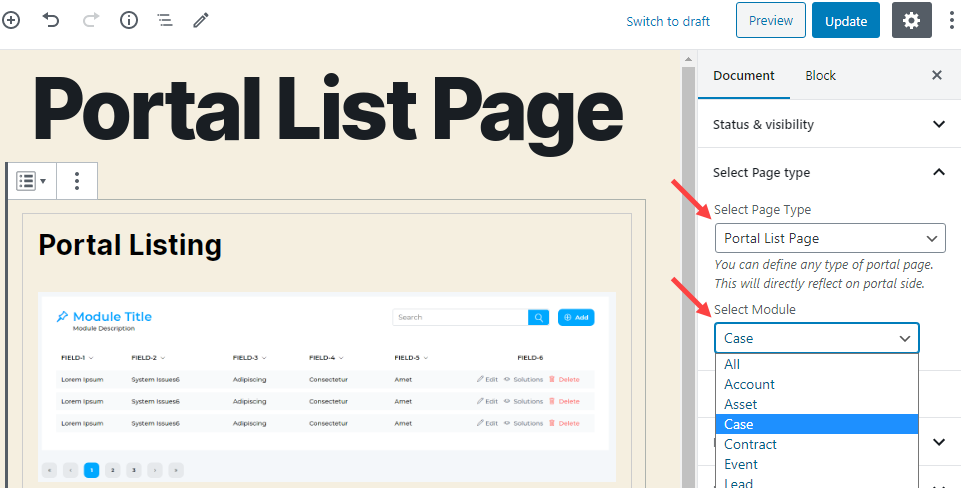
i.e. If you want to create a listing page for ‘Case’ separately, you need to create a new Portal Listing page and select the ‘Page Type’ and the ‘Module’ during the editing of the block.
You need to select the ‘Page Type’ as Portal List Page to define the Portal Listing block. You can make Portal Listing page same for all the modules or you can make it individual for a specific module by selecting the ‘Module’.
Note: If you have added a new custom Portal listing page for a specific module, it will automatically redirect the user to the newly created listing page.
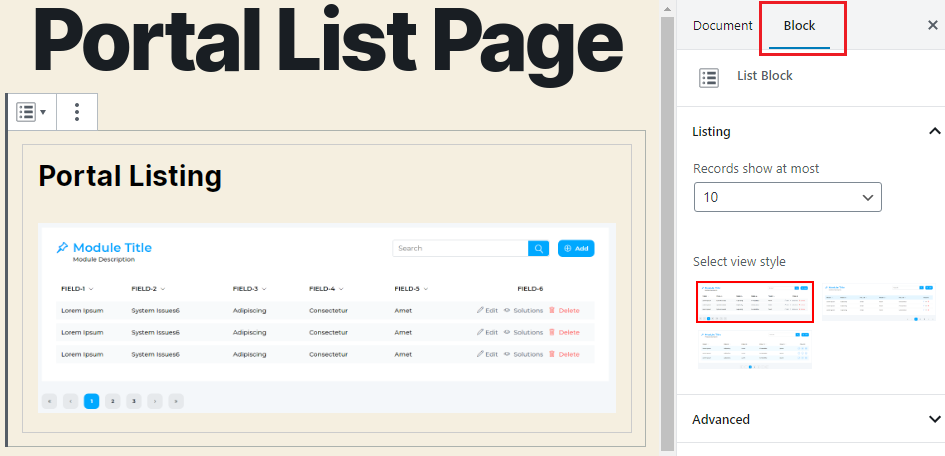
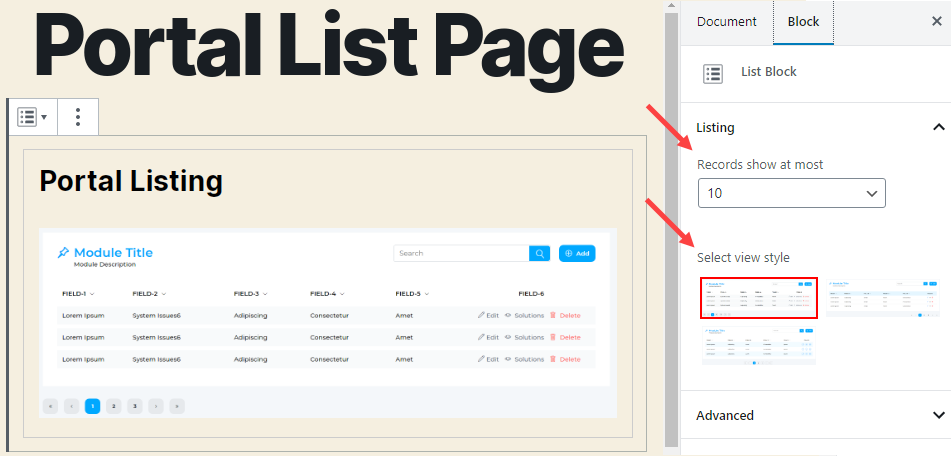
By selecting the “Portal Listing” block content, in the Block tab option, you will find the selection of the most records to display in the list and three predefined Style of the ‘Portal Listing’ block.
-> Records show at most: You can select the maximum records to display per page.
You can select the style from the three predefined styles for Portal Listing.
Portal Detail Block
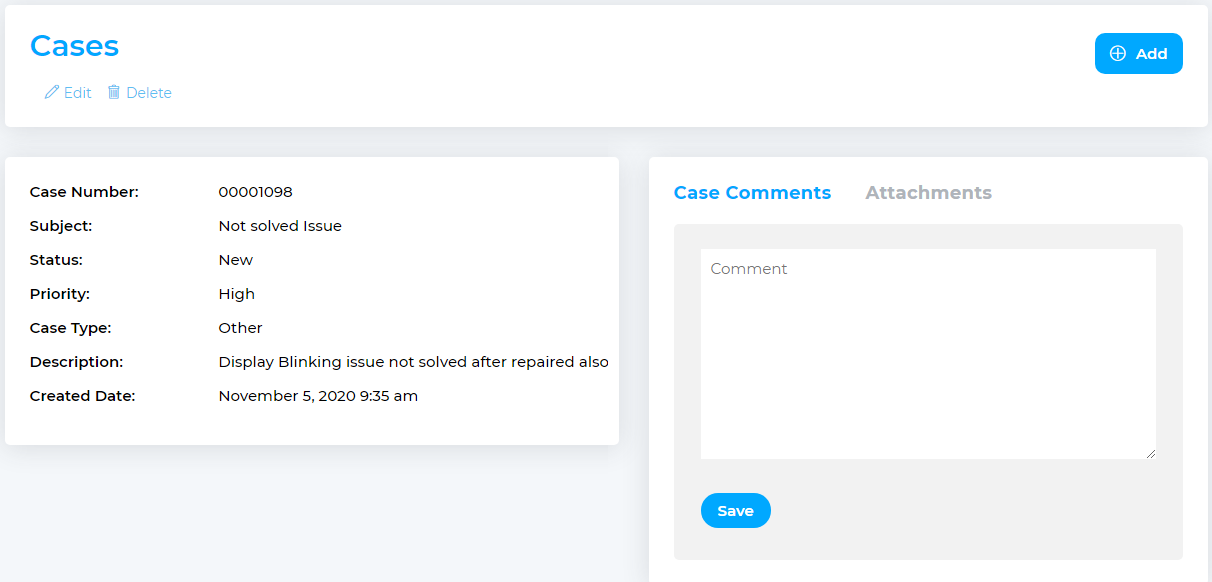
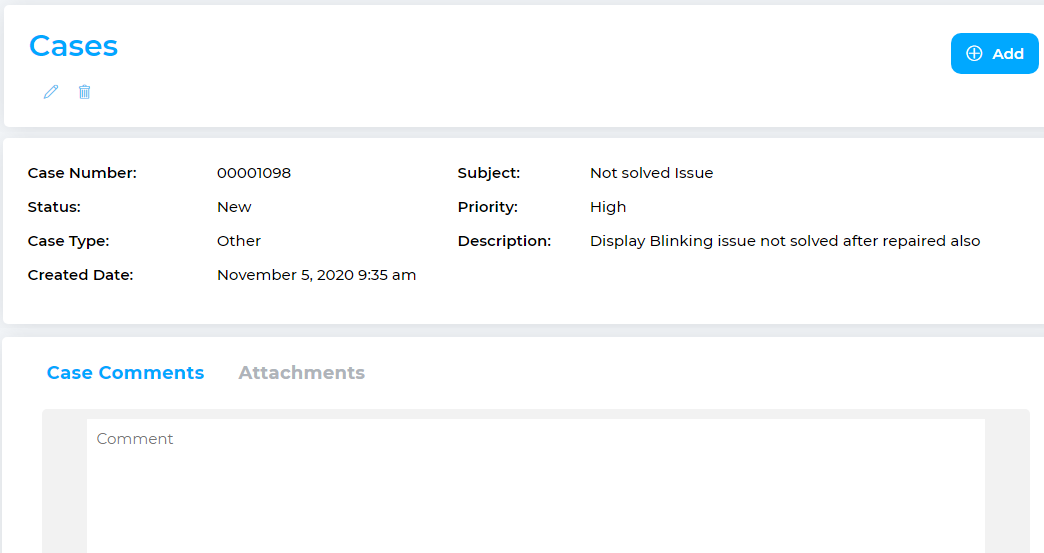
You can select and edit the Detail view of any record. You can create a new page or edit the existing page for the Portal Detail block.
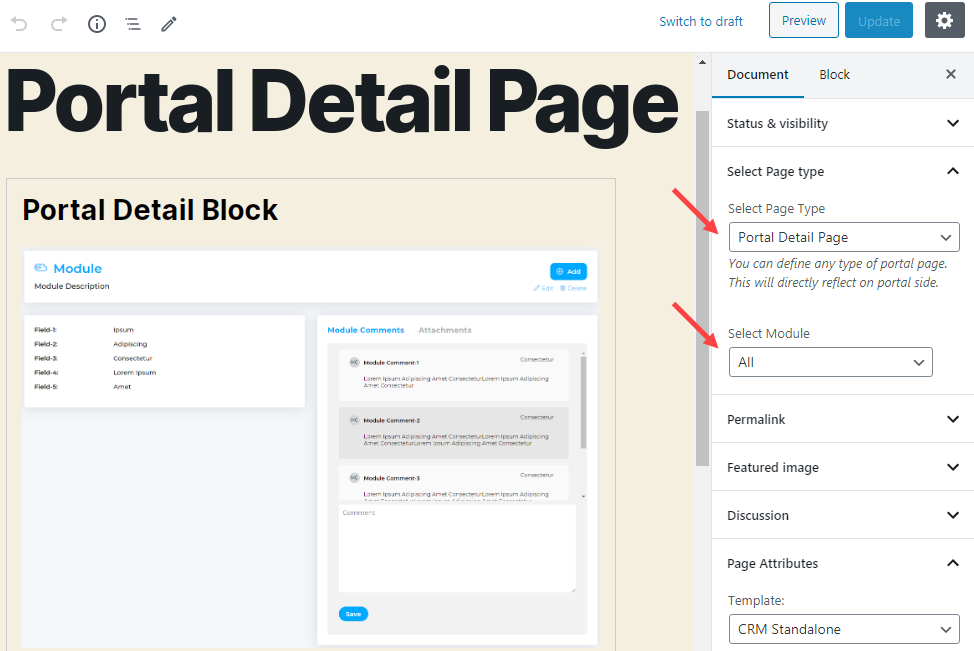
You need to select the ‘Page Type’ as Portal Detail Page to define the Portal Detail block. You can make the Portal Detail page the same for all the modules or you can make it individual for a specific module by selecting the ‘Module’.
Note: If you have added a new custom Portal detail page for a specific module, it will automatically redirect the user to the newly created listing page.
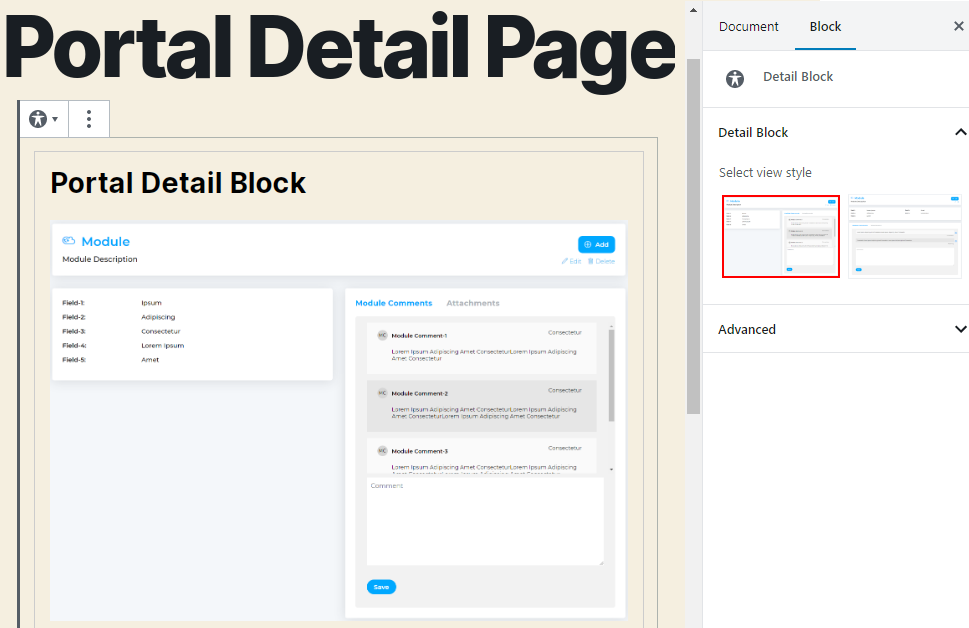
By selecting the Portal Detail block content, in the Block tab option, you will find two predefined Styles of the ‘Portal Detail Page’ block.
Manage Block (Add-Edit)
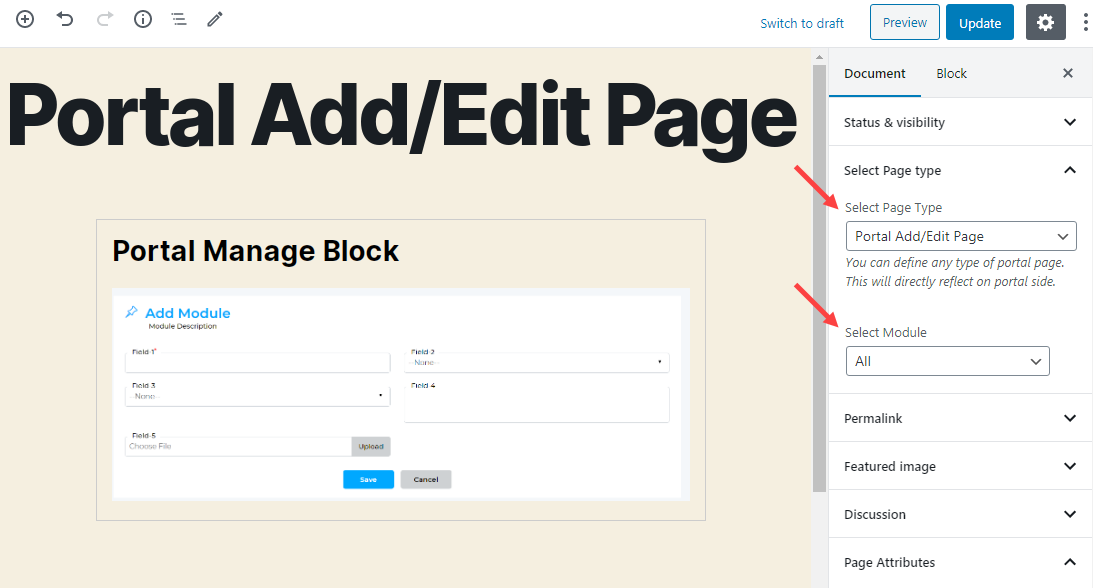
Using this block, you can edit and manage the layout of ‘add the new record’ block or edit the existing record block.
You need to select the ‘Page Type’ as Portal Add/Edit Page to define the Portal Add/Edit block. You can make Portal Detail page same for all the modules or you can make it individual for a specific module by selecting the ‘Module’.
Note: If you have added a new custom Portal Add/Edit page for a specific module, it will automatically redirect the user to the newly created listing page.
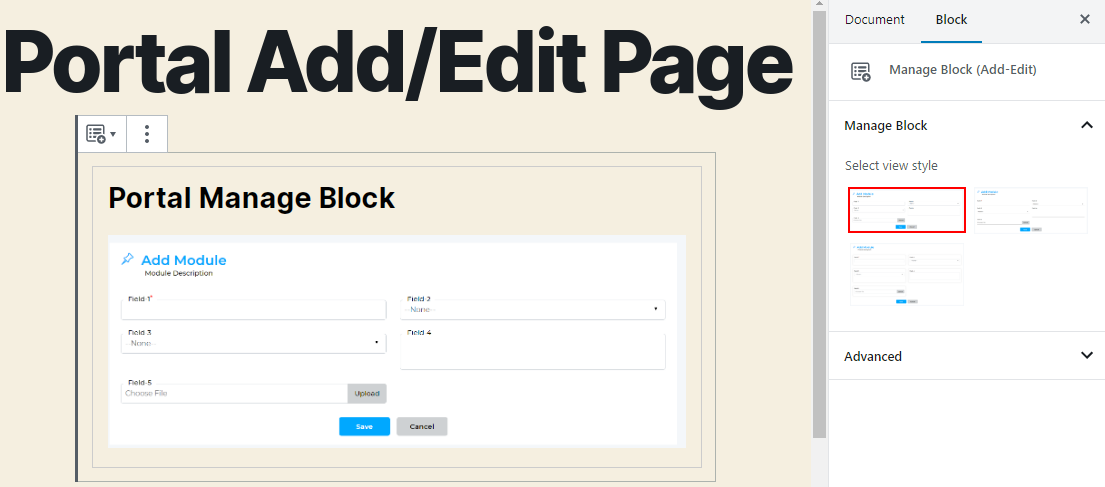
By selecting the Manage Block content, in the Block tab option, you will find three predefined Style of the ‘Manage Block (Add-Edit)’ block.
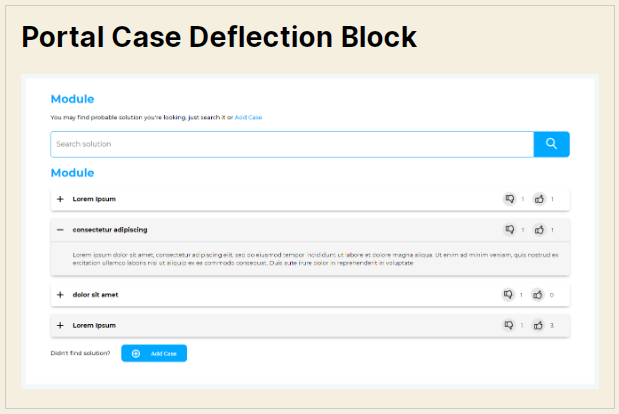
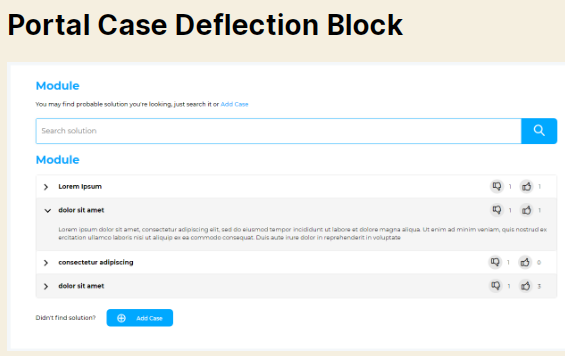
Case Deflection Block
Case deflection block is used to display the list of the case solution in the customer portal. You need to select the Case Deflection block from the ‘Salesforce Portal’ blocks.
Note: Case deflection page is not automatically created when the CRM is connected, you need to create it manually.
You must select the ‘Page Type’ as Portal Case Deflection Page. So, it will define as a Case Deflection page.
By selecting the ‘Case deflection block content, you can edit the following options under the “Block” tab.
-> Description Text: Edit the text label to display the instruction regarding the Case deflection.
-> Add Case Heading: Edit the text label of the add case.
-> Records show at most: You can select the maximum records to display per page.
-> There are two predefined styles provided for the ‘Case Deflection’ block.
Knowledge base
Knowledge Base block is used to get the Knowledge base articles, blogs or instructions in the customer portal under the Knowledge base modules. You need to select the Knowledge base block from the ‘Salesforce Portal’ blocks.
Note: Knowledge base page is not automatically created when the CRM is connected, you need to create it manually.
You must select the ‘Page Type’ as the Portal Knowledge Base Page. So, it will define as a Knowledge base page.
By selecting the ‘Knowledge base’ block content, you can edit the following options under the “Block” tab:
-> Records show at most: You can select the maximum records to display per page.
-> There are two predefined styles provided for the ‘Case Deflection’ block.
Edit Profile Block
To set the Profile page layout in the Customer Portal, you can create a new page or edit an existing page of the Edit Profile block.
You must select the Portal Profile in the ‘Page Type’ under the Document tab.
By selecting the ‘Edit Profile’ block content, you can edit the following options under the “Block” tab:
Edit Profile Text: Edit the text label for ‘Edit Profile’.
Change Password Text: Edit the text label for ‘Change Password’.
The three predefined styles are provided for Edit Profile Block.
General shortcodes
The Page blocks are created blocks for Gutenberg users. But in case if you are not using Gutenberg, you can use our plugin by placing a manual shortcode.
Registration [bcp_registration]
“Registration” shortcode is used to create a registration page layout for the Customer portal registration.
Note: the fields will be fetched from the CRM Side.
This shortcode has the following parameters that can be customized:
-> sign_up_title: Sign up Title which is displaying on the registration page.
-> capcha_enable: Recaptcha enables or not flag on the registration page. Possible values are “yes” or “no”.
-> view_style: View Style selection from three predefined styles on the registration page.Possible values are “style_1”,“style_2” or “style_3”.
E.g. shortcode : [bcp_registration sign_up_title=’Portal Sign Up’ capcha_enable=’no’ view_style=’style_1’]
Login [bcp_login]
“Login” shortcode is used to create the Login page layout for the Customer portal login. Please find the admin settings image for the login shortcode.
This shortcode is used to login as a portal user.
This shortcode has the following parameters which can be customized:
-> username_text: Username text title which will change user name label text.
-> password_text: Password text title which will change user name label text.
-> login_button_text: Login button text which will change the login button text.
-> show_forgot_password: Enable Forget password flag which will be managed to display the forget password link on Login Page. Possible values are “yes” or “no”.
-> signup_enable: Enable the Signup flag which will be managed to display the registration link on Login Page. Possible values are “yes” or “no”.
-> capcha_enable: Recaptcha enables or not flag on the Login Page. Possible values are “yes” or “no”.
E.g. short code: [bcp_login username_text=’Portal Username’password_text=’Portal Password’ login_button_text=’Login’ show_forgot_password=’yes’ signup_enable=’yes’ capcha_enable=’yes’ ]
Forget Password [bcp_forgot_password]
“Forget password” short code is used to get the forget password page for the Customer portal. Forgot password short code is used to change the password or recover the forgotten password.
This shortcode has the following argument which can be customized:
-> email_text: The email text title is displaying on this page.
-> submit_button_text: Submit the Button text title which is displaying on this page.
-> capcha_enable: Recaptcha enabled or not flags on this page. Possible values are “yes” or “no”.
E.g. Short code: [bcp_forgot_password email_text=’Email Address’ submit_button_text=’Submit’ capcha_enable=’yes’ ]
Reset Password [bcp_reset_password]
“Reset password” short code is used to get the Reset password block for the customer portal login.
This shortcode has the following argument which can be customized:
-> new_password_text: The new Password text title is displaying on this page.
-> confirm_password_text: Confirm Password text title which is displayed on this page.
-> submit_button_text: Submit the Button text title which is displaying on this page.
E.g. short code : [bcp_reset_password new_password_text=’Enter new passsword’ confirm_password_text=‘Enter confirm password’ submit_button_text=‘Submit’ ]
Listing [bcp_list]
“Listing” block is used to create a list block in the backend. It detects the module from the URL. This block is used to module listing records and set with pagination and different styles.
Listing Block has the following arguments which can be exciting:
-> view_style: View Style selection from three predefined styles on the listing page.
-> Pagination: Records per page option are used to display the number of pages.
E.g. shortcode: [bcp_list pagination=’5’ view_style=’style_1’ ]
Detail [bcp_detail]
A portal “Detail” block is used to get the portal detail page in the Customer portal. It detects the module from the URL.
The detailed block has only one argument about style selection:
->E.g. shortcode: [bcp_detail view_style=’style_1’ ]
(Add-Edit) Shortcode [bcp_edit view]
The “Manage” block is used to Add and Edit New Data to Salesforce CRM. Please find the admin settings for Manage Block.
This block is used to module Add/Edit records with different styles.
There are 3 different styles of Mange Block:
-> E.g. short code: [bcp_edit view_style=’style_1’ ]
Edit Profile Block [bcp_profile]
“Edit Profile” block is used to create the Edit Profile Page layout in the front end. Please find the admin settings for the Edit Profile block.
This Block is used for user detail changes and password changes with different styles.
This block has the following argument which can be customized:
-> edit_profile_title: Edit Profile Label which will change the Edit Profile label.
-> change_password_text: Change Password Label which will change the Password label.
-> view_style: View Style selection from three predefined styles on the Edit Profile page.
-> E.g. short code: [bcp_profile edit_profile_title=’Edit Profile’ change_password_text=’Change Password’ edit_profile_text=’Save’ change_password_save_label=’Update’ view_style=’style_1′ ]
Global Search [bcp_search]
The “Global Search” block is used to display the global search blocks in the customer portal, and it does not have any parameters. This block is used to search for data for all portal records.
There is a search record module wise and without module wise.
E.g. short code : [bcp_search]
Content [bcp_content]
There is a “Content” block provided in the Salesforce block. This block is dragged in the Portal manage page by default.
Case deflection, Global Search Results, Knowledge Base Articles, etc. are displayed in the content block.
E.g. shortcode: [bcp_content]
Multi-Language
Provide the multi-language translation to the portal users. Translate the content of the portal and provide users their regional language in the customer portal.
WordPress admin can configure the multi-language settings and translate the portal content to the desired language.
Site Language Settings
Navigate to WordPress Settings -> General to install the language(s). From the General page, scroll down to Site Language from where you can select the language.
From Site Language, you will find a list of languages with Installed and Available.
You can select the required language and save the language settings once. The language will be installed.
Customer Portal Settings
After installing the language(s), navigate to the “Customer Portal Settings” to enable the Multilanguage option.
Portal Language: Select the language(s) to enable the portal. Selected language(s) will be displayed.
Default Portal Language: Select the language to display as default for the customer portal.
How to translate?
You can add language translation for the portal in two ways:
-> Using WordPress or
-> Third-party plugins: Loco Translate
Using default WordPress
You must install the WP-CLI Software if you want to translate the portal content using WordPress. After installing the WP-CLI software, follow the below steps:
We have already generated a template POT file including all the static content (strings) used in the plugin.
You just need to copy template files in the desired language.
Ex.: Suppose, if you want to translate the plugin in the “Spanish” language, you need to copy bcp_portal.POT file and after pasting the file, rename the file as “bcp_portal-es_ES.po” file where bcp_portal represents our portal’s slug and es_ES represents the language slug.
Add translation for all the content (strings) manually from the PO file and generate the MO file.
Note: You can generate an MO file by using any free website and put that file in the language folder of the plugin. You need to name the PO file (i.e., bcp_portal-es_ES.mo).
You need to translate ‘JavaScript’ files by using the below command which will create a JSON file that includes JavaScript strings.
wp i18n make-json bcp_portal-gu.po –no-purge
First, you need to add any custom string into the POT file. “msgid” represents the original string name, and ”msgstr” represents the translated string but in the POT file, you need to keep blank the “msgstr”.
Once you added the string in the POT file, you need to copy those custom strings into the PO file and once you copied the strings in the PO file, you need to add the translated string in the “msgstr” text.
When all the custom strings are added, you need to generate the MO file again and replace it with a respected MO file.
Using third party: Loco Translate
You can also translate the content by installing Loco Translate, the third-party plugin into WordPress. To install “Loco Translate” and translate the content with it, follow the below steps:
Install the ‘Loco Translate’ plugin into your WordPress admin.
You can check the translation progress, by clicking on the ‘Salesforce Customer Portal’. You will navigate to the Language Translation details from where you can edit the existing language.
Click on any language to translate the source texts.
Now, on that specific language page, select any source text from the list of the Source Text that appears for the portal users.
Under the selected language translation, add the translated content and click on the “Sync” button.
Now, if you want to add the custom strings, navigate to the “Plugin” of ‘Salesforce Customer Portal’ and click on the Edit Template caption.
By clicking on the ‘Edit Template’ button, you will navigate to the template page where you will find the list of all the Source Text of the customer portal. By clicking on the + Add button, you can add the new string (content) for the portal.
Note: Once you add the new string, edit the Source Text, but you must keep the Content blank.
By clicking on the Sync button, the added string will be updated in the Source Text and from there you can translate in the specific language.
Translate Menus
You need to translate the Portal menus individually. To translate the text label of the menus, navigate to the Appearance à Menus. Open the menu details to translate the menu label.
Now, you can insert the translated menu labels under the specific language.
Note: You will get only those languages that are activated from the “Site Language” under the General Settings.
Data confirmation on deactivating plugin
If the admin user deactivates the plugin, it asks whether to keep customer portal settings, pages, and configured menus or not.
If the checkbox is checked, the plugin will be removed but data, pages, and portal settings will be kept as it is in WordPress else the plugin will be removed with data, pages, and portal settings when the user deletes the plugin after deactivation.
So, if the admin user needs to deactivate the plugin temporarily but does not want to lose their settings then they can choose this option.
zz.Customer Portal (Front side)
After completing all configurations at Salesforce and WordPress for Customer Portal, Customer can sign-up or login to Customer Portal and access Salesforce modules.
Portal Login & Registration
Directly login to the portal using your portal credentials.
If two-step authentication is enabled, then portal users will receive an OTP in email. Enter valid OTP and it will allow portal users to access interface.
Note: OTP is valid for 30 minutes. If not used, then the portal user needs to resend OTP and get a new OTP.
Sign Up:
Customers can sign-up to the Portal by clicking on the ‘Sign Up Now!’ link on the Login Page.
Clicking on this link will redirect the customer to the sign-up page. A new user can directly sign-up from the Portal.
Note: Already existing customers on both sides (WordPress and Salesforce) won’t get the access for Customer Portal automatically on installation.
While Sign up, it will check if any customer is registered with the same username and email address. If no such user exists in the system, then it will create a record in the Salesforce Contacts module.
After successful registration, the user will be redirected to the login page. Thereafter, users can log in to portal with their Username and Password.
Forgot Password:
Portal user can retrieve their login password using the ‘Forgot Password’. They just need to click on the ‘Forgot Password’ option and enter your email address.
Now, click on the ‘Submit’ button and you will receive access token in your email to reset your password.
Portal Login by selecting a specific Language
Portal users can log in by selecting a language and access the portal in their regional language.
Once they select the language, all portal pages including the Login page will be translated into the selected language.
Edit Profile
User can view and update own profile details by navigating to the ‘Account name’ -> My Profile.
The user will be redirected to the ‘Profile’ page and they can edit your details from here.
Here the user will get the Profile details fields as per the block configuration from the WordPress side in Profile page.
You can also change your existing password and create the new one. Just you need to add an old password, new password, and confirm password.
Portal Dashboard
Here the user will get the portal layout as per the selection in the ‘Layout settings’ and ‘Menu Location’ from the WordPress side.
If the CRM Standalone layout is selected from the WordPress Customer Portal settings, the user will get the CRM layout.
Here the user will get the Dashboard view as per the block configuration and Page settings. Here the Counters and Charts are displayed as per the configuration in the Counters & Charts block.
The WordPress admin can also display the menu Horizontally & Vertically as per the Menu location.
Quickly access any module from the navigation drawer. WordPress admin can set the accessibility to recently added records for portal users.
Accordingly, those modules with their recent records will be displayed on the dashboard.
You can also search globally from the portal or can select modules from the drop-down to search from any specific module.
Note: If the WordPress admin has selected the Default (full width) template, the header and footer will be displayed of the Theme.
Records View
The user will get the Listing view, Add/Edit view and Details view of any records as per the module wise fields and the user wise role selection from the Salesforce side and as per the block content editing from the WordPress side.
List view
By navigating to any object, the user will be able to see the list of records of that object.
Here the user will get the Listing as per the configuration from the Salesforce CRM side and the WordPress admin side.
The template (layout) will display as per the selection of the Customer Portal Layout settings.
Here the list view layout is displayed as per the style selection and records at most selection in the block settings on the Portal List page from WordPress.
The portal user can add a new case. To add a new case, click on the ‘Add’ button.
The portal user can filter and search the cases from the list view.
Data Access based on Relationship Type
If on the CRM side, “Contact-based Relationship” is selected, then portal Will load the data and store the based on the contact relationship.
If on the CRM side, “Account-based Relationship” is selected then portal will load and store the data based on the Account relationship of logged-in contact.
- User can also able to filter the My Records and All Records for any object for account-based data.
- It will display the view for My Records and All Records. Example: My Cases/All Cases, My Events/All Events etc.
Add/Edit Record
Add a new record or edit the existing record in any object from the portal and it will get reflected in Salesforce.
If the Add/Edit/Delete accessible rights are provided from the CRM side in the user role wise, the user can add/edit/delete the record of that object.
The portal users will get the Add/Edit page “look and feel” as per the configuration in the “Block settings” from the WordPress -> Manage Page blocks.
The portal user will get the ‘place holder’, ‘validation’, ‘help tip’, and ‘Read Only’ fields as per the configuration in the Layout Settings -> Field Management Settings from Salesforce CRM. The portal users will get some fields as mandatory that are selected as “Required” in Field Management Settings.
The portal users will get the Validation message which is added from the Field Management Settingsà General Management.
From the CRM side, if you have managed the page layout of any object ‘section wise’ for the edit/detail page, the portal users will edit the details section-wise from the customer portal.
Note: Once you configured the object’s page layout (edit/detail) section-wise, you also need to sync the layouts from the WordPress admin side from the “Customer Portal Settings à Authentication”, only then the portal users will get the section-wise page layout of any object.
Show/Hide Fields
You can Show/Hide the fields to portal users based on the condition match that is set and configured in the “Conditional Management” for the fields. (Portal Layout Settings -> Field Management)
When the portal user selects a Field, which is set as Conditional Field, the Field which is selected in “Visibility Field” will appear in add/edit of any objects.
Here, the “Status” field is selected as Conditional Fields and the New option is selected in the “Conditional Field Option”, by clicking on it, the portal users will get the Case Type which is set as a Visibility Field in the Field Management -> Conditional Management from the Salesforce CRM.
Picklist selection limit
You can allow the maximum no. of the option selected from the Multi Picklist options as per the configuration in the “Picklist Management” of the Fields (Field Management -> Picklist Management).
If the user portal crosses the limits during the option selection, they will get the notification of maximum selection.
Detail Page
From the list of objects, by clicking on any record, the user will view the details of that record. If the editing rights are provided, the User can edit that record or delete it from the detail view.
From the CRM side, if you have managed the page layout of any object ‘section wise’ for the detail page layout, the portal users will get the details section-wise as they access the specific page detail.
Here, the detailed layout will be displayed as per the configuration in the “Detail” block from the page builder.
Note: Once you configured the object’s page layout (edit/detail) section-wise, you also need to sync the layouts from the WordPress admin side from the “Customer Portal Settings -> Authentication”, only then the portal users will get the section-wise page layout of any object.
Sub Panel
From the CRM side, if you have enabled the Sub Panel for the objects, the portal users will get the Sub Panel access for a specific object.
The portal users will get the listing records of the related object as per the relationship with that object and along with the contact Object will be shown into the subpanel list.
Sub-panel will be visible as per the configurations from the Customer Portal Roles.
If you have enabled the Add/Edit/Delete rights, the portal users can access under the Sub Panel as well.
Case Management
Under the Cases module, the User can add the case related to the query. First, the user can search the solution regarding the query. Add the new Case if there’s no solution and attach the files if required.
Add Attachments
To add attachments for case module, go to the detail view of a record or if you want to relate attachment to logged in contact, then navigate to attachments from the module list.
Upload the file for attachment by clicking on the ‘Choose File’ button, you can also enter the description for the attachment in the ‘Description’ text field.
Now click on the ‘Upload’ button to upload the attachment along with its description.
You can also preview the uploaded attachments either from a detail view or list view.
Case Deflection
The solution module in the portal helps the portal users to get a probable solution before generating any case.
When the portal user faces any queries or issues, they will navigate to add a case option.
They can add queries or issues in search solution boxes if they want to or they can also directly add a case. If they have searched and there is any appropriate solution related to that query, then the solution will get listed.
The users will also get a counter of likes or dislikes of the solutions. Moreover, a user also likes or dislikes them if the solution is to find them useful.
If no solution is found related to portal users queries or issues or they didn’t find which they are looking for then they can add case by clicking on the “Add Case” button.
Once the case is added and if admin adds any solution related to that case then the portal user can view those solutions. Navigate to Case Listing -> Actions -> Solutions.
Note: Here default solution object of salesforce is being used. For adding a solution and relating it to any case you need to navigate to Classic View -> All Tabs -> solution.
Case Comments
To add comments for a case, go to the detail view of a case and enter comments in the ‘Case Comments’ text field. Click on the ‘Save’ button to save the comments.
To add comments for a case, go to the detail view of a case and enter comments in the ‘Case Comments’ text field. Click on the ‘Save’ button to save the comments.
Case Closed/Reopen
Portal users will get the Closed & Reopen buttons to update the status of the Cases. By clicking on any status, the portal user can check the Closed case or Reopen the closed case as per need.
If the portal users click on the “Close” button, the case will be closed, and the Re-Open button will appear there. The portal user will not be able to edit the closed cases further.
But if the portal users click on “Re-Open”, the case can be edited again.
Product Menu
After enabling the Product menu, it will be visible on the portal. Under this menu, you can select the Price List and products. After selection, the portal user will get the “Create” button. After clicking on the button users will be able to select the object for which they want to create the product.
If Product is enabled for any object like Order and Opportunity, then you can add the Product object into the menu on the portal side.
After object selection, users will be redirected to the order details page. Here they have to fill the product details.
Orders
If the ‘Orders’ object is enabled from the CRM, the customer can access and get the added orders list.
If the ‘Product’ selection is also enabled, at the time of adding/editing the Orders, the user will get the product selection sub gird.
The product list will be fetched based on the selection of ‘Price List’.
Similarly, the customers will get the Opportunity object and the Product selection in the sub-grid if you have enabled from the Object Access Setting on the CRM side.
Contact Us
We simplify your business, offer unique business solutions in digital web and IT landscapes.
Live Chat
-> Get instant support with our Live Chat.
-> Visit our product page at https://www.crmjetty.com/salesforce-wordpress-customer-portal and click on the Live Chat button for instant support.
Tickets
-> Raise tickets for your specific question!
-> Send an email to support@crmjetty.com or you can login to your account @ crmjetty.com and click on My Support Tickets on your account dashboard, to get answers to your specific questions.
Customization
If you would like to customize or discuss additional features for your Customer Portal, please write to us on sales@crmjetty.com
