


You can add the rules and set the conditions if you want to show the specific data in the customer portal or allow the portal users to access the specific data. Here is how you can set the rules.
Login to backend
Navigate to the Settings ➤ Portal Settings ➤ Workflow Management, you will land on the Workflow Management page.
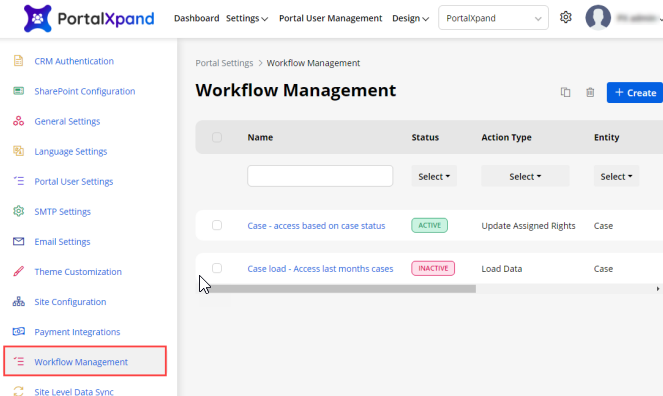
You will be redirected to the listing page of the Workflow Management. You can see the added workflow if already added.
You can activate any workflow as per your need. If there are two workflows with the same Action Type and Entity, you can activate only one workflow at a time. If you activate one workflow then another workflow will be deactivated automatically.
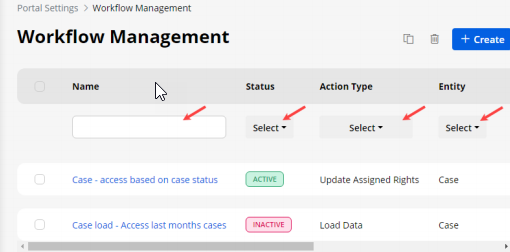
You can search and filter the workflow records if there are more records. You can search the specific workflow by inserting the text caption. You can filter the records by selecting the Status, Action Type, and Entity. To add a new workflow, click on the +Create button.
By clicking on the +Create button, you will be navigated to the Create Workflow page. From here, you can configure and set the conditional rules for the workflow to sort and filter the specific entity data or allow customers to access the entity data for CRUD operations (Edit, Detail, and Delete rights).
You need to configure the following options for the workflow:
Title: Insert the relevant name to identify the workflow.
Status: Select the status as Active or Inactive as per your requirement.
Note: If you select the workflow as active, other workflow having the same entity will be deactivated.
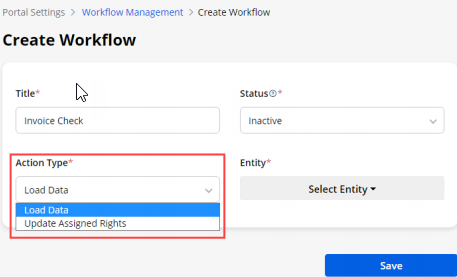
Action type: You will get two options to act on the data in the customer portal: Load Data and Update Assign Rights.
Note: This workflow condition for rights will be only applied to those rights from the user’s role. (Portal User Management ➤ Roles)
Load Data
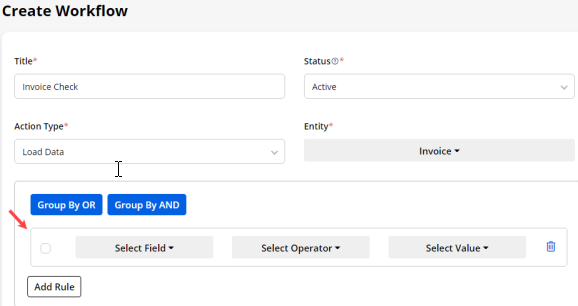
If you have selected the Load Data in the action type of the workflow, you can sort and filter the entity data in the customer portal. You can display the entity data as per the specific data range or based on the status of the entity data.
You will get the dropdown selection of the enabled entity. As shown in the screenshot, the invoice entity is selected to load the specific data based on the conditional rule(s).
Once the entity is selected, you will get the options to set the conditions for the selected entity. You will get the list of the fields as per the selection of the entity. As per the field selection, you will get the operators and selected fields values. You can also create a group of conditions with AND and OR.
Now, you need to select the Field from the drop-down selection to filter the entity data based on that you will get the fields of the selected entity as per configurations in the Dynamics CRM.
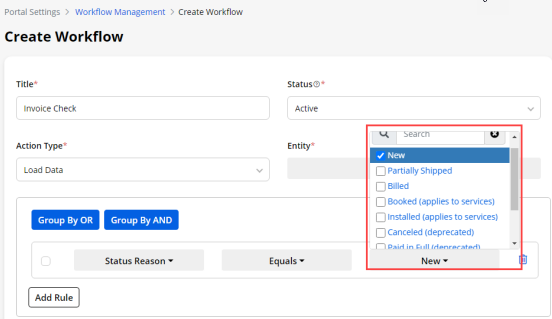
Now you have to select the field, here, the field (i.e. Status Reason) means the entity data will be accessible to the portal users as per the condition set.

Once the field is selected, you need to select the Operator option to match with the field’s value (attribute).
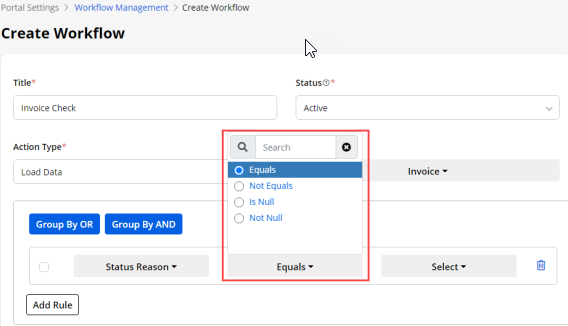
After the selection of the operator, you need to select the field’s value (attribute). You can select multiple values for the field. Here, the New field’s value is selected.
Note: You will get this option as per the selection of the Field. If you have selected the Data type field, you will get a calendar (date picker) to select the date range. You will get the edit box to insert the field’s value manually if (i.e. Amount). So, it depends on which field is selected.
Once the condition is added, click on the Save button.
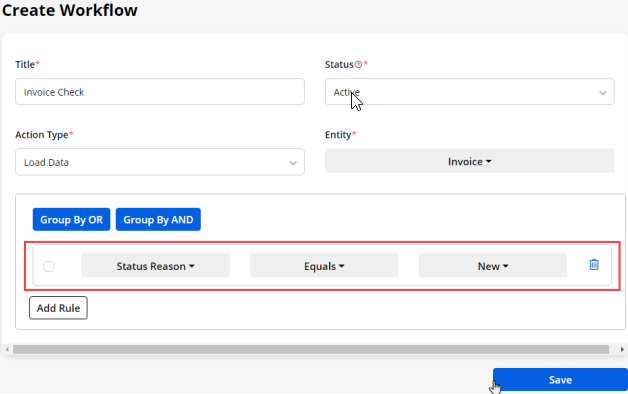
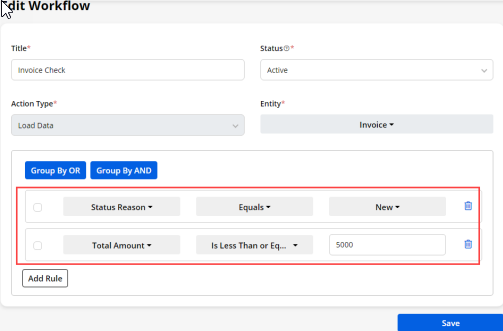
The following condition is set for the Invoice entity:
Entity: Invoice
Field: Status Reason
Operator(match): Equals
Field’s value(attribute): New
Note: Here, you can also select the multiple values as per your requirement. You will get the field’s value selected based on the field selected. In some of the fields, you will get only one option to select (radio button).
Based on the condition, the portal users can only see those records of the invoice entity whose status reason is New. This will be applied to the Recent activity list view, entity list view, and entity data card view as well.
Multiple Rules and Grouping
You can also add more conditions to sort and filter the entity data in the customer portal. By clicking on the Add Rule button, the new row will be added to set the condition.
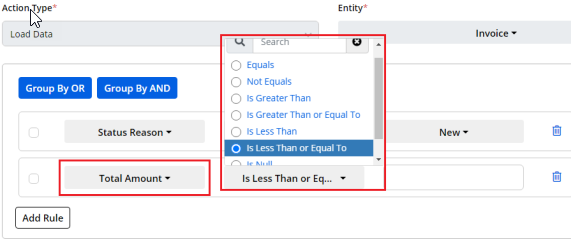
You will get the operator (match) options as per the selection of the field.
Here, you have added two rules (conditions) to sort and filter the invoice entity data in the customer portal.
Both conditions work individually. But, if you want to apply them together, you can group both conditions. You can group the conditions by And/ by OR as per your requirement.
To group the conditions, you need to select the conditions and then click on the button that you want to group (By OR/ By And).
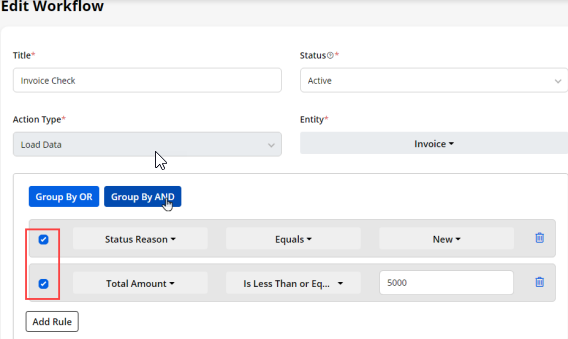
Here, both conditions are grouped with AND. It means that the portal users will get the filtered data when both conditions are fulfilled.
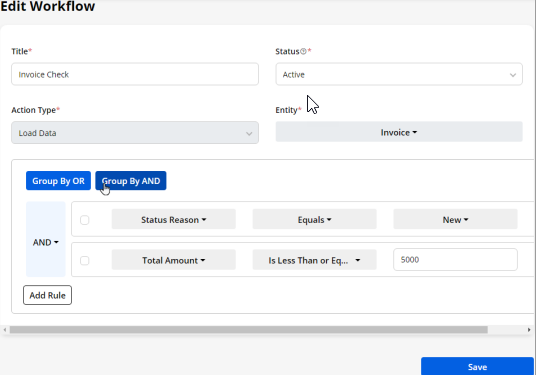
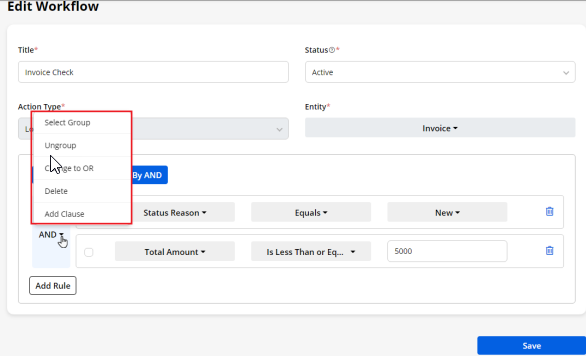
You will get the option for the grouped conditions. By clicking on the down arrow icon, you will get the options for the group.
You can ungroup the conditions and change the group type from OR to AND and AND to OR as well. If you want to add a new connection to a group, you can add it by clicking on the Add Clause option.
You can add the conditions and group them into multiple groups as per requirement.
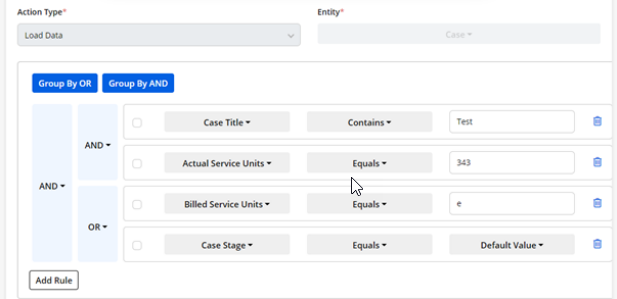
Even groups can be configured with the option to select the whole group.